Docker Commands
Well, luckily, you have reached the right place!
In this hands-on, brief, and self-paced tutorial, we will help you use the Docker commands in the Ubuntu operating system. This guide will provide a brief overview of what Docker is and how it works, how to install Docker on Ubuntu, and how to use Docker commands in Dockers. We will demonstrate the primarily used Docker command and present some quick examples to enable you to use the Docker commands in your applications.
The tutorial discusses how to install Docker in Ubuntu, build the Docker image, pull images from Ubuntu, install software and applications with Docker commands, what is the systemctl command, how to use it in Docker, use volumes to persist data, and several Docker commands. With the help of simple examples, you can build your customized Docker image and perform some networking, as well.
Since the release of Docker in 2013, it has become famous every day. Solomon Hykes released Docker at DockerCon as an open-source project which later took the name of Docker. The Docker platform runs natively on both operating systems, Windows and Linux. The main reason for the popularity of Docker is that it has revolutionized the development process. Containers have been here for a very long time, but they were not as useful as they were after the inception of Docker. Combined with Docker, containers have revolutionized the software industry in just a few years. This combination became famous in a brief span by creating a vast economy of scale.
For developers, beginners, and experts, Docker has become a de facto standard for building, sharing, and collaborating on containerized applications. Dockers allow developers to collaborate not just on the desktop but also on the cloud. Dockers made the deployment of code to production very simple and easy.
What Is Docker?
Dockers offer a collaborative application development platform making the life of developers simple and easier. Docker provides an opportunity for developers to spend more time on innovation and less on everything else. Since the beginning of high-level programming languages, the only way of developing, executing, and testing the applications on various operating systems is to use multiple dedicated physical or virtual machines mapped with any operating system. This method requires a lot of hardware resources and overhead for providing the new systems for every OS specification and software.
However, with the release of Docker in 2013, this issue has been resolved. Docker provides microservice architecture helping developers build and run code or applications on multiple systems. It utilizes the services of containers to improve the development workflow fast and smoothly. In addition, it has several benefits like high scalability, customization, portability, and more. It works just like traditional virtual machines. However, it provides a lightweight and fast working environment compared to VMs. It runs on the layer present between containerized isolated application services and the host OS kernel.
Why Docker?
In the beginning, application development was all about writing codes. However, the tech industry has evolved, and practices have been changed for quite a long time. It takes the understanding of different programming languages, several architectures, and various frameworks, along with the knowledge of how to create a continuous and stable interface between tools for every stage of its lifecycle just to build a simple application. Here comes Docker to simplify things, accelerate the workflows, and allow the developers to use tools, deployment environments, and application stacks of their own choice for each project.
Docker created an industry standard for containerized applications. By using Docker, developers can build an isolated and independent working environment to launch and deploy the applications on different platforms. It allows the developers to run and compile the code on any platform without worrying about dependencies and execution errors. It has changed developers’ lives by providing a fast, multi-platform, dependency-free, easy to use, and easy to deploy, isolated, and independent working platform. Since its launch, it has become a must-have in the world of IT and technological development.
Docker Commands
A long list of the Docker commands provides useful built-in functionalities to work in the Docker environment. This detailed tutorial on the Docker command is designed to cover the essential Docker commands, i.e., run, build, volume, pull, start, pause, etc. In addition, this tutorial also provides examples for each Docker command to help you have a better and clear understanding of the working of the Docker commands. Without further ado, quickly go through the essential Docker commands. Refer to the table provided below:
| Command | Description |
| attach | Used to attach input stream, output stream, and error stream to a running container |
| commit | Used to create a new image of changes made to the container |
| disable | Used to disable the services |
| edit | Used to open a file in edit mode |
| enable | Used to enable the services |
| exec | Used to run the command in a running container |
| groupadd | Used to create the group of the Docker |
| install | Used to install files, software, repository, etc. |
| images | Used to list down all the images in the registry |
| kill | Used to kill the running containers |
| login | Used to log in into the Docker registry |
| newgrp | Used to activate the changes made to the group |
| netstat | Used to check the status of open ports |
| ps | Used to list all the running containers |
| ps -a | Used to list all the running, as well as stopped containers |
| pull | Used to extract the repository or image from the Docker registry |
| pause | Used to pause the processes executed in the container |
| prune | Used to delete all stopped containers |
| prune -a | Used to delete all images, network, build cache, and stopped containers |
| run | Used to run the commands |
| rm | Used to remove the containers |
| rmi | Used to remove images |
| reload | Used to reload the system configuration |
| restart | Used to restart the containers |
| Search | Used to search the images, files, or repository from the Docker hub |
| start | Used to start a container |
| stop | Used to stop the running containers |
| unpause | Used to unpause the processes executed in the container |
| update | Used to update the configuration of containers |
| usermod | Used to add the user to the Docker |
| version | Used to get the version of Docker |
| Wait | Used to block the container until other stops |
How To install Docker on Ubuntu
The trend of using Docker has been growing uncontrollably, with developers and DevOps engineers actively using Dockers for application development. On top of that, big and small organizations are looking for people who are experts in Docker commands or at least have a few years of professional experience using Docker commands. To work with the Docker commands, the first thing that you need is to install Docker in your system. Dockers can be installed on any system, including Unix, Linux, Windows, and even macOS. This section consists of a step-by-step process of how to install Dockers on Ubuntu. We will guide you with sample examples to install the Docker in your Ubuntu 20.04 easily and correctly.
Prerequisites
This section is a walkthrough on how to install Docker in Ubuntu 20.04 system. If you want to follow along, you need to ensure your system fulfills all the prerequisite requirements.
We will use Ubuntu 20.04 with 1 GB of RAM for this quick and intriguing tutorial. The system must have a 3.10 or the latest version of the Linux kernel with a minimum of 25 GB of free disk space. The firewall and a sudo non-root user should also be included. An executable “ps” distributed by “procps” or a similar package with git version 1.7 or higher.
If your system fulfills all these requirements, it is ready to install Docker.
Preparation
After ensuring that your system is suitable for Docker installation, you need to prepare your system to begin the installation process.
The first thing that you need to do is to make a folder to save all the images in it. When you use Docker, you will create containers, build images, and play with them. You may want to save all the resultant images built through the commands you will be executing in the coming sections. Hence, make sure to create a folder beforehand. After creating the folder, change the directory to that new folder so that it will be the default working directory. Docker uses the default directory location to download all images and files directly. Finally, the system is ready and fully prepared for installing the Docker on Ubuntu 20.04.
So, let’s begin the installation process!
Step # 1: Update the System’s Repository
The first and most essential thing is updating all the system’s repositories. For that, we need to use the “update” command. As briefly discussed, the “update” command is used to update files, repositories, configurations, etc. Hence, we are updating the repository using the “update” command. See the result of the following “update” command:

The update of the repository has been successful. So, the system is ready to install the essential packages that are a must for installing Docker on the system.
Step # 2: Install Essential Packages
The next step is to gather all the packages that must be available in the system before you begin Docker’s download and installation process. The “install” command installs the software, packages, and everything. Here, you can execute the “install” command to install the required packages:
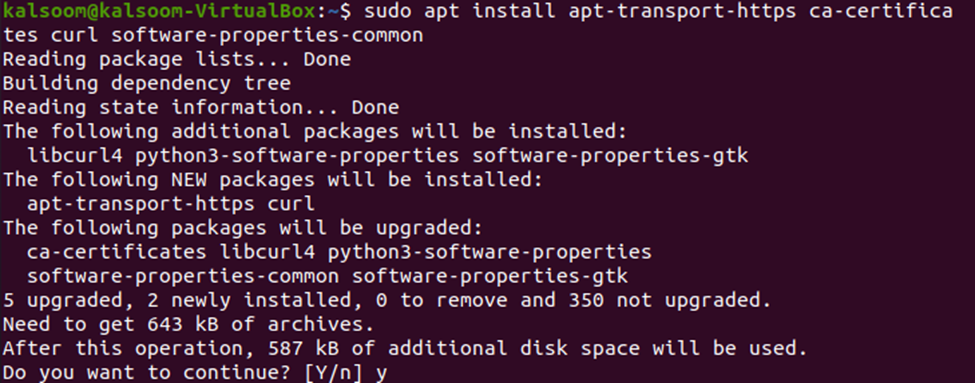
After reading the complete list of packages, the system will ask for your permission to continue the package installation process. Press “y/Y” to allow the installation process to complete. Once you press the “y” or “Y” button, the system will download and install all the packages you specified with the “install” command.
Step # 3: Add GPG Key
The next thing to do is to add the GPG key to the Docker repository. The “curl -fsSL <GPG key repository> | sudo apt-key add” command is used to add the GP
G key. The “OK” result shows that the GPG key was added to the system successfully.

Step # 4: Add Docker Repository
After adding the GPG key, add the Docker repository to your Ubuntu 20.04 system. The following “add-apt-repository” command allows you to add the Docker repository to the Ubuntu system.
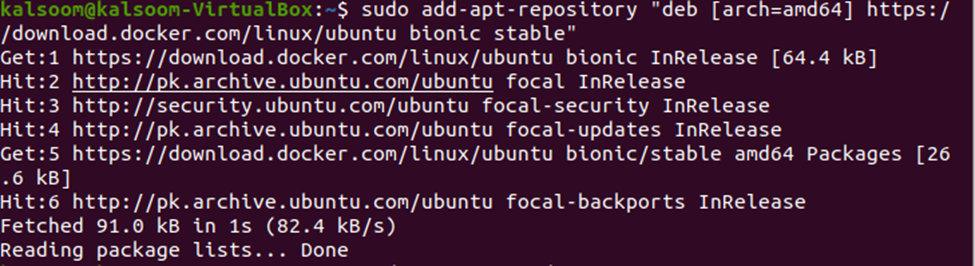
The repositories of the Ubuntu system need to be updated again so that all the installed packages and that has been made so far gets updated in the repository. Use the same “update” command to update the repository of Ubuntu.

Step # 5: Execute “apt-cache”
The apt-cache command ensures that the application will be installed from the Docker repository. Refer below to the output of the apt-cache command:

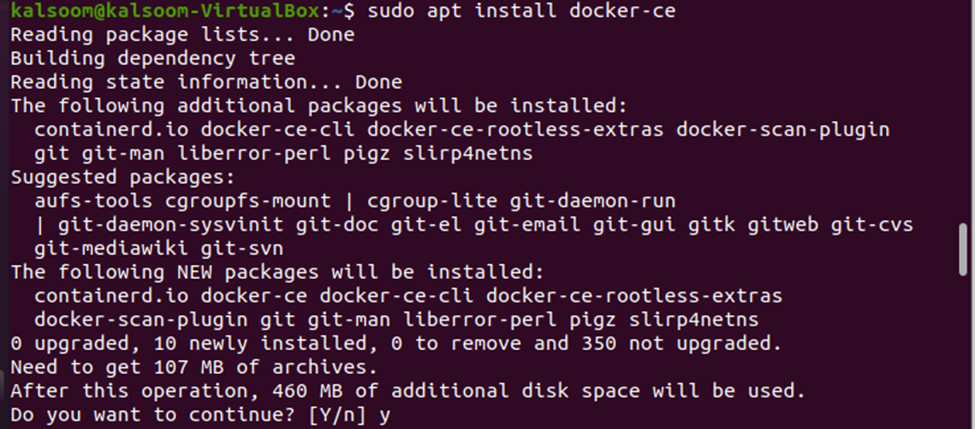
Step # 6: Install Docker
Here comes the main step, the installation of Docker. Enter the “sudo apt install docker-ce” command in your terminal and let the system automatically download and install the Docker. Once the system gathers all the packages, dependencies, and configurations for installing the Docker, it will ask for your permission to continue. Press “y” or “Y” on your keyboard and let the system complete the installation process.
Step # 7: Check Status
The final step is to check the status of the Docker on your system. Refer to the output below:
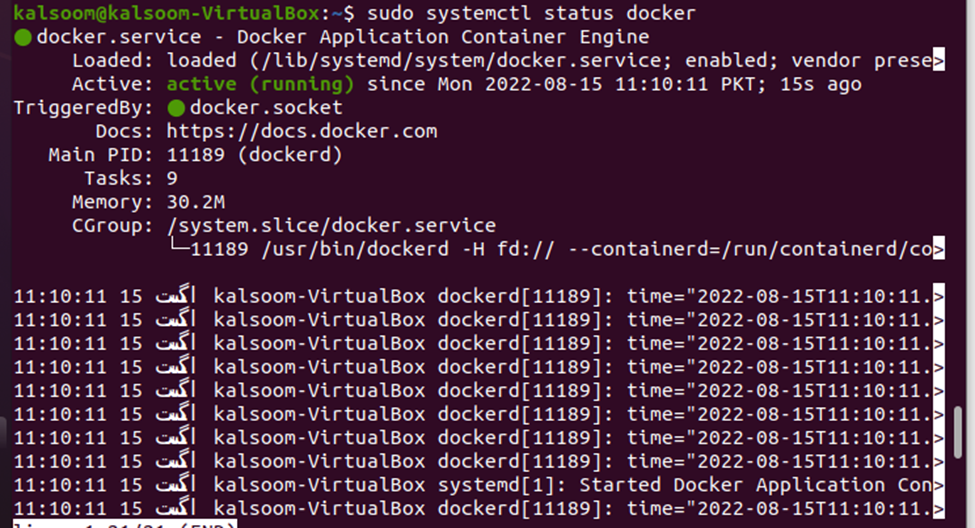
Note that the Docker is up, actively running, and ready to be used. Hence, the installation process has been completed, and your system has Docker installed. The system is prepared to test and execute the Docker commands. So let us move to the next section and test several popular Docker commands and learn how they work with Docker making the life of developers and DevOps engineers easy and fast.
Remember that we are using Ubuntu 20.04 to execute all the commands given above and below. However, the Docker commands provided in the subsequent section can be executed on any Ubuntu version, i.e., 18.04, 20.04, etc., and they can be executed on any Linux platform. Just make sure that your system fulfills all the requirements of prerequisites and that your system is completely prepared with Dockers to execute and test the Docker commands. Let us have a look at all the major Docker commands in detail with sample examples as well.
Command # 1: Docker search
The Docker search command searches images, repositories, and anything in the Docker hub. The search command looks for the required data in the Docker hub and returns it to the user if found. The Docker hub is the official Docker library used to pull the images from. It is an online central repository where all the Docker users keep their images. The Docker users can also create their directory to create, execute, test, and store the Docker images. Docker hub now consists of hundreds of thousands of Docker images, which is increasing rapidly with each passing day.
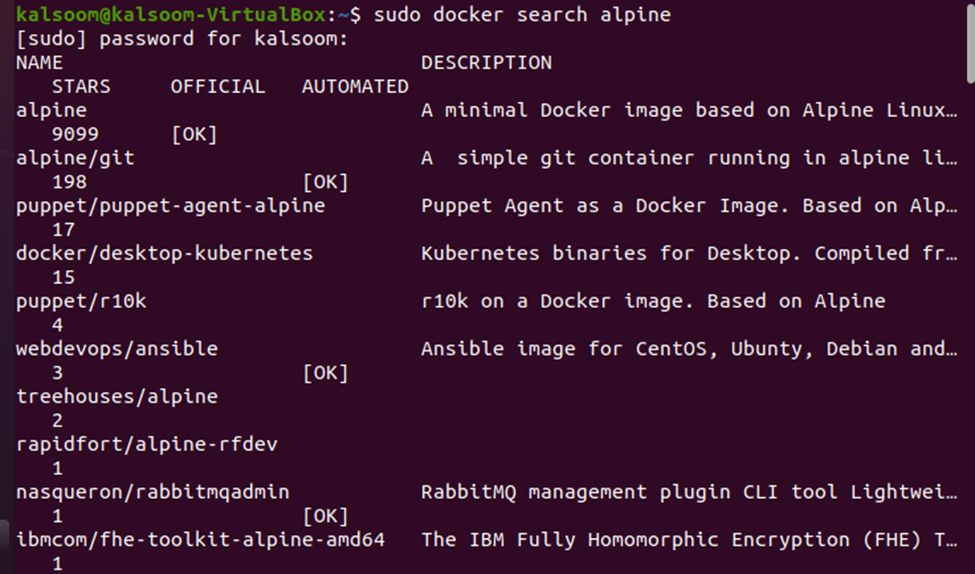
Let us search for a Docker image based on Alpine Linux using the “docker search” command. Run the “sudo docker search alpine” command on the command line interface to look for the alpine-based image in the Docker hub.
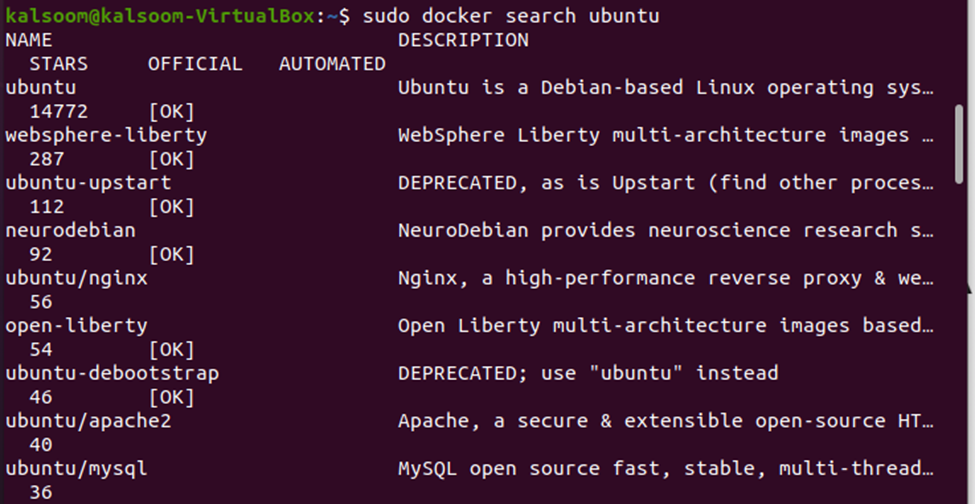
For example, you need to search for an image in the Docker hub based on Ubuntu. Find it by using the same “search” command. Just specify the image type as “ubuntu”, and you are good to go. See the command and output of the “search ubuntu” given below:
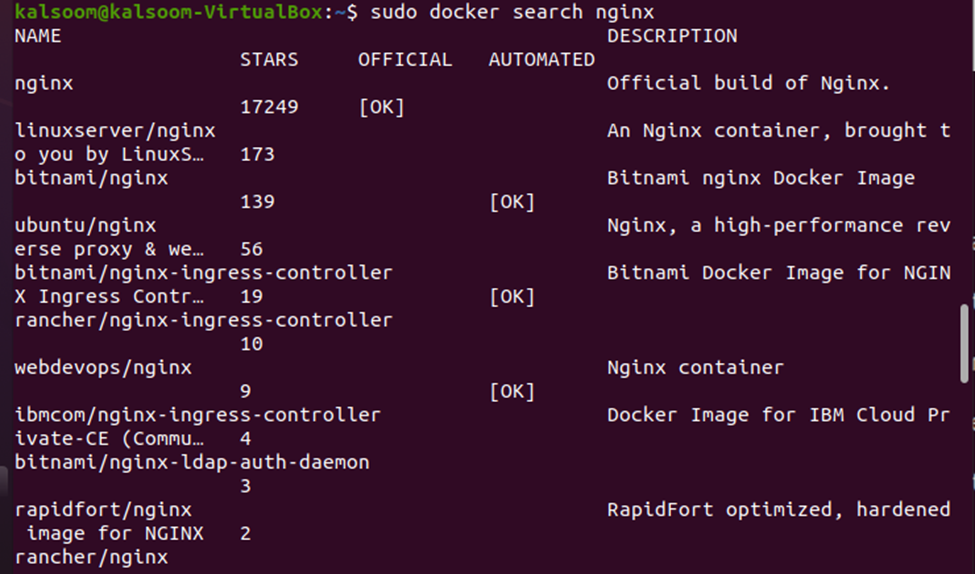
The “docker command” does not just search the images based on different operating systems. It can also search for the Docker images for the application. For example, you must find the Docker image for the “Nginx” application. You just need to provide the application type with the “search” command. Here is how the “search” command is used to get the images for the “Nginx” kind of application.
A wide range and several types of images are present in the Docker hub. The Docker users are building images with base images as well as completely customized Docker images. They are all the different types and are based on different operating systems or applications. Some are just the operating system images, some are the application images, and some are a combination of different applications. If you are new to Docker and looking for some pre-build images, you just need to look into the Docker hub. You will find a base image in the Docker hub for almost every situation. Suppose you do not find an image suitable for your scenario. You can custom-build it and share it on the Docker hub publicly so that other Docker users dealing with a similar situation can use your built image.
Command # 2: Docker pull
Simply use the “pull” command to download an image of the Ubuntu 20.04 operating system. Execute the “sudo docker pull ubuntu” command on the terminal and download the most recent Ubuntu image from the Docker hub. Have a look at the following sample output:

The “docker pull” command allows the Docker users to download a specific version of the ubuntu image. The version of Ubuntu goes with the “pull” command so that just the image of that specific version will be downloaded. See the syntax of the “pull” command with the specific version given below:

Regardless of the host operating system, using the “pull” command on any kind of image can be easily downloaded from the Docker hub. Just like the “search” command, specify the image type with the “pull” command, and you are good to go. For example, if you need to download an image based on the “alpine” operating system, simply specify “alpine” with the “pull” command. Refer to the executed command with the sample output given below for a clearer and better understanding:

Command # 3: Docker images
The “docker images” command lists all the images present in the Docker directory. When a Docker image is downloaded, it gets saved in the /var/lib/docker/ default directory. If you need to view all the images that you have downloaded, just run the “sudo docker images” command on the terminal, which will display all the downloaded Docker images. Here is the sample list of images that are downloaded in the default folder:

Note that three Docker images are listed by the “images” command, “alpine latest”, “ubuntu latest”, and “ubuntu 20.04”. Each image has a “TAG” and an “ID”. The “latest”, “latest”, and “20.04” are the tags, and “9c6f07244728”, “df5de72bdb3b”, and “3bc6e9f30f51” are the IDs of each image.
Command # 4: Docker run
The “docker run” command starts the container based on the downloaded images. The Docker container can be started in two different ways. Either you need to use the “image ID”, or you need to use the “image TAG”. the “image ID”, as the name suggests, refers to the actual id of the image. On the other hand, the “image TAG” refers to the snapshot of a particular image. By using the “docker images” command, all the downloaded images have been listed with their respective IDs and TAGs. By using either TAG or the ID of an image, the Docker can be started. See the syntax of the “run” command that is used to start the Docker container and connected by its TAG given below:

The “sudo docker run” is the general syntax of the “run” Docker command. The “-t” element is used to assign a new Pseudo-terminal in a Ubuntu container. The “-i” element is used to get the standard STDIN of the container to make an interactive connection. The “ubuntu : latest” is the key : value pair specifying the “latest” tag of the Ubuntu image. The “/bin/bash” is the new “Bash” shell for the container. This is an optional parameter; if you do not provide it, the default shell will be given to the container. Once you execute the “run” command, you will automatically land into the shell of the container, just as shown in the previous output. As shown in the image, the new container based on the latest Ubuntu image of id 6e56bee8d3d7 has been started successfully. For each new container, a new name and ID are assigned so that it can be easily located by name and its ID.
The other way or a bit different syntax of the “run” command is as follows:

Once you are done working in the container, you can easily go back to the host terminal of the system without terminating it.
In the last two illustrations, we employed the TAG of the image to start a new container. The image id can also be used to start a new container. Just provide the specific image id with the “-it” parameter, and the “run” command will start a new container and connect to it using the image id. Here, you can provide the image id with the following run command:
![]()
Once you are done working in the container, you need to go back to the host terminal. But you do not want to terminate the container yet, so you can simply detach from it. To do that, press “CTRL+P” and “CTRL+Q”. These two commands will take you back to the original host terminal of the system while the container is still running in the background without being terminated. Remember that “CTRL+P” and “CTRL+Q” only detach the container but do not stop or terminate it. The container keeps running in the background until you specifically stop it.
Now, let us run a container in a detached mode. To run a container in the background without automatically attaching to it or, in simple words, run a container in a detach mode, specify the ‘-d’ parameter with the run command. Execute the ‘run -it -d’ command in your terminal, and you will get to start the detached container in the background.

Note that the container ID is the first 12 letters in the output, i.e., “1363cb33560c”. This can be verified by the “ps” command.
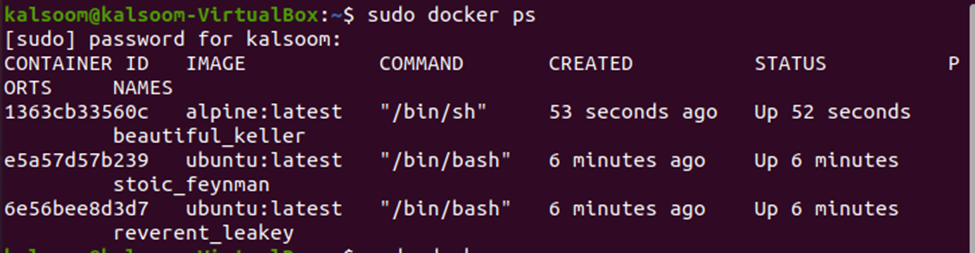
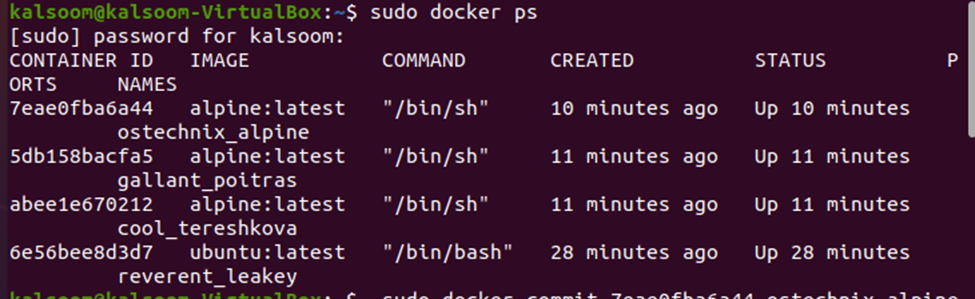
Command # 5: Docker ps
The “docker ps” command is used to list down all the containers that are currently running. When you execute the “sudo docker ps” command in the terminal, all the running containers will be displayed on the terminal, as shown in the following output:
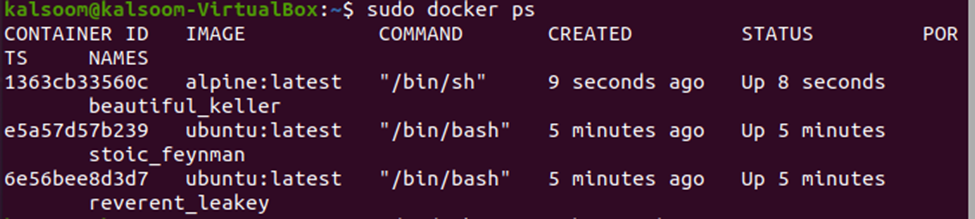
Here, you can verify that the ID of the first container in the list is “1363cb33560c”, which is the same 12 letters given in the previous section. Moreover, it is an “alpine” container, and we did not attach it yet. To specifically attach to this container, use the “attach” command.
Command # 6: Docker attach
The “docker attach” command is used to attach to the container. To attach to a specific container, simply provide the id of the container to the “attach” command, and voila, you are done.
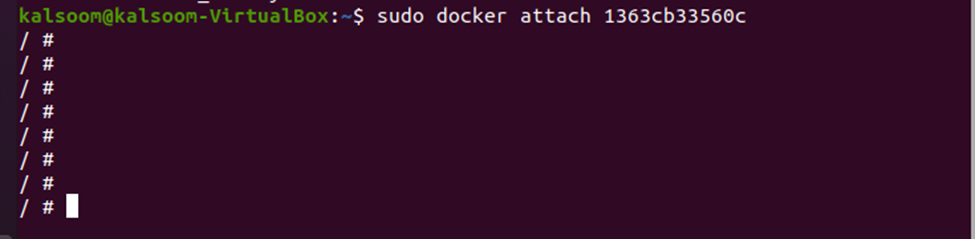
To view the new list of all the currently running containers, run the “ps” command again.
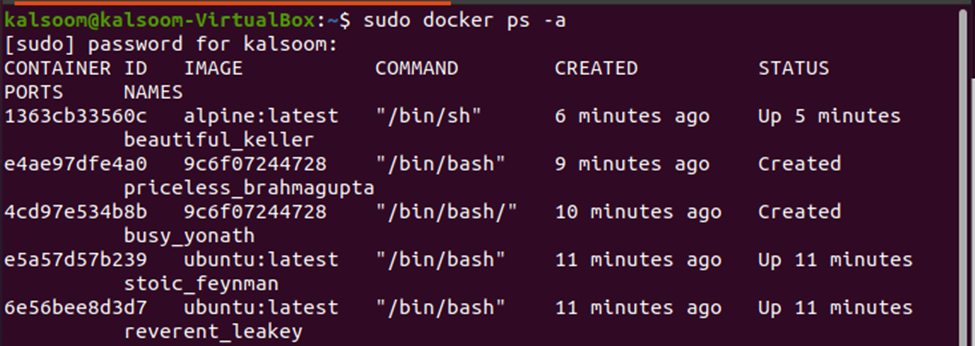
If you want to display all the containers either stopped or running, just add “-a” to the “ps” command.

Command # 7: Docker start
The “docker start” command starts a specific container by providing its id or name. Display all the running and stopped containers by executing the “ps -a” command to get the names and ids of the containers.
Now that we have a complete list of all the containers, we can simply use the name or id of the container with the “start” command to start the container. Let us start the “beautiful_keller” container. The “beautiful_keller” is the container name.

If you want to start a container by providing the container id, you can also do that. The “1363cb33560c” is the container ID.

Command # 8: Docker pause
The “docker pause” command is used to pause the container which is currently running. The same syntax and process of the “start” command should be followed by just replacing the “start” command with the “pause” command. Provide the specific container id with the “pause” command to pause that container specifically.

Command # 9: Docker unpause
The “docker unpause” command is used to unpause all the paused containers. The “1363cb33560c” was paused in the previous section. It can simply be unpaused by executing the “unpause” command with the container’s id.

Command # 10: Docker wait
The “docker wait” command is used to block a specific container until all other containers stop. For example, you need to block the “1363cb33560c” container, so you just execute the “wait 1363cb33560c” command, and the container will be blocked until other containers stop working.

Command # 11: Docker stop
The “docker stop” command is used to stop the container purposely. Just use the name or the id of the container with the stop command to stop it.

Now, list all the active and working containers by executing the “ps” command.

As you may notice, the “1363cb33560c” is not on the list, which means it stopped.
Command # 12: Docker kill
The “docker kill” command is used to shut down or stop a container forcibly. The “stop” and “kill” commands serve a similar function. However, the only difference is that if a container does not or cannot be stopped by using the “stop” command, then it can be forcibly shut down by using the “kill” command.

The “run” command is not just used to run the container, but it can also perform some other functions. The flags used with the “run” command specify the actual function of the run command. For example, you need to delete a container automatically right after you are done working in it. You can use the “run” command with the “–rm” flag to achieve that purpose. Refer to the execution of the following “run -it –rm” command:
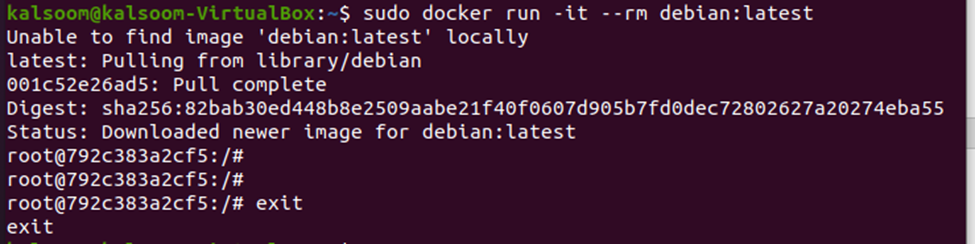
Now, when you exit from the “ebian : latest” container, it will be automatically deleted.
The other function that you can perform with the “run” command is assigning a name to it. In all the previous examples, each container has a random name. If you don’t specifically assign a name to the container, Docker will assign a random name. Refer to the example given below:


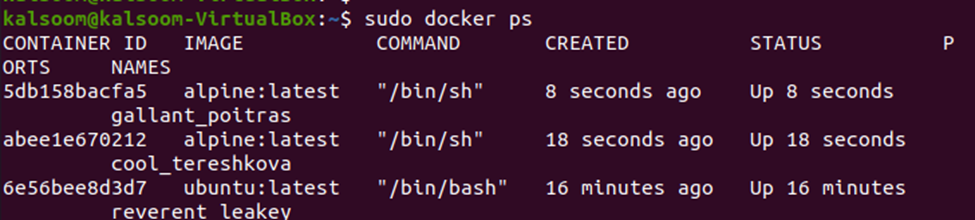
Two containers are created, “abee1e670212” and “5db158bacfa5”, using the “docker run” command. Notice that both containers are created using the same Docker image, but each of them has assigned a different image id. Now, list down all the running containers with the “ps” command:
If you want to set a customized or personalized name to the container, you can do that by simply running the following command:

After executing this command, a new container named “ostechnix_alpine” is created. Let us display the new list of active containers again with the “ps” command:
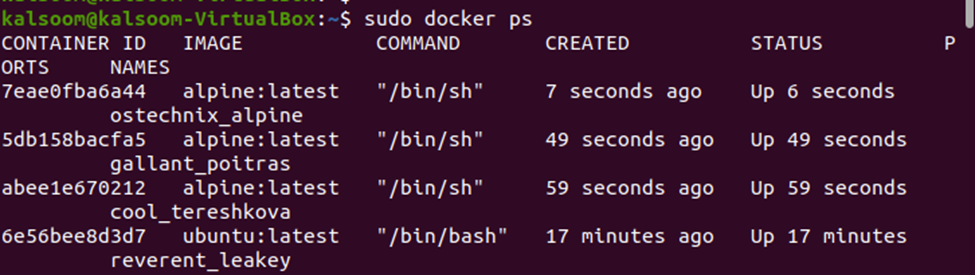
Notice that the first container in the list has the name “ostechnix_alpine”, which we specifically provided as a container name.
Now, let us create a customized Docker image by using the same “run” command. Start the “Ubuntu” container first:

The terminal indicates that the control is in the container’s shell. Now, you can perform any function, i.e., download software, update files, etc.
So, let us install the “apache2” web server. First, update the system to ensure all the necessary packages are available before downloading or installing anything in the container.
Command # 13: “apt update”
The “apt update” command is used to update the configurations of the system.
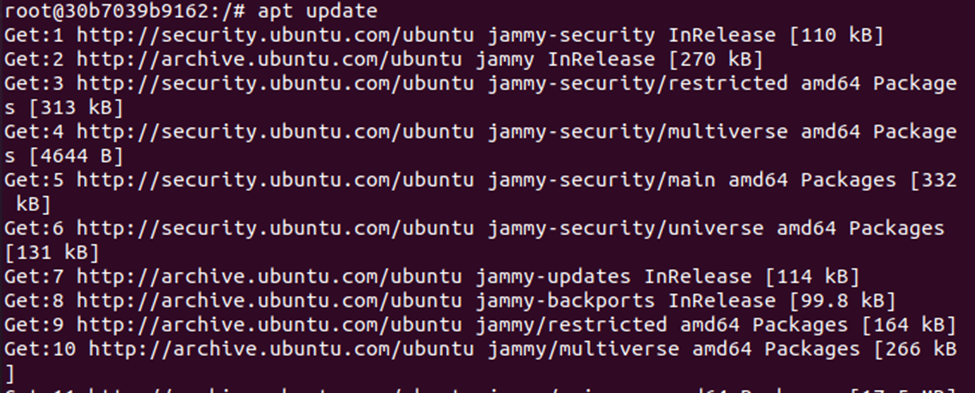
Once the system is updated, install apache2 in the container with the “apt install apache2” command.
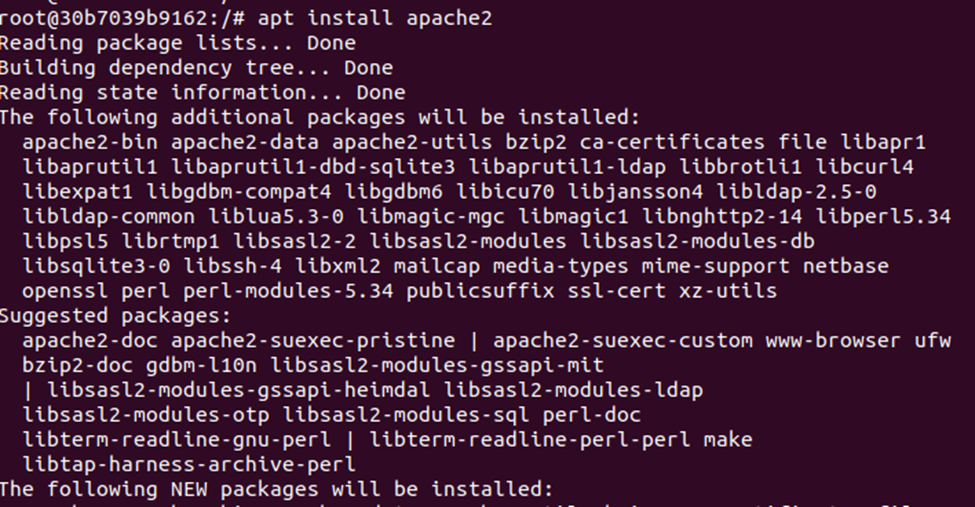
Command # 14: “apt install”
The “apt install” command is to install packages, servers, software, applications, etc.
Once the installation process is complete, detach from the container and go back to the host shell of the system by pressing CTRL+P followed by CTRL+Q.
After getting back to the host shell, find the container ID with the “ps” command again. By using the container id, build a new image with “commit”.
Command # 15: Docker Commit
The “docker commit” command builds a new image of all the changes made to the container so far. It creates a new customized image of all the changes made to the container.

List down all the images with the “images” command to check whether the new image has been created or not.

Note that the new Docker image named “ostechnix_alpine” has been added to the host system. Now, a new container can be created with the newly created image by using the “run -it” command.

Stop the container by using the “stop” command and providing the container id, and then delete it.

Command # 16: Docker rm
The “docker rm” command removes the container from the repository. Delete the container by executing the “rm” command and specifying the container id that you want to delete. The “rm” command deletes only one stopped container. What if you have many stopped containers and need to remove all of them at once?
Deleting each container one by one is a tedious task. So, you can use another Docker command.

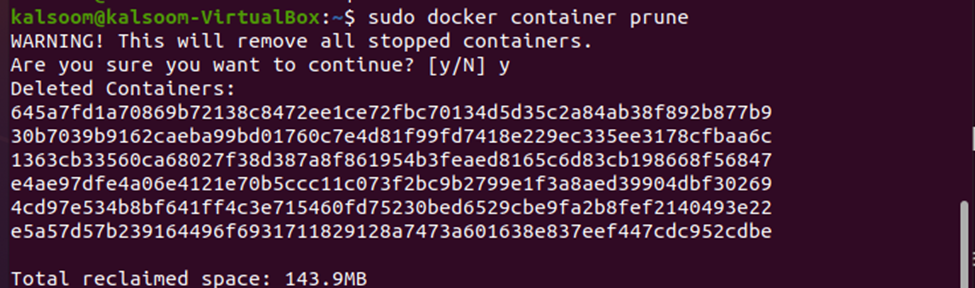
Command # 17: Docker prune
The “docker prune” command deletes all the stopped containers. Just execute the “sudo docker container prune” command and remove all stopped containers in just one go.
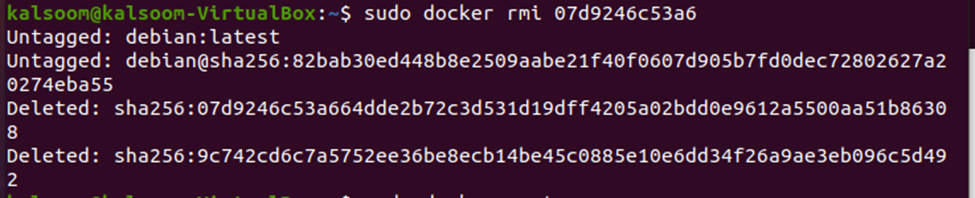
Command # 18: Docker rmi
The “docker rmi” command is used to delete the Docker images. Run the “rmi” command with a specific image id, and “rmi” will remove it from the directory.
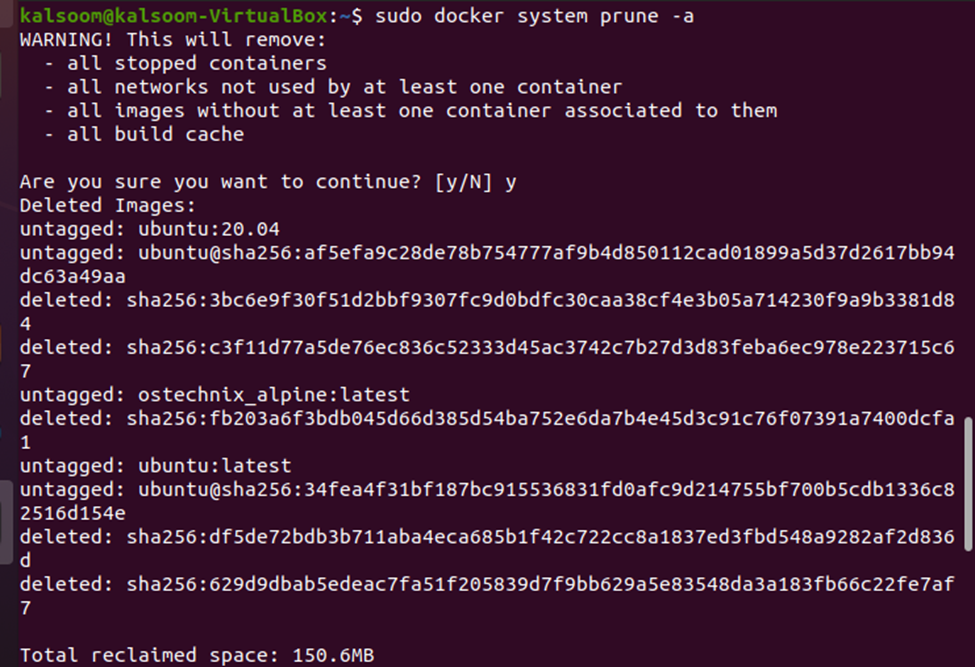
Command # 19: Docker prune -a
The “docker prune -a” command removes all the networks, builds cache, images, and stopped containers. When you execute the “sudo docker system prune -a” command, it will delete everything from the repository.
You need to be very careful with this command, as it will delete all images, networks, and unused or stopped containers.
Moreover, if you want to delete everything that includes versions, use the –volume flag with the prune -a command.

Command # 20: Docker –version
The “docker version” command returns the current Docker version. If you want to see the currently installed version of Docker, simply run “sudo docker –version”, and it will return the current version of Docker.

Command # 21: Docker exec
The “docker exec” command gets you into the running containers. To access a specific container, just provide the container id to the exec command, and it will get you into that container.

Command # 22: Docker login
The “docker login” command allows you to log in to the Docker hub repository. Just execute the “sudo docker login” command, provide the login credential and get into the Docker hub repository.

Docker Commands for Linux Post-Installation Process
We have seen the most common and essential Docker command with examples. In this section, we will provide the commands used for configuring Linux hosts. These commands are mostly used in the post-installation process of Linux.
Command # 1: Docker groupadd
The “docker groupadd” command is used to create a Docker group. When you execute the “sudo groupadd docker”, a new group of the Docker is created in the repository.

Command # 2: Docker usermod
The “docker usermod” command is used to add the Docker user to the Docker. Specify the “$USER” user name to the usermod command and add it to the Docker.

Command # 3: Docker newgrp
The “docker newgrp” command is used to activate the changes made to the group. When you need to activate the changes made so far to the group, you can use the “newgrp” command.

Command # 4: systemctl enable
The “systemctl enable” command manages which service needs to be enabled when the system boots. Use the following command to automatically start the container and Docker on boot:

Once the command is executed successfully, the docker.service will be enabled when the system boots.

Similarly, when this command is executed successfully, the containerd.service will be enabled when the system boots.
Command # 5: systemctl disable
When you need to disable some services, the “disable” command comes to the rescue. The “systemctl disable” command is used to disable the service when the system boots. To disable the containerd services, just run the following command:

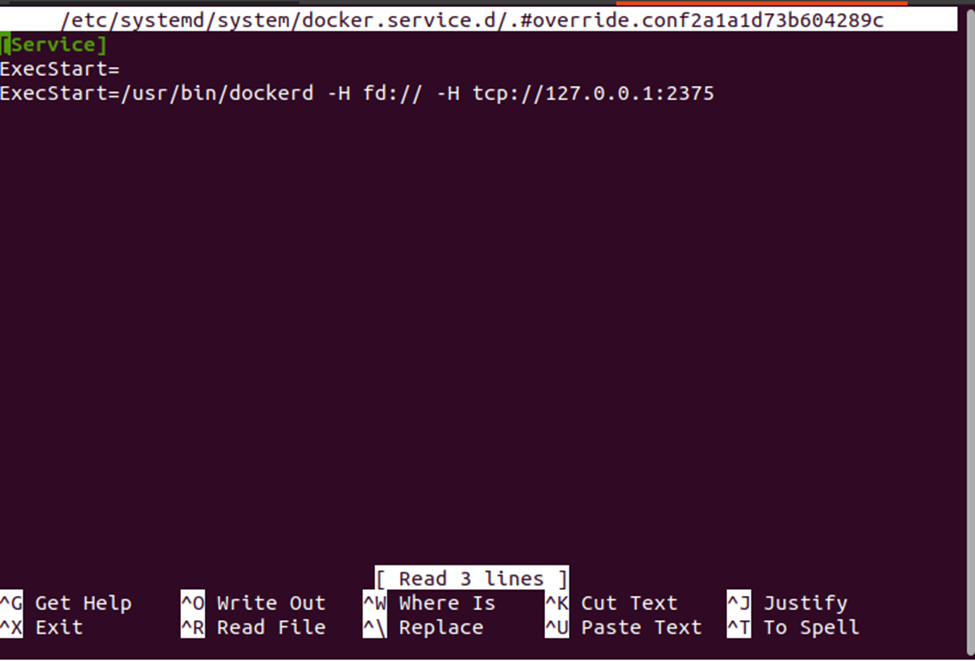
Command # 6: systemctl edit
The “edit” command opens up a file in edit mode, which means that the file can be edited in real time. You can add or remove any line or modify any lines by using the “edit” command.

You can simply override the lines by substituting your values.
Command # 7: systemctl daemon-reload
The “reload” command reloads the configuration. The “sudo systemctl daemon.reload” will reload the configuration of systemctl.

Command # 8: systemctl restart daemon.service
The “restart” command is used to restart the Docker services. When you execute the “sudo systemctl restart daemon,service” command, it will restart the Docker services automatically.

Command # 9: Docker netstat
The “netstat” is used to verify the changes made so far. When you need to verify whether the changes were honored or not, the “netstat” command is used. It specifically tells which port is open and the Docker is listening to it.
![]()
Conclusion
At this point, you are well aware of all the commands used with Dockers. Executing the Docker commands in the Docker environment is as simple as running commands in any other system. Assuming that you have followed all the examples and executed each command one by one, you can now play with the Docker container and images easily. If you want to test and store your work, you can just clone the examples and save them as a new Docker image in the Docker hub.
Source: linuxhint.com