Disabling Dark Mode in Microsoft Word
Although the dark mode is popular among most Microsoft Word users, some people may dislike it. You can simply disable the dark mode if you don’t want to use it. It can be achieved by changing the settings of the programs or disabling the dark mode from the settings of the device itself. This article demonstrates how to disable the dark mode in Microsoft Word.
What Is Dark Mode?
Dark mode is a setting option or theme that darkens the background color of some apps, the OS desktop, and other screens. Lowering the brightness of app windows and other screen elements helps to minimize eye strain, especially in low-light settings. It diminishes or lessens the intensity of blue light exposure that is displayed on the screen. Additionally, it aids in battery conservation of devices like smartphones and laptops.
Disabling Dark Mode in MS Word
In this section, we’ll walk you through the process of disabling the dark mode on your Windows, Mac, Android, and iOS devices.
Using Windows
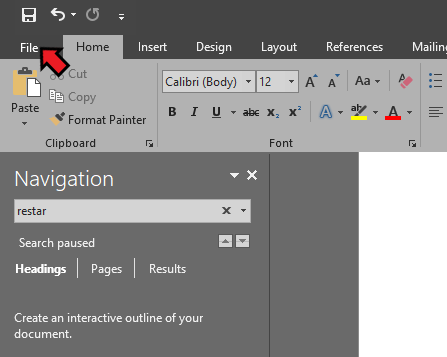
Step 1: Launch the MS Word on your Windows system.
Step 2: Click on the “File” tab. This is located before the “Home” tab in the toolbar. A new window will appear.
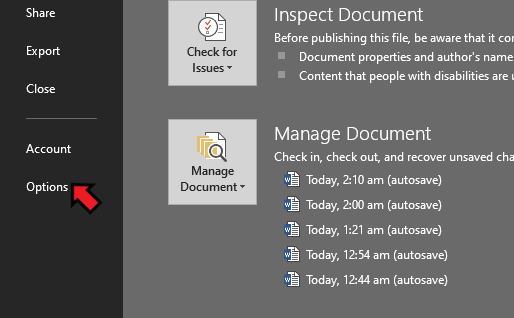
Step 3: Select “Options” from the side panel. You can find it in the left panel’s lower corner. It then directs you to the “Options” window of MS Word.
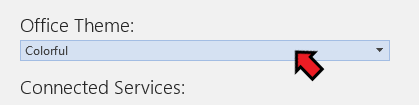
Step 4: Under the “Personalize your copy of MS Office” section, open the “Office Theme” drop-down menu and select a theme (other than dark or grey).
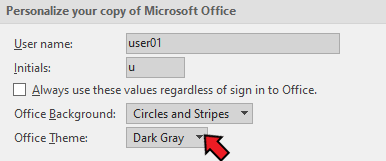
Step 5: Select “Colorful”. This is Microsoft Office’s default theme. All other parts will appear in light mode with the blue top taskbar.

- Choose White to make everything white.
- To switch back to dark mode, choose “Black” or “Dark Gray”.
- Check the “Never change the page color” checkbox if you want your page to always be white regardless of the theme.
Step 6: Click the “OK” button. When you do this, your theme returns to light mode and dark mode is disabled.
Alternate Method:
Step 1: Launch the MS Word.
Step 2: Click the “File” at the top-left corner of MS Word.
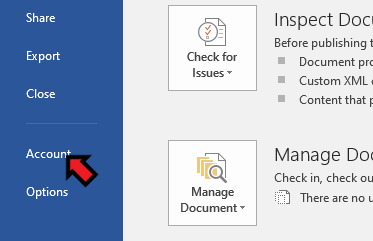
Step 3: Click the “Account” option on the left-sidebar.
Step 4: Click the drop-down list under the “Office Theme” and select “White”. This turns on the light mode and deactivates the dark mode.
If you want to keep MS Word colorful, use the “Colorful” theme. It resembles the “White” theme.
Using Mac
Step 1: Launch the Microsoft Word on your Mac computer.
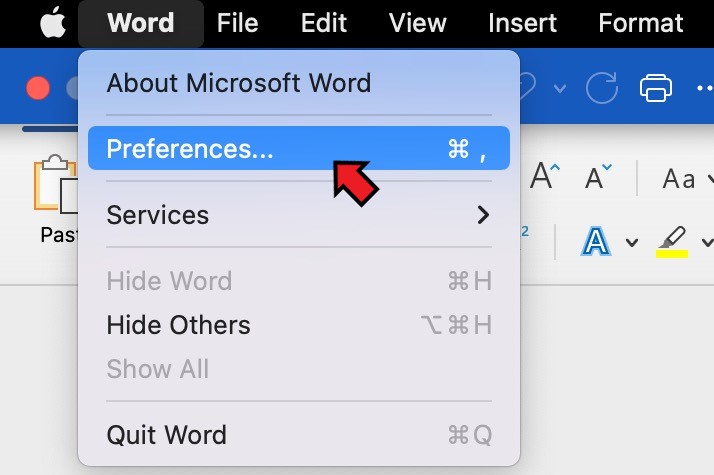
Step 2: Select the “Word” tab from the menu. This is located between the “File” and the Apple logo on the application’s top toolbar.

Step 3: Select “Preferences” from the menu. This is at the very top of the menu.
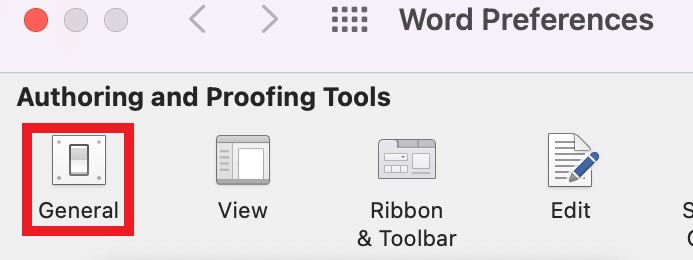
Step 4: Select the “General” option under the “Authoring and Proofing Tools”.
Step 5: Check the “Turn off Dark Mode” checkbox under the “Personalise” section.
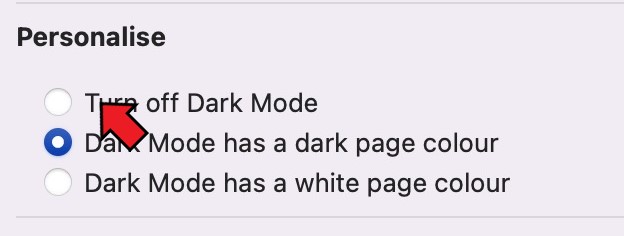
MS Word will return to its original or default theme.
Note: You can also select a white page color in dark mode or have a dark page color.
Alternate Method
All Mac applications, including Microsoft Word, will run in dark mode if you activate the dark mode in your Mac operating system.
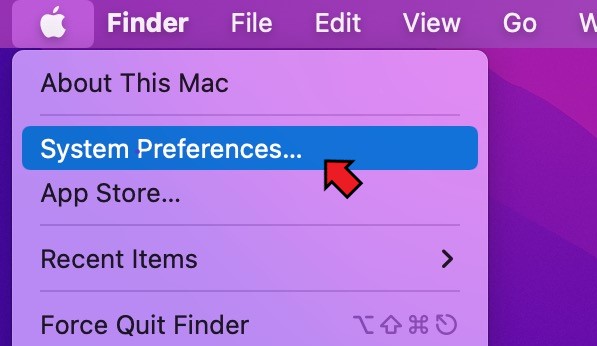
Step 1: Click the Apple logo from your Mac screen’s upper-left corner.

Step 2: Click on the “System Preferences”.
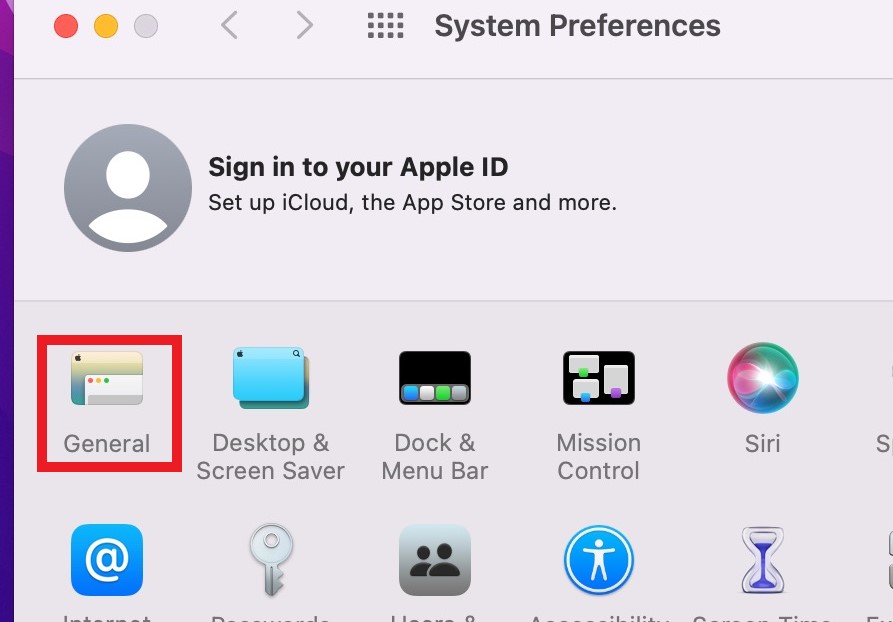
Step 3: Click on “General”.
Step 4: Click the “Light” theme from the list of available “Appearance” options to instantly change macOS to the light visual theme.
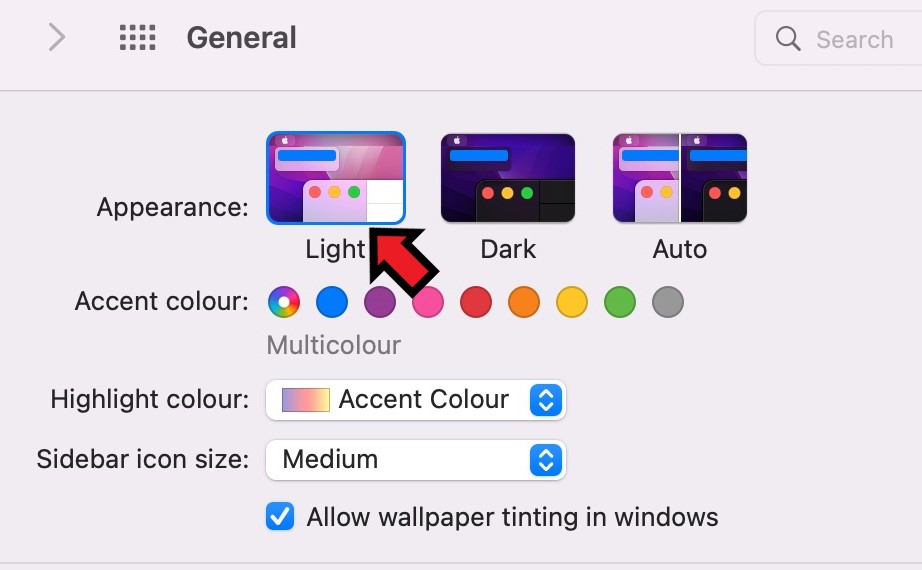
This enables the light mode in all of your Mac’s programs including Microsoft Word.
Using a Web Browser
Disabling the dark mode in the online version of Microsoft Word is simple. If your browser is set to a dark theme mode, you can deactivate it or keep reading to modify Microsoft Word exclusively.
Step 1: Open a browser and go to https://www.office.com. Input your login details and click on “Sign in”.
Step 2: Launch the Microsoft Word. You can create a new Word document or open one that you already saved.
Step 3: Click on “View”. This is located in the toolbar, between the “Review” and “Help” buttons.
Step 4: Click on “Dark Mode”.
The light mode will be enabled if you are currently in dark mode.
Note: Dark mode can be activated once by clicking it again.
Using Android
Step 1: Launch the Microsoft Word app on your Android device.
Step 2: After it has opened, tap on your profile pic in the screen’s top left corner.
Step 3: Tap on the “Settings” options. It launches the “settings” window.
Step 4: Tap on “Theme” under the “Display Preferences” section.
Step 5: Select the light theme from the list of themes. The Word for Microsoft app will switch back to light mode.
For the new theme to take effect, it may require to close and restart the app.
Using an iPad or iPhone
To change the theme for the iOS device, you have to customize your device settings. The theme of the Word app cannot be altered independently.
Step 1: Launch the “Settings” app. This appears to be a cog icon.
Step 2: Update your iPad or iPhone as soon as possible.
Step 3: Tap on the “Display & Brightness” option from the “Settings” menu.
Step 4: Select or tap on “Light” under the “Appearance” section.
This system settings will also be followed by the Word app and the dark mode will be disabled from the Word app as well.
Conclusion
Microsoft Word includes a dark mode to help us work more effectively at night and in low-light circumstances. However, some people find it unpleasant and want to disable it. There are various ways to disable the dark mode in Word, and we provided instructions for each version. This article explained how to turn off the dark mode in Microsoft Word for Windows, Mac, Android, and iOS devices. You can easily disable the dark mode in MS Office using these simple steps.
Source: linuxhint.com