Difference Between “git rm –cached x” and “git reset head — x”?
On Git, users deal with multiple source files to make the development procedure more efficient. After working on them, they can remove these files from the Git repository for cleaning and making space purposes if these files are unnecessary. To do so, the “git rm” and “git reset” commands can be used.
This guide will differentiate the “git reset — x” and “git rm –cached” commands with their working.
Difference Between the “git rm –cached x” and “git reset head — x” Commands
When the developer wants to remove the added changes from the “git rm –cached” command can be used. It also reverts changes to the tracking area. On the other hand, the “git reset — x” command is used to delete the added changes permanently from the Git local directory.
How to Delete Content From Git Repository Using “git rm –cached” Command?
In order to remove the file from the Git repository and revert to the staging area, follow the below-provided instructions.
Step 1: Navigate to Git Repository
At first, go to the Git local repository by running the “cd” command:
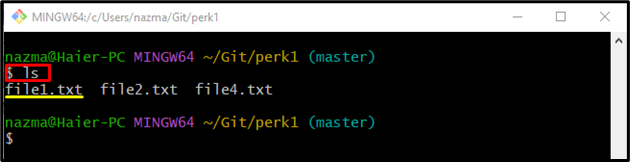
Step 2: List Repository Content
Execute the “ls” command to check the list of existing content:
In the below-provided output, we have chosen the “file1.txt” file for deleting purposes:
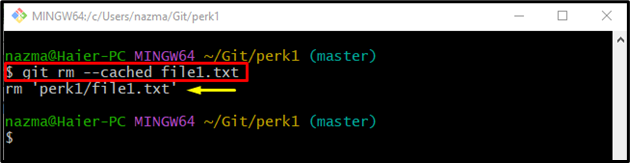
Step 3: Remove Staged File
Now, remove the previously selected file by utilizing the “git rm” command:
Here, the “–cached” option is used as synonymous of the “–staged” option:
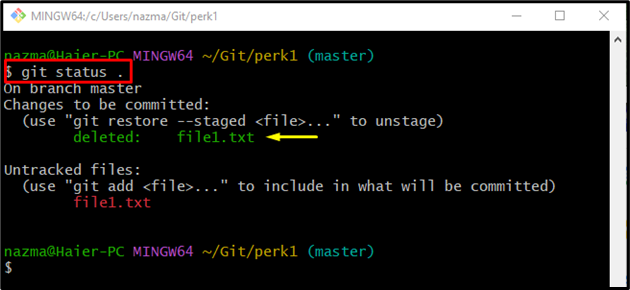
Step 4: Check Status
Next, run the “git status .” command to check the current status of the working repository:
According to the below-given output, the specified file has been deleted successfully:

How to Delete File From Git Repository Using “git reset head” Command?
In order to remove the particular changes from the Git repository permanently, the “git reset head — <file-name>” command can be used. To do so, follow the below-listed steps.
Step 1: View Repository Status
First, check the status of the current working repository using the following command:
It can be observed that the current repository contains the most recently added changes, such as deleted “file1.txt” file and another unstaged “file1.txt” file:
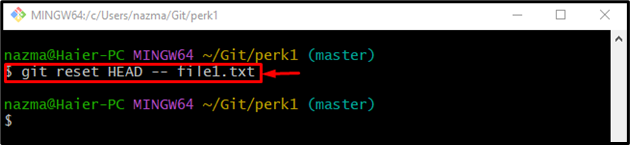
Step 2: Permanently Delete File from Git Repository
Now, execute the “git reset” command to remove the most recently added changes, including staged and unstaged:
Here, the “—” is used to separate the provided command from the specified file name. The above-given command will remove the specified from the repository:
Step 3: Verify Deleted Operation
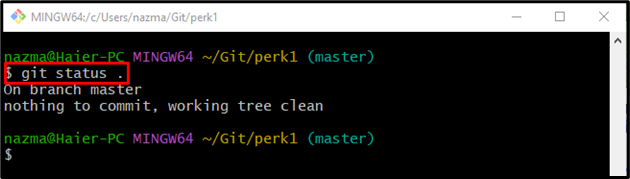
Lastly, to ensure that the specified file is removed from the repository, use the “git status .” command:
It can be observed that the working area is clean, and nothing to commit:
We have briefly explained the difference and working of the “git rm –cached” and “git reset — x” commands.
Conclusion
The “git rm –cached” command is utilized to delete the added changes from the Git repository and revert to the staging area. In contrast, the “git reset — x” command permanently deletes the added changes from the Git repository. This post provided the difference between the “git reset — x” and “git rm –cached” commands and their working.
Source: linuxhint.com