Decorators in Python
When to Utilize a Python Decorator
Whenever you want to alter a function’s behavior without changing the method itself, you’ll utilize a decorator. Adding logs, analyzing performance, executing caching, confirming authorization, and other tasks are a few notable examples. Whenever you need to execute an identical code on many processes, you can, however, employ one. You won’t have to write the duplicate programs as a result.
Prerequisites for Understanding Decorators
We need to understand first a few fundamental Python concepts before we learn about decorators.
-
- Functions can be employed or provided as parameters in Python because they behave like classes and objects.
- An element of the Object type is a function.
- The function could be retained in a variable.
- The function is used as an argument in another function.
- Users may return another method from a function.
- They might be kept in data structures like arrays and hash tables.
For a good understanding, consider the following instances:
Example 1:
We will treat the functions as objects in this case. We’ll give a variable to the shout method. This generates a second name, yell that points to the function object that is specified by the shout method but does not call the function.

At the start of the program, we define the shout() function. Here, we pass the “t” attribute as the parameter of the shout() function. This function returns the text in the upper format. We use the upper() function. Then, we call the print() method to display the line. Within this function, we call the shout() function. We provide the text which we want to appear on the screen as output. We set the value of the shout() function equal to the yell() function. In the last line, we print the value of the yell method so we apply the print() method. Here, we also specify the “Good Morning” value as the argument of the yell() function.

Example 2:
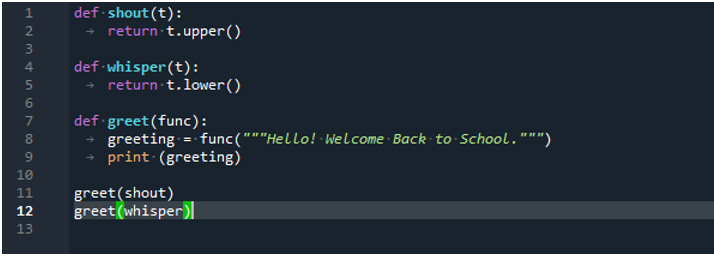
We’ll provide the method to another function as a parameter. Here, the greet method accepts a second function as an argument (shout and whisper). The greet function then calls other defined functions that were specified as an input.

The shout() function is defined at the beginning of the program. Here, the argument for the shout function is the “t” element. This gives the text back in upper case because we utilized the upper() function. The whisper() method is defined in the following step. This function outputs the text that was passed as an argument in the lower format. The greet() method is now used. Here, we provide the “func” parameter which is defined in the following line. We specify the value of the “func” attribute that we have to depict on the console. Finally, we employ the print() function to show the values of both the shout and whisper methods.

The instances that are previously mentioned show the main concepts that are required to comprehend the decorators. Now, we’ll execute some instances to demonstrate the use of decorators.
Decorators
As was already said, decorators can be utilized to change a function or class’ behavior. Functions are defined within the wrapper function when using decorators, where they are passed as parameters to other functions.
Example 3:
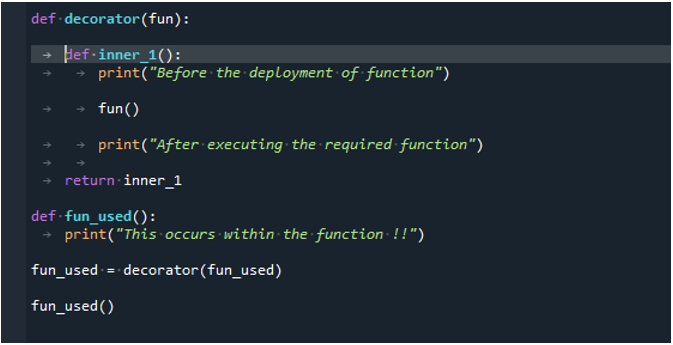
This illustration can illustrate how a decorator alters a function’s behavior.

First of all, we define the decorator. Next, we call the inner1() function. It is a wrapper method in which the parameter is called. Within this function, we utilize the print() function. Then, we call the actual function inside the wrapper function. We again employ the print() method.in the next line. We define a fun_used() method to be called inside the wrapper. Now, we pass the “fun_used” within the decorator to modify its behavior. To terminate the code, we invoke the method.

Example 4:
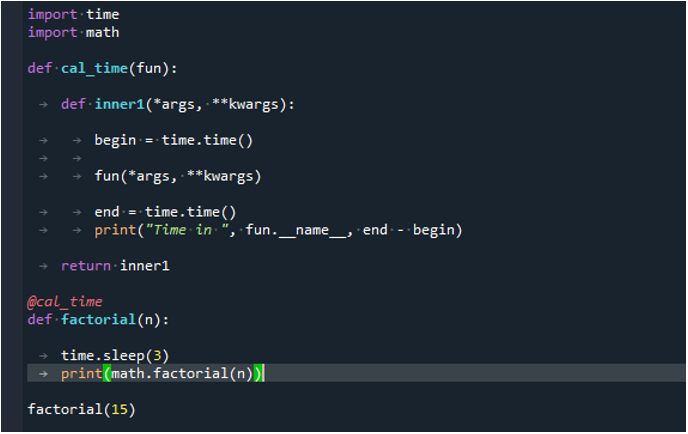
Let’s move on to a different instance in which we can determine how long a function takes to execute by utilizing a decorator.

Here, we import the required header files which include time and math. The “time” library is responsible for calculating the “time” and the “math” module is responsible for all the mathematical operations. We utilize a decorator to calculate the duration taken by the function. We define the cal_time() method. This function contains any required function as a parameter. We employ the inner1() function. We provide the *args and **kwargs as the arguments of the function. In the next step, we store the duration before implementing the function. We call the time() method associated with the “time” module. Then, we acquire the time after executing the method. We again utilize the time() function and its value is saved in the “end” variable.
The print() method is applied to show the calculated time. Now, we calculate the factorial so we define the factorial() method. We pass the specific number as its parameter. We set a 3 second value for the sleep() function because it takes very little time so that we can notice the actual difference. The print() function is employed to display the factorial of the number. In the end, we invoke the factorial by providing the number of which we want to calculate the factorial.

Conclusion
In this guide, we discussed how to provide a function to a variable, how to treat functions as objects, how to return functions, and how to provide a function as a parameter to some other function. Along with several instances, we also demonstrated how to construct and utilize the Python decorators. We implemented the code that employs the decorators to change a function’s behavior. And in another illustration, we used a decorator to determine how long a function takes to execute.
Source: linuxhint.com
