CSS Table Height
In our daily life, we say that height is the measurement of something from bottom to top, or from head to foot. We have the “height” property in CSS which provides us this opportunity to set the height of the table according to our choice. We can set it in pixels or percentages. When we set any value in this “height” property, our table is adjusted in that given height. In this guide, we will use this property for setting the height of the table and will let you know how it will set the height of the table. We will set the height of the table here in different examples.
Example # 1
We must first design the table in the HTML file to set the height of the table. Visual Studio Code is used to produce this HTML file. You can use any software to do these codes. We are using this software to execute examples in this guide. When creating a new file in Visual Studio Code, we must select the language or it will recognize it by default. When we choose HTML as the language, the file extension is generated automatically when we save the file under any name.
After selecting HTML as a language, we simply type “!” into this file and hit “Enter,”. The “HTML” code’s fundamental tags are formed automatically. Simply place the body portion in the HTML body. The CSS file link is placed before the body within the “head” tag. We create the table by first generating the heading and then using the “<table>” tag. There are five columns and six rows in the table we are making. The first row is the table’s heading row and we use “th” to add data to the table’s heading row.
We also use the “td” tag to insert data into the table’s cells with “tr” representing the table’s rows. Then, we’ll go on to the CSS file which will be used to set the height of this table.

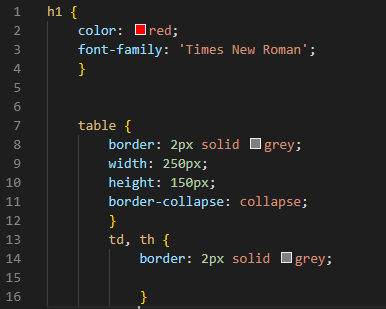
Style the heading by mentioning “h1” and use properties of CSS here. We set the “color” to “red”. The “font-family” of this heading is “Times New Roman”. Then, style the whole table by applying a “border” of “2px” and set its type to “solid”. The color of the border is “grey”.
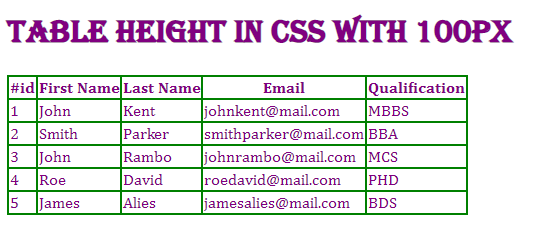
Then, we have the “width” of the table. We are using “250px” for width. Here, we are going to set the “height” of the table. For setting the height of the table we use the “height” property of CSS. When we set the value here in this “height” property, it will set the height of the table. We are setting the “height” of this table to “150px”. So, when this table renders on the screen, it will have a “150px” height.
After this, we are setting the border to a single border for all cells and table borders by using the “border-collapse” property and setting this property to “collapse”. We also apply the border on the cells and heading row. We use the “border” property with “th” and “td” also and set the same border which we set for the table. The border is in “grey” of “solid” type and “2px” in its width.
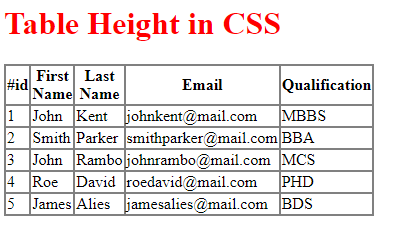
The table which is given below is at “150px” height. It manages its content at this height which we have mentioned in the CSS code. When we set the height of the table, then it will be created at the same height.
Example # 2
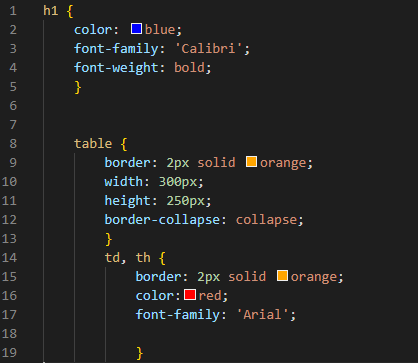
The table we are using here is the same as we have created in the previous example. But here, we are going to change the height of the table by using the height property. We set “blue” for the “heading” which appears before the table at the top of the page. Then, set its “font-family” to “Calibri” and its weight is “bolder”. Then, we apply some properties to the whole table. Set the border by using “border” of “2px” and in “solid” form and in “orange” color. The width of this table is “300px”. This time and we are increasing the height of the table here to “250px”. The “border-collapse” is again “collapse” in this example. The setting of the “th” and “td”, by applying the same border as the table and the “color” “red”, sets the color of the text written in the cells and heading cells to “red”. The “font-family” for this text is “Arial”.
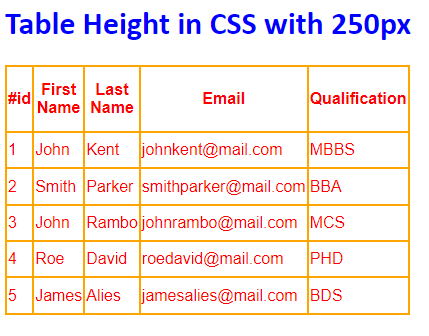
In this output, the table height is increased from the previous table which we have created in example 1 because we change the height here in the CSS code. Then, we increased the height of the table.
Example # 3
We are using the same table again as the one we used in the first example. But we are going to change the height property value to adjust the table’s height. The “heading” that displays before the table at the top is set to “purple”. Then, change the font’s “font-family” to “Algerian”. Then, we apply some attributes to the entire table and establish the border. First, with a “border” of “2px” and in “solid” form, as well as in the color “green”. This time, the table’s width is “auto” while the table’s height is “100px.”
In this case, “border-collapse” is set with “collapse”. The “th” and “td” are set to the same border as the table. The color of the text written in the cells and heading cells is set to “purple”. This text’s “font-family” is “Cambria”.

The given screenshot is the output of this code. Here, you can see that the table adjusts its width automatically and the height of this given table is “100px”.
Example # 4
We set the same table using different values of the properties. The “color” of the heading is “orange” and its “font-family” is “Algerian”. In this instance, the border color of the entire table is “purple”. The “width” of the entire table is again “auto” but the “height” of the table is “400px”. The border of all cells is “purple” and the text “color” is “red”. The “font-family” of the text is “sans-serif”.

Here, in the screenshot, you can notice the height of the table. The table is similar to the illustration above. But in the illustration below, the height of the table is changed.

Example # 5
In this code, we set the heading to the “green” color of “Algerian” “font-family”. Then, the table properties are the same which we have discussed in the previous example. Here, we are setting the height of the table using percentage instead of pixel. We are going to adjust the height of the table to “50%”. Now, we will check in the output how the table looks when we set its height in percentage.

Here, the height of the table is “50%” and its width is auto. We can set any value in this “height” property of the table. We can set the height of the table corresponding to our choice.

Conclusion:
This guide was intended to show you what is the height of the table, how to set the height of the table in CSS, and which CSS property is used for setting the height of the table. As we have discussed, height is the measurement of the table from top to bottom. We have gone over several codes here, and we have also included the output. After thoroughly studying this guide, you will be able to set the height of the table in CSS in the future.
Source: linuxhint.com