CSS Conditional Formatting
Example 01: Conditional formatting based on the support conditional rule of CSS
In this example, we will use CSS’s support conditional rule property to determine how the style change will be applied when the browser or its settings are modified. We will opt for the internal style tag CSS approach in this example.
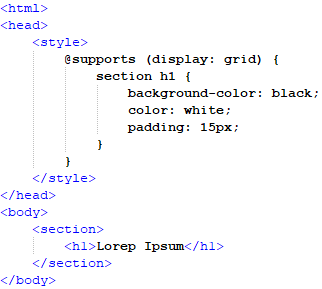
In this script, we will start with the header of the file where the styling properties for the support conditional formatting will be included. In the style tag, we will call the “supports” condition rule. Then, apply the display-related formatting to the heading tag h1 in which the grid will change when the display size changes. Then, we’ll open the body tag and insert a section for the h1 heading tag. The section tag will call the styling properties that we added in the style tag of the header of the file. We will close the section and body tag to end the file.

In this output, we can see that the browser is opened in maximized size and the section is spread wide. But when we minimize the screen size, the section adapts to the change in size and shrinks accordingly to the new page size as seen below:

Example 02: Conditional formatting based on the media conditional rule of CSS
We’ll utilize the style tag CSS technique in this example. In this example, we’ll utilize CSS’s media conditional rule property to control how the style changes when the browser size changes.
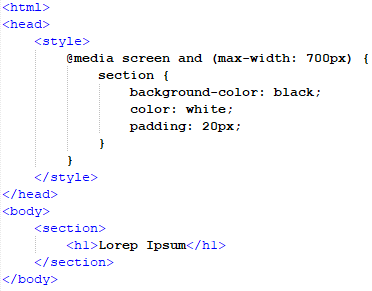
In this script, we will start with the header of the file where the styling properties for the media conditional formatting will be included. We will invoke the “media” condition rule in the style tag and apply display-related formatting to the heading tag h1 so that the grid changes when the display size changes to 700px or smaller. Then, we will open the body tag where we will add a section for the h1 heading tag. The section tag will call the styling properties that we added in the style tag of the header of the file. We will close the section and body tag to end the file.


In both these snippets, we can see that when the size changes, the formatting is different, and when it enlarges it adapts to the styling properties defined in the header of the file.
Example 03: Conditional formatting based on the document conditional rule of CSS
We’ll use CSS’s document conditional rule capability manage how the style changes in this example when the browser size changes.

We will start with the file’s header, which contains the style tag, in which we will use the “document” condition rule. Then, we will add display-related formatting to the heading tag h1 so that the grid changes depending on the URL visit. We will also change the background color, font color, and padding. The section tag will invoke the stylistic attributes added in the file’s header’s style tag. To finish the file, we will close the section and body tags.

The above output is the vision of how the page will look on the visit of the given document URL.
Example 04: Conditional formatting on a table element by transforming font color
In this example, we will format a table and its elements using conditional formatting. This is a type of conditional formatting that does not follow any of the three CSS Conditions rules.
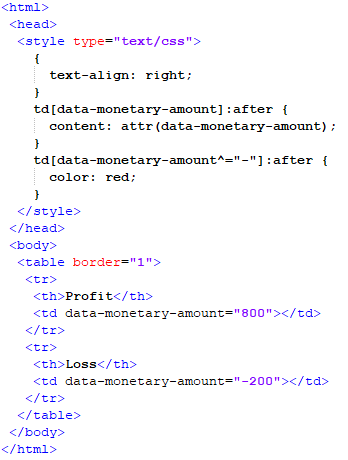
In this script, we will be adding the CSS styling properties in a style text type tag. In this tag, we will be focusing on the font of the table’s data. First, we will add two properties that will have certain conditions. The first property will be for the normal data input which will be shown as the input by the “attr” selector function. Then, the second property will be for the amount that will have the “-” sign with them in which the after function transforms the color of the font to a red color which will highlight the negative value or loss in our case.
After that, we’ll close the style and head tags and open the HTML file’s body. We’ll include a table with a border in the file’s body. Using the tr tag, we will add two rows to this table. The first row will have two columns, one for the header and one for the table data. In the table data, we will include the monetary amount that corresponds to the property indicated in the style tag. The second row will also have a similar structure, but the table data will have a negative value. After this, we will end the file by closing all the remaining tags.

As shown in the above output, the positive value is in a black font, while the negative value in the second row is in red font, as stated in the style tag.
Example 05: Conditional formatting on a table using table data transformation
In this example, we’ll use conditional formatting on the td element (table data) of a table. This is a type of conditional formatting that does not follow any of the three CSS Conditions rules.
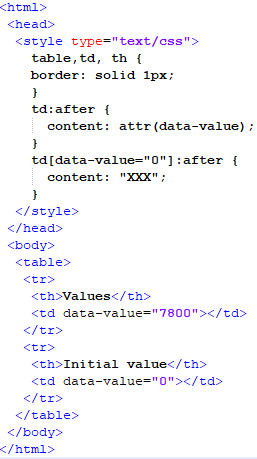
The CSS styling attributes will be added in a style text type tag in this script. The value of the table’s data will be the emphasis of this tag. First, we’ll give the table and its contents a border. The first property will be for the standard data input, which will be shown as input by the “attr” selection function. The second property will be for the amount, with the value “0,”. The after function will make this value the default view. After that, we’ll close the style and head tags and open the body of the HTML file.
We’ll introduce a table with two rows into the file’s body using the tr tag. The first row will include two columns: one for the table title and one for the table data. In the table data, we will include the monetary amount that corresponds to the property indicated in the style tag. The second row will be structured similarly, but the table data will be set to “0.”
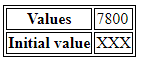
As we can see in the following result, the first row has a normal value, while the second row has a placeholder as provided in the style tag.
Conclusion:
In this article, we discussed the conditional formatting that CSS provides. The conditional formatting is usually set on three rules related to support, media, and document. All these three have different bounds to apply changes to the webpage which were all discussed and implemented in this article. Then the other type of formatting does not follow these rules and is done purely on the visual perception of a concerned individual. We implemented this type of conditional formatting on a table element in the Notepad++ IDE in this article.
Source: linuxhint.com