CSS – Better Way to Set Distance Between Flexbox Items
This article will demonstrate the use of both the “space-around” and “space-between” values for the “justify-content” for the purpose of adding spaces between the flexbox items.
How to Set Distance Between Flexbox Items?
The syntax to define the “justify-content” to set space around and between the flexbox items is as follows:
Prerequisite: Creating Flexbox Items
To set the distance between flexbox items, it is first required to create a flexbox with the flexbox items and then apply the CSS properties on it.
Example
Let’s add a div container element to create the main div and then some div elements inside it to create the flexbox items:
In the code snippet added above:
- A “div” container element has been added with the class declared as “flex”.
- Inside that, four more div container elements are added each with the class name declared as “item”.
- The div elements have the text “A”, “B”, “C” and “D” written on them.
The CSS style element will contain some properties to make a better display of the flexbox items:
{
display: flex;
height: 50vh;
align-items: center;
}
.item
{
width: 40px;
height: 40px;
background-color: powderblue;
text-align: center;
padding:25px;
}
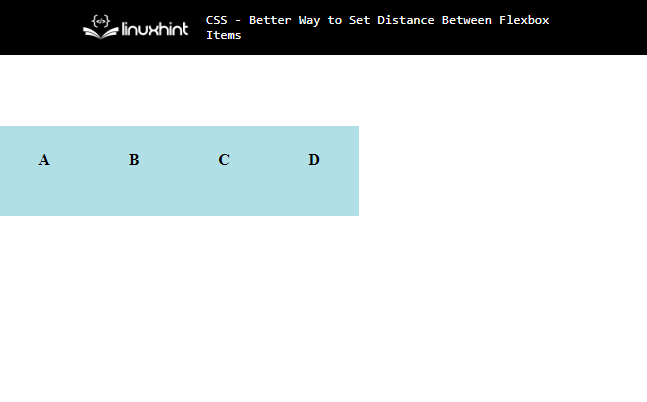
In the above code snippet, the following CSS properties have been added:
- The “display” property has been defined as “flex” to properly align the text inside the div container.
- The “height” property has been set to “50vh” to set the vertical length of the div container element.
- The “align-items” property is defined as centered to align the div element to the center.
- After the “.flex” class selector, the “.item” class selector is added that has the CSS properties for the items inside the main div container.
- The “width” property is defined as “40px” to set the horizontal length of each of the flexbox items.
- The “height” of the flexbox items is set to “40px”.
- The “background-color” of the flexbox items is defined as “powderblue”.
- The “text-align” center has been defined as “center” to align the written alphabets inside the flexbox items to the center.
- The “padding” property has been defined as “25px” to define the distance between the content and the border.
The above code snippet will generate the following output:
Now, it is required to set the distance between the created flexbox items.
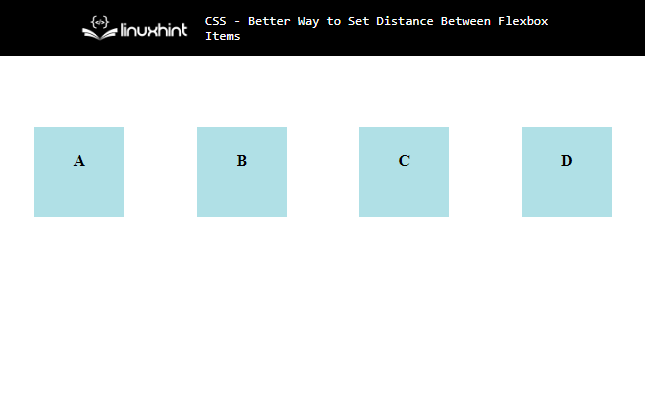
Method 1: Define “justify-content” Property as “space-around”
One of the methods is to add the “justify-property” and define it as “space-around” to add the spaces or the distance around each flexbox item:
{
justify-content: space-around;
…
}
.item
{
…
}
The above code example indicates that there is the addition of the “justify-content” property that has been defined as “space-around”. The dots indicate that all the properties remain the same here as added above in the prerequisite section of this post.
As a result, the defined space will be added around the flexbox items:
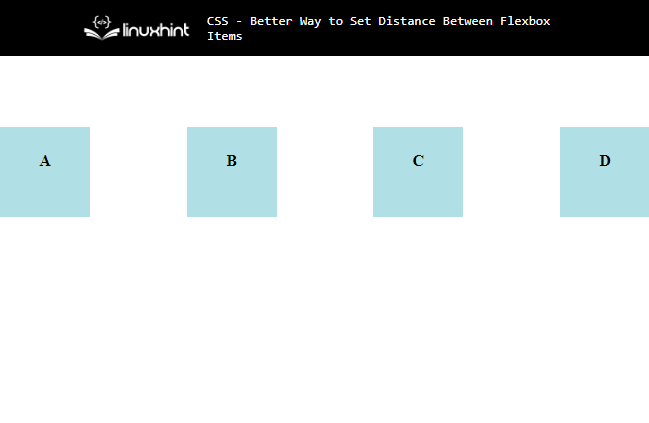
Method 2: Define the “justify-content” Property as “space-between”
The other method is to add the “justify-property” and define it as “space-between” to add the spaces or the distance between each flexbox item:
{
justify-content: space-between;
…
}
.item
{
…
}
The above example indicates that there is the addition of the “justify-content: space-between” and all the CSS properties remain the same here also.
The above example will add distance between each flexbox item. However, there will be no distance between the leftmost and the rightmost item and the div container because it only adds distance between the flexbox items unlike the “space-around”:
This sums up the two different methods to set the distance between the flexbox items.
Conclusion
To set the distance between the flexbox items, add the id or class selector in the CSS style element referring to the parent element in which all the flexbox items have been created and then define the “justify-content: space-between” property as either “space-around” or “space-between”. This blog guide about the methods for setting the distance between flexbox items.
Source: linuxhint.com