Create a Persistent Volume Claim in Kubernetes
This article is about persistent volume claims (PVC) in Kubernetes. First, we know that persistent volume is a piece of storage that stores a lot of information. When we restart or shut down the pod, this information remains safe in persistent volumes in Kubernetes. This topic is very interesting, and you all will enjoy this if you are with us until the end of this article. We will learn about persistent volume claim (PVC) and how we create PVC in Kubernetes containers in detail with the help of examples and commands.
What Is a Kubernetes Persistent Volume Claim (PVC)?
Persistent Volume Claims are requests for storage that are called on demand. A pod can use it to request a specified quantity of storage and specific access modes. Since persistent volumes of resources are present and the PVC is a cluster resource, it is like a pod in that regard. PVC isn’t associated with a persistent volume when it is created. Before the PVC may request to be tied to a PV that satisfies its resource needs, an administrator must first supply the persistent volume. A PV cannot be released from a PVC after it has been bound to it; this lock lasts until the PVC is erased.
Prerequisites:
The latest version of Ubuntu must be running on your system. The Windows user installs a virtual box to run Linux or Ubuntu in parallel with the Windows operating system. To run the commands on a local terminal, the user must be familiar with Kubernetes, clusters, pods, and the kubectl command line.
In the session that follows, we will define the process of PVC creation in various steps with detailed explanations. Let’s begin the demo of PVC in Kubernetes.
Step 1: Launch the Minikube Dashboard for Kubernetes
In this step, we start a Kubernetes local-based cluster named minikube. We run the following command:
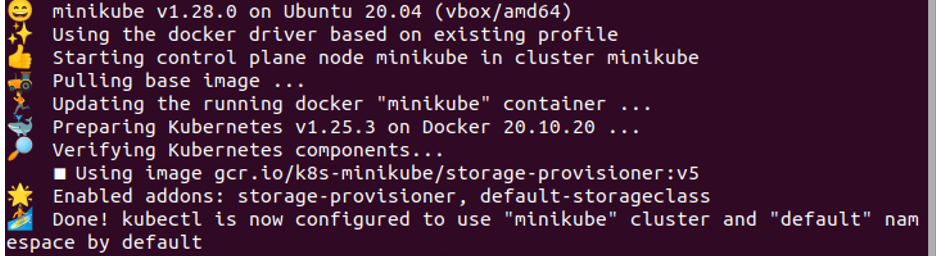
When we run this command, the minikube local cluster runs successfully in our system.
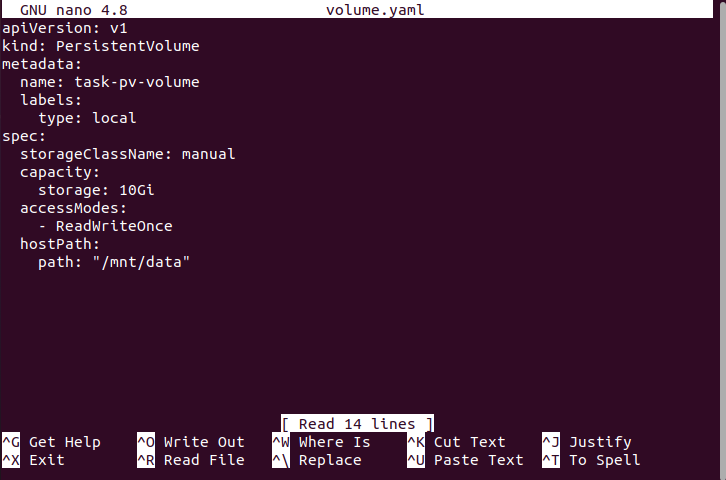
Step 2: Create a Configuration File in Kubernetes
In this step, we create a configuration file for storage in the Kubernetes cluster. This configuration file is in YAML format. We run the following command to create a file:
If you press “Enter” after running the command, the configuration file opens after the command’s execution. In this case, we create a pod for storage on a persistent volume. As you see in the attached screenshot, the kind of this pod is PersistentVolume, and this is in the local directory. Read the configuration file with focused attention for better understanding.
Step 3: Deploy the PV Configuration File
In this step, we need to deploy the configuration file in the Kubernetes application. We run the following command on the kubectl terminal:
![]()
The deployment of the “task-pv-volume” file is successful. We request that the storage be implemented in Kubernetes applications.
Step 4: Examine the Persistent Volume Pod in Detail
In this step, we fetch the details of the PV pod for confirmation. We run the following command to see if the PV Pod is successfully running on the system:

The output is attached to this command as shown in the previous illustration. In this screenshot, this command gives us a lot of information about the PV task-pv-volume pod like its name, capacity, access mode, status, etc. The status of this pod is “available.” It means that this pod has a storage for information.
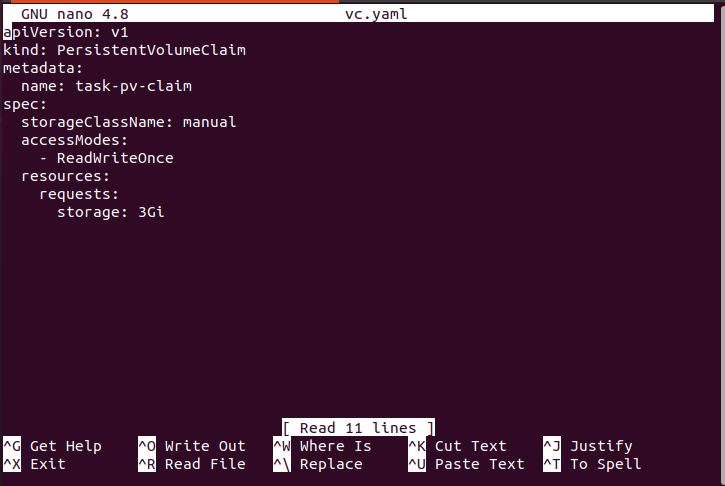
Step 5: Create a Configuration File for PV Claims
In this step, we create a configuration file for PVC through which we send a storage request. We run the following command:
The configuration file is successfully created when this command is executed. Open the configuration file that we created for the storage request. The name of this configuration file is vc.yaml. The type of this pod is persistent volume claims (PVC), creating the task-pv-claim name. After creating the configuration file, we implement this configuration in Kubernetes’ application in the following steps.
Step 6: Deploy the PVC File in Kubernetes
We consider our requirements during this step. Here, we run the command for PVC files that come into action in Kubernetes applications. The command is as follows:

After running the previous command, PVC is successfully created in our system.
Step 7: Enlist the Pods in Kubernetes
In this step, we fetch the list of running pods in our applications. We run the command that gives us a list of running pods at this time. The command is as follows:
This command yields a list of pods with persistent volume. The command returns a dataset, as we can see in the following screenshot:
![]()
After that, we run another command through which we get a list of pods whose pod type is persistent volume claims. We run the following command here:

This command shows us a pod having different attributes as we can see in the previous screenshot.
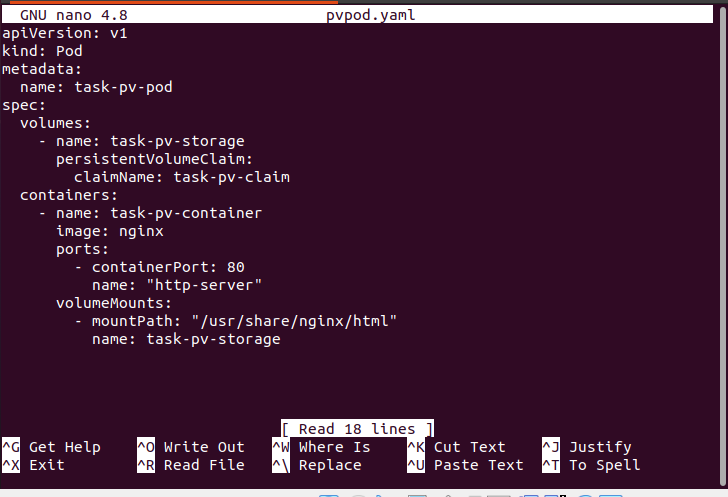
Step 8: Create a Configuration File Again
In this step, we create another configuration file by running the following command:
This pod is created just because PVC runs on this pod as a volume.
The command is executed, which in return opens a file that is attached in the following as a screenshot. This file contains different information related to pods like their name, type, etc. The requested storage is used in this pod as a volume.
Step 9: Deploy the Pod in Kubernetes
We now deploy this pod by running the following command and specifying the name of the pod. The command is as follows:
![]()
This pod is created successfully. Now, our storage requirement is fulfilled as the requested storage is used in this pod as per demand.
Step 10: Enlist the Running Pods in Kubernetes
Now, we check if this pod is running perfectly in Kubernetes. For this reason, we run the following command:
![]()
When a command is executed, it returns an information such as the name of the pod, its status, its age, and many other details.
Conclusion
We conclude that we can easily use the pods for storage in Kubernetes. If we need more storage, we can also request a storage in Kubernetes. Persistent volume claims make this issue resolvable. When the requested storage for a pod becomes available, we successfully run that pod in our system. We explained everything in detail with appropriate examples here. You can also practice all these examples in your environment for better understanding.
Source: linuxhint.com