Configure Lets Encrypt Digital Ocean
A website’s domain must have SSL/TLS encryption if it intends to get visitors. SSL/TLS certificates provide a strong connection among web servers and browsers. Earlier, security wasn’t a major concern. It was relatively common for websites to deliver data via the established HTTP protocol. Nowadays, the channel used to communicate with the server must be secured, though, because cybercrimes including identity theft, credit card fraud, and espionage are on the rise.
A Certificate Authority (CA) called Let’s Encrypt offers free SSL/TLS certificates, enabling HTTPS encryption on web servers. It is domain verified, so a dedicated IP Address is not necessary. It is usually advised to have an SSL certificate enabled on your website to improve your SEO ranking, particularly on Google.
Workings of Let’s Encrypt
Let’s Encrypt confirms domain ownership before providing a certificate. When the token is validated, the Let’s Encrypt validation server makes an HTTP request to obtain the file and ensures that the domain’s DNS record points to the server hosting the Let’s Encrypt client.
Requirements
You must do the following before using Let’s Encrypt:
Following the instructions in this first server setup for Ubuntu 20.04 tutorial, once Ubuntu 20.04 server is set up, complete with a firewall and a non-root user with sudo access.
A domain name with registration. Throughout this article, myfirstproject1.com will be used. You can buy a domain.
The following two DNS records are configured on your server.
- A “myproject1” record with myfirstproject1.com pointing to the public IP address of your server
- A “myproject2” record with myfirstproject2.com pointing to the public IP address of your server.
Nginx should be installed, and you must ensure that your domain has a server block.
Steps For Installing Let’s Encrypt on Digital Ocean
The main steps for installing Let’s Encrypt on the digital ocean are:
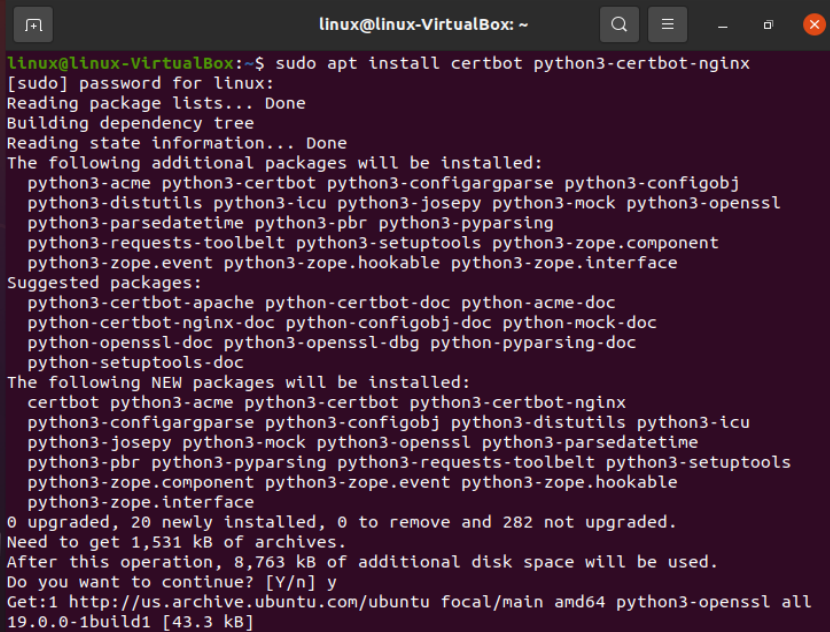
Installing Certbot
The Certbot software is the primary need for utilizing Let’s Encrypt to obtain an SSL certificate. For installing Certbot and its Nginx plugin, we use the following command:

Most shared hosting companies and some cloud hosting companies incorporate Certbot or a similar plugin in the website hosting panel that enables you to purchase, renew, and administer SSL/TLS certificates by having some clicks.
Whereas “python3-certbot-nginx” is a package used to:
Immediately demonstrate to the Let’s Encrypt CA that you are in charge of the website.
- Keep records of when your license has to be upgraded and when it’s about to expire.
- Obtain and install a browser-trusted certificate on any web server.
- Assist you in revoking the certificate should the need arise.
Certbot is now ready for usage, but some of its settings have to be confirmed before it can set up SSL for Nginx automatically.
Verifying Nginx’s Configuration
Certbot should be able to configure SSL automatically. It must be able to locate the proper server block in your Nginx configuration. More precisely, it accomplishes this by searching for a server name directive corresponding to the domain you request a certificate for.
It should already have the server name directive properly configured in a server block for the domain, which we will use at “/etc/nginx/sites-available/myfirstproject1.com”.

Open the domain configuration file in nano or your other text editor to verify your file will be opened if it exists, close your editor and go to the next action. The server name will look like “server_name domain_name www.domain_name.com“, as shown in the snippet below.

If it doesn’t change, it corresponds. Verify the syntax of your configuration modifications after saving the file and closing your editor. Use the subsequent instruction to check:
Reload Nginx to load the updated configuration after making sure that your configuration file’s syntax is correct:
Now, Certbot can automatically locate the right server block and update it. A systemctl is in charge of inspecting and managing the systemd system and service management. It serves as the System V init daemon’s replacement and consists of several system administration libraries, tools, and daemons.
Enabling HTTPS Via the Firewall
The required recommendations advise you to enable the UFW firewall. You must change the settings to permit HTTPS traffic.

The UFW status option enables us to view UFW’s most recent condition. The UFW status displays a list of regulations if UFW is activated. Of course, if you have the necessary credentials, you can only run the command as the root user or by prefixing it with sudo.
Enable the Nginx Full profile and remove the unnecessary Nginx HTTP profile allowance to allow HTTPS traffic as well:

The previous snippet shows the method to allow complete Traffic from Nginx and the second one shows how to delete the other traffic we allowed.

How To Get an SSL Certificate
With the help of plugins, Certbot offers several ways to get SSL certificates. Nginx’s configuration and reloading of the configuration will be handled by the Nginx plugin as needed.
![]()
Utilize the Certbot to get the domain’s SSL certificate right away. To indicate the domain, a “-d” argument is needed. One certificate is issued by Let’s Encrypt for the www subdomain and the root. It’s necessary to obtain the certificate for both versions since having only one for either version will result in a warning in the browser if a visitor views the other version. For new users, certbot asks you to provide your email for the first and confirm that you agree to the terms of service.

If this were successful, it would ask you to make your selection and press ENTER. After updating the configuration, Nginx will reload and consider the new settings. After finishing, certbot will let you know that the procedure was successful.
Conclusion
In this guide, we demonstrated how to install and utilize the Let’s Encrypt software certbot, get an SSL certificate, set up your auto-update for an SSL certificate, and configure Nginx. In addition, we also provided you with some examples of situations that might result in compilation issues when using the Let’s Encrypt Digital Ocean.
Source: linuxhint.com