Configure HPA in Kubernetes
What Is HPA in Kubernetes?
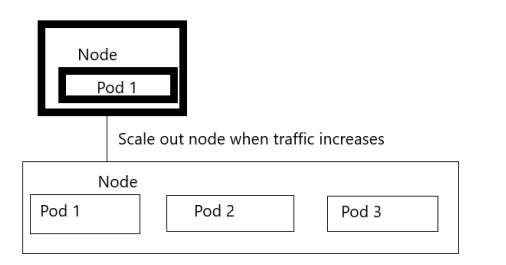
HPA stands for Horizontal Pod Autoscaler in Kubernetes, and it modifies the structure of Kubernetes traffic workload by automatically increasing or decreasing the number of pods according to CPU utilization capacity. In contrast to modifying the resources which are allotted to a single container, this scaling is carried out horizontally because it impacts the total number of CPU instances.
How Does HPA Functions in Kubernetes?
We are all aware that the CPU handles processes. As soon as we deploy and set the replicas, the demons are all set and we can manually add more pods to the deployment or replica set. Kubernetes provides Horizontal Pod Autoscaling to automate this process. HPA is the controller that is used to control the CPU Utilization through automation. A Kubernetes application scales automatically based on workloads. If the number of traffic drops and the CPU utilization decreases, it scales down. The Kubernetes application scales out when the workloads increase by creating more replicas of the Kubernetes application.
Prerequisites:
The following are required to run the HPA in your Kubernetes application:
- Installed latest version of Ubuntu in your system.
- If you are a Windows user, install the Virtual box first and run the Ubuntu or Linux virtually in your system.
- Installed latest version of Kubernetes in your system with version 1.23.
- You must have an idea about the Kubernetes cluster and kubectl command line tool on which we run the commands. You must know their configuration.
In this article, we will learn every step-in detail with helpful examples. If you are a beginner, this is the right place for you to learn about Kubernetes methods. We will explain about the HPA configuration process in different steps. Let’s begin!
Step 1: Kubernetes Container Startup
In this step, we start with the Kubernetes container which is a minikube. We run the following command to start the minikube:

Minikube starts after command execution. Minikube provides us with a local Kubernetes container in which we perform different actions.
Step 2: Run the PHP-Apache Server in the YAML File
In this step, we create a configuration file after a container is created to start a deployment. We run the following command to create a YAML file:
The following is the execution of the command that is mentioned in the attached screenshot.
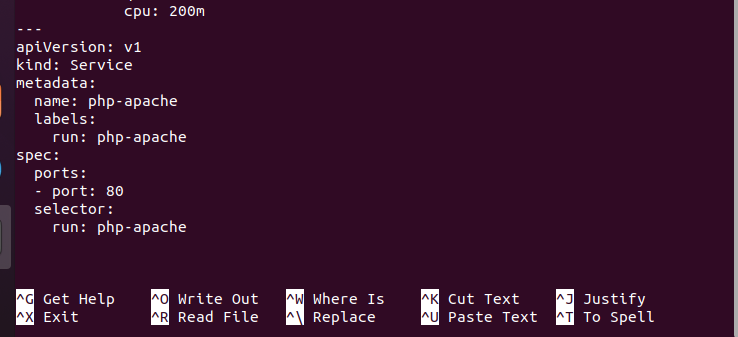
The configuration file contains different types of data like the name of the file, the spec of containers, and the spec of the selector. This container runs with the help of “registry.k8s.io/hpa-example” image as we can see in the following screenshot:
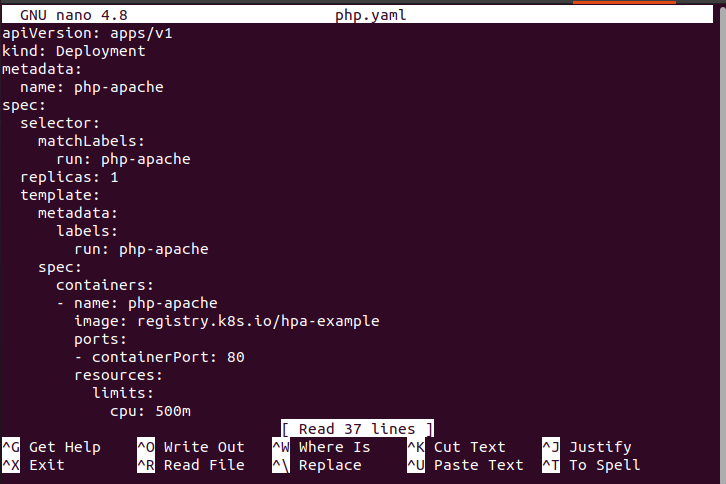
This is also the YAML file part:
Step 3: Create a Deployment and Services in Kubernetes
In this step, we create a deployment and declare it as a service using the attached screenshot. We execute the following command in the terminal:

After this command execution, the php-apache deployment server is created. Along with this, the service is created successfully.
Step 4: Create a Horizontal Pod Autoscaler in Kubernetes
In this step, we create a horizontal pod autoscaler using kubectl on the deployment server. For this purpose, we run the following command:
![]()
When we execute this command, the horizontal pod autoscaler is created successfully. In the previous command, we also initialize the min and max values. This means that the horizontal pod autoscaler is maintained between 1 to 10 replicas of the pod. This is all controlled by the deployment php-apache server.
Step 5: Check the Horizontal Pod Autoscaler Status in Kubernetes
In this step, we want to get or check the status of HPA – if any HPA is present in Kubernetes or not. We run the attached command for this purpose:

As we have seen in the previously-attached screenshot, one HPA is present in our container and its name is “php-apache”. The reference of this pod is “Deployment/php-apache”. The targets show us that the CPU consumption of this pod is unknown to 50% which means that no client request is received. The Minimum number of the pod is 1 and the maximum number of pods is 10. The replicas is “0” and the age of this pod is “7s”.
Step 6: Increase a Workload or Traffic in the Server
In this step, we connect to the deployment that is previously created to create a pod and check the HPA in the real environment to see if the HPA can manage the resources or not. We also increase the load on the cluster by running the following subsequent command:
Step 7: Watch the HPA After Execution
We can easily watch the list of HPA by running the following command:

After running the previously-mentioned command, the result appears the same as in the step 6 of this article.
Step 8: Show the Deployment of Kubernetes
In this step, we fetch the list of Kubernetes deployments by just running the following command:

Step 9: Create More Replicas
In this step, we create the replica of the same pod in Kubernetes with the same command:

This command watches the pod detail after execution. We can see this pod detail in the previously-mentioned screenshot.
Step 10: Enlist the Deployment Again
In this step, we run the same command to show the deployment. The command is as follows:

Conclusion
This article is about HPA. HPA provides a facility for automation which is related to CPU utilization. We learned every step-in detail for HPA configuration. We hope that you will also understand the working of HPA, and you can do this practice in your environment.
Source: linuxhint.com