chgrp Command in Linux
Prerequisites
Before we start, you will need to have a system running Linux OS where you are signed in as an administrator with sudo privileges and you have access to a terminal command.
What are sudo Privileges?
Sudo is a command-line tool that lets users run programs as root (superuser). The sudo command allows us to temporarily elevate our current account to have root privileges.
What Is chgrp Command?
The chgrp command in Linux can be used to make changes to the name of the group that a file or directory refers to. Users can join groups in Linux. These teams are known as user groups. User groups allow for permissions, file ownership, and group membership management. A user group is similar to a user account. However, user accounts are created automatically at login and do not require any configuration after they have been created.
On the other hand, user groups need to be manually created before they can be utilized. The permission to access and modify a file changes when the group ownership of a file or directory is changed. Keep in mind that the sudo prefix must be used when running the chgrp command in Linux because the chgrp command requires superuser permissions to run.
Syntax of chgrp Command
The syntax of the command chgrp is as follows:
![]()
As you can see, the syntax includes three parameters: options, group, and file/directory. The parameter “options” represents additional options.
The name of the new group that the file or directory receives upon execution is represented by the [GROUP] attribute.
The ‘file/directory’ parameter, as the name indicates, is the name of the file or directory you want to make changes to.
The optional options that you can use are mentioned below.
| Options | Description |
|---|---|
| -f, –silent, –quiet | This command completes the task without showing error signals. |
| -v, –verbose | This command provides information for each file that is executed. |
| -c, –changes | This command is similar to –verbose but only reports when a change is being made |
| –preserve-root | The ‘/’ symbol is not recursively used by this command. |
| –no-preserve-root | This command does not prioritize ‘/’ (default setting). |
| –reference=RFILE | The group name of a file is modified to match the referenced file’s group name. |
| –dereference | Affects each symbolic link’s reference rather than the link itself. |
To determine which group a file or directory belongs to, use the ls -l command as we have done below.
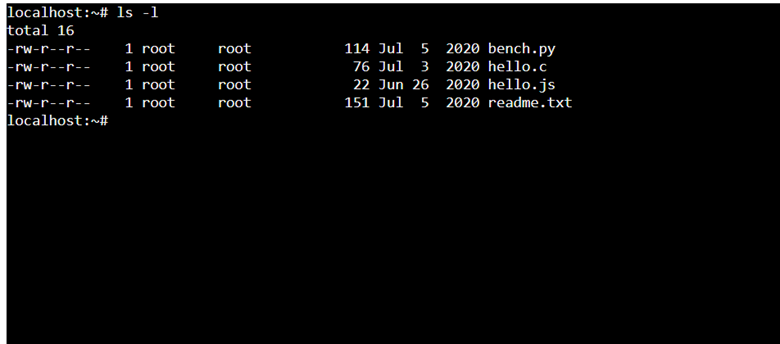
The command ls –l used here indicates vgroup ownership.
In the output shown above, the command ls shows the details of the files and also the subdirectories. The owner and group of all files as well as directories is the root, as can be seen in the image above.
Examples of chgrp Command
Here we are going to look at some examples of how to use the chgrp command in Linux. By doing so, we will be able to see the commands and the outputs for changing the directory group ownership and match the reference file. This will also show the execution details and hide any command errors.
Example 1:
We’ll show you how to change the directory group in this example. The [NAME_OF_THE_FILE] attribute in the command should be replaced with the directory name to modify a directory group’s ownership:
![]()
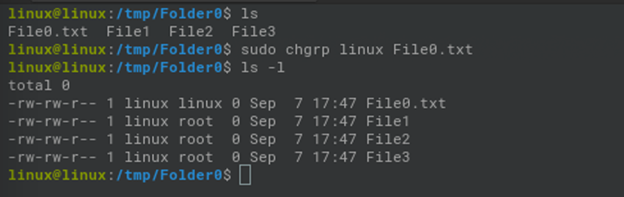
You can see in the image below that the directory File0’s group name is linux.

In this image below, we have applied the chgrp command to change the file/directory File0’s group name.
![]()
The directory’s default group, linux, was changed to root, as shown in the picture below. The result is given below.
Example 2:
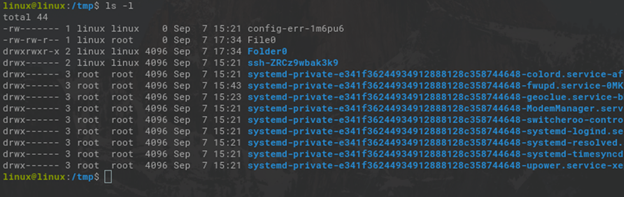
Do you know that you can recursively change the group ownership of a specific directory, any of its subdirectories, and even a file inside with the help of the -R option. This example explains how you can do this. First, let’s see the syntax given below.
![]()
The following command modifies the Folder0’s directory and all of its files’ group affiliation:
![]()
As you can see, after using the chgrp –R command shown in the picture above, the directory’s default group, linux, was changed to root, as shown in the picture below.
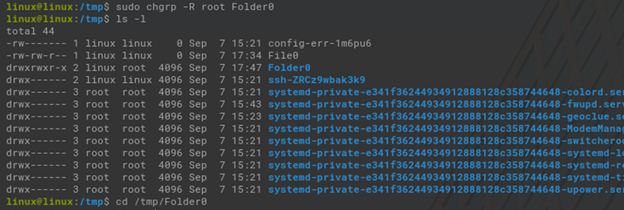
You can see in the screenshot above that files under the ‘Folder0’ subdirectory have also had their group ownership changed to root.
Example 3:
The group name of a reference file will be used to change the group in this example. Using the group name from a reference file, we can change a file’s group. We can use the reference of any other file or directory to change the group of another file by running the following command:
![]()
And by using the ls command, we can see the files in the directory below.

The below-mentioned command will change the group of ‘File0.txt’ by using the reference of a specific directory.
Example 4:
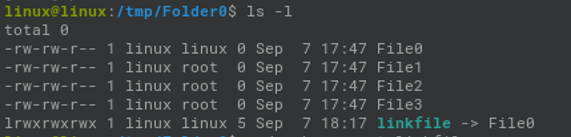
We’ll discuss how chgrp manages symbolic links in this example. By default, a symbolic link’s referent is affected by the chgrp command. This indicates that any modifications performed with the tool are done to the file it refers to rather than the symbolic link. Take the symbolic link “linkfile” as an illustration, which connects to “file1”.

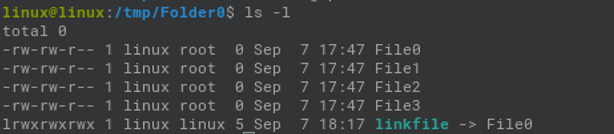
You can see that the owner’s name and a group of ‘file1’ and ‘linkfile’ are set to ‘root’ and ‘Linux.’
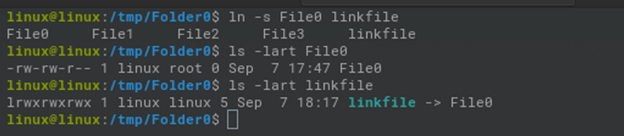
If you want to modify the group of the symbolic link file, you will observe that “linkfile” will stay unchanged but that the group ownership of “file1” is changed.
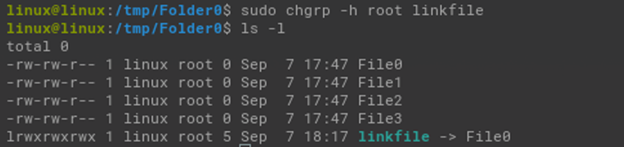
The below command will alter the group rights of the “linkfile.”
![]()
Here is the result.
However, the -h command-line option can also be used here. This command changed the group of the symbolic link. See below.
Conclusion:
As we have discussed and learned in this article, each file in Linux has an owner, a group, and permissions that specify which users are allowed to read, write, or execute a file. This article explains how to modify the group ownership of specific files. This is done using the chgrp command. With the guidelines provided in this article, you now understand the basic rules for using the chgrp command to modify the group ownership of a file or even a directory. Additionally, how to use the various options to modify the procedures in the Linux system.
Source: linuxhint.com