Changing NIS Password
Interestingly, users can effectively change their NIS passwords using the various methods. But irrespective of your chosen method, you must use the NIS yppasswd command.
This article will take you through the various ways to change your NIS passwords. Notably, it will focus on how you can do this using the yppasswd daemon.
Let’s go!
How to Use the yppasswd Command to Change the NIS Passwords
The standard model of installing or changing the NIS passwords is through the yppasswd daemon. The command is an alias for the passwd command. The yppasswd command modifies the /etc/passwd file once the user logs into the master server. Of course, you will need to rebuild the passwd map manually.
To change an NIS password, you must be the owner of that password. However, the root users on NIS servers have the privilege to change another user’s password even without knowing the respective user’s original password.
This action is possible by entering the root user’s password instead of the user’s original password. Notably, this privilege is not available for the root users who are accessing the system from an NIS client machine.
The syntax for this utility is as follows:
![]()
The two notable flags in the above synopsis are as follows:
- -f [ Name ] – This flag helps to change the gecos information (information in the /etc/passwd file) in the NIS maps for every User Name.
- -s [ Name [ ShellProg ]] – This flag changes the login shell in the maps for any User Name.
How the yppasswd Works
Once the yppasswd command is already running on your master server, you can proceed to change the passwords from any host within the domain by typing the following command:
![]()
Once you enter the given utility in the command line, the system will prompt you to enter the old password. Mostly, the NIS passwords should have a minimum of six characters.
If you enter an incorrect old password, you will not get an error message until you key in your new password. This happens because the system needs both passwords simultaneously to activate the update protocol. So, the system will only inform you if the old password is wrong after you click the update button.
The following are the three ways on how you can use the yppasswd command to change NIS passwords:
a. Change the NIS Password of a User
Notably, the previous command is handy when changing a user’s credentials. The user can handle this independently. Alternatively, a root user on a server machine can change any user’s password even without knowing the user’s existing password.
Tweak the command as shown in the following illustration. The example demonstrates how you can change the password for a user named Ken in your system. The system will prompt you to enter Ken’s password. If you are a root user on a server machine and do not know Ken’s current password, use your password before entering a new password for Ken.
![]()
b. Change the Login Shell of a User
You can also change a user’s login shell using the yppasswd daemon. You will get a prompt for the user’s new shell as the old shell comes as a default. Notably, you should do this if the yppasswd utility does not have a –noshell flag when it is run.
For example, you can change the login shell of the user named Ken to /bin/ksh using the following command:
![]()
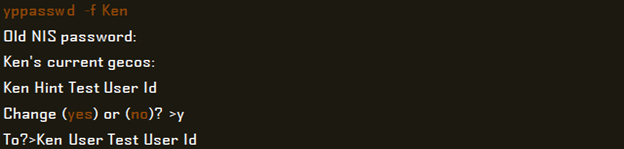
c. Change the Gecos Information of a User
Finally, you can use the command to change the gecos information of a user, as can be found in the passswd file. Similar with the login shell modifications, this only happens when the yppasswdd utility is not started with the –nogecos flag.
Conclusion
The given examples are some of the common ways through which you can change the NIS passwords. Hopefully, this article is helpful and you can now go through the procedure independently.
Sources:
- https://www.ibm.com/docs/en/aix/7.2?topic=maintenance-changing-nis-passwords
- https://www.computerhope.com/unix/uyppassw.htm
- https://www.tutorialspoint.com/unix_commands/yppasswd.htm
- https://tldp.org/HOWTO/NIS-HOWTO/rpasswdd.html
- https://www.ibm.com/docs/en/aix/7.2?topic=y-yppasswd-command
- https://docs.oracle.com/cd/E36784_01/html/E36870/yppasswd-1.html
- https://www.suse.com/support/kb/doc/?id=000017269
Source: linuxhint.com