C# Rename File
Methods for Renaming a File in C#
Example # 1: Using Move() Method
In this given example, we are going to use the Move() method for renaming a file in C# programming. We perform these examples in Ubuntu 20.04 text editor. The file extension for this C# code is “.cs.” So, you must save your file with this file extension.
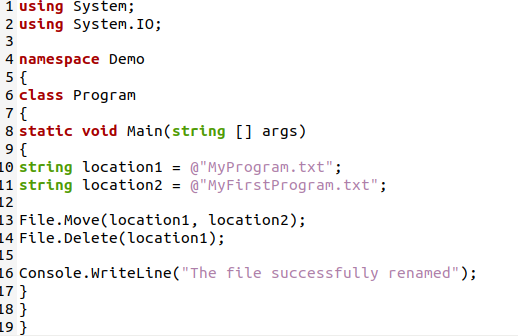
We start our C# code with “using System.” We use a library in our program to access classes such as the “Console” class and functions such as the “WriteLine” function. We also import “System.IO,” used for input/output. If we don’t use this “System.IO,” the program doesn’t get the file from your system. It gives an error. The namespace is here with the name “Demo.” We also declare a class with the name “Program” and call our “main” function. Our C# program starts from this “main” function when executing our code.
Here, we just give the file name because this C# code and the file we want to rename are in the same directory. If you want to rename a file in the other directory, you must give the proper path of the directory. After this, we declare another variable of a string data type with the name “location2” and give the file’s new name. Here we want to change the name of file “MyProgram.txt” file to “MyFirstProgram.txt,” so we store this name in our string variable “location2”.
Now, we use File.Move() method for renaming the existing file. In “File.Move(location1, location2)”, we give our string variables so that it renames our location1 file with the location2 file name. When it moves this file and renames it, then we have to delete this “location1” file, so for this, we use “File.Delete(location1)”. It will delete our previous file and save it with the new name, which means it renames our existing file. After renaming the file, we want to print a line on the screen, so for this, we use the “Console.WriteLine()” method and then close all the brackets and save this code.
We can get the output of this code by using the “mcs” command for compiling our code and the “mono” command for executing this compiled code in Ubuntu 20.04. When this code is compiled and executed successfully, we get the output, and our existing file is renamed.

In this output, you can see that both commands run successfully, and the existing file is renamed, and then it prints the line on the terminal that is “The file successfully renamed.”
Example # 2: Using the Copy() Method
We give another example of using the Copy() method for renaming our existing file in C# programming. Check this example of how this method renames a file.
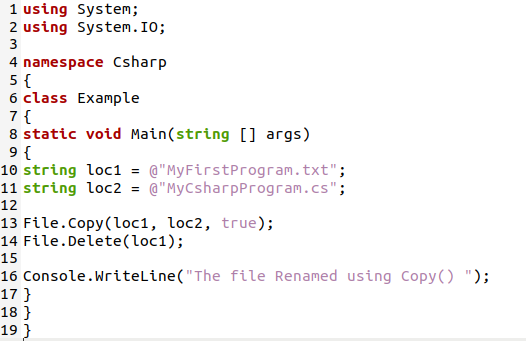
In this example, the “namespace” is named “Csharp,” and the class name here is “Example.” After invoking the “main” function, we are going to declare two variables of the “string” data type with the name “loc1” and “loc2,” respectively. We store the path of the existing file which we want to rename in “loc1,” which is “MyFirstProgram.txt,” and we want to change this file name and give a new name to this file which is “MyCsharpProgram.cs”, so we store this new file name and path to the second “string” variable “loc2”. We must put the “@” sign whenever we give any file path.
Here, we give the filename because this code file and the file we want to rename are saved in the same directory as we explained in the previous example. After this, we use the Copy() method. The copy() method is used for renaming a file. It will copy the existing file to a new file and change the new file’s name. Here, we have “File.Copy(loc1, loc2, true),” which means if we have this file whose path is given in “loc1,” then this file is copied and saved with the new name which we give in the “loc2” string variable.
After copying this, we deleted our previous file, which is stored in “loc1” by using the “File.Delete(loc1)” method. After successfully renaming the file, we have to print one line on the screen, which is “The file Renamed using Copy ()” with the help of the “Console.WriteLine()” function. The output of this code is given in the image below:

Example # 3
In this example, we give the file name that doesn’t exist in the given directory and use the try-catch method, which displays an exception. Let’s try this example of how it shows an exception when the file is not found.

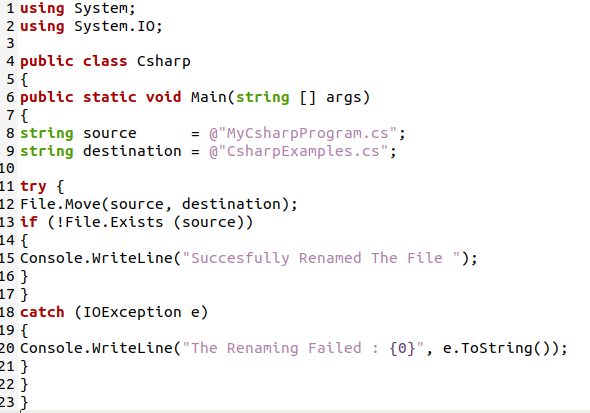
Here we declare a public class “Csharp” and have a “main” function inside this “Csharp class.” We have two string variables named “source” and “destination.” We initialize the “source” string variable with the file name, which doesn’t exist in the directory. And initialize the second variable, “destination,” with the new file name. After this, we utilize the try-catch method here. The “try” method works when the file exists in the directory; otherwise, it moves to the catch statement, which throws the exception.
In this try method, we have the File.Move() method, which we discussed in our first example. This method works if the file exists. If the file exists, then it moves the file and renames it. We have an “if” statement that checks if the file saved in the “source” variable does not exist, which means; the file is renamed. In the catch statement, we have “IOException,” which throws an exception while accessing the file. And stores this exception in “e.” We will print the exception also by using “ConsoleWriteLine.”

In the output, we see that it throws an exception that “file not found” because the path or name of the file is not correct, so it throws an exception. We must give the correct name and path for renaming that file; otherwise, it throws an exception.
Example # 4
We use the same example, i.e., example 3, and give the correct file name for renaming it. In this example, we give the name of the file that exists in the directory, and we rename the file with the help of the same code we discussed in example 3.
This code is the same as discussed in our previous example 3. But here, we store the correct file in the “source” variable and rename this file by using the same code. We discuss this code in example 3 in detail.

Just look at the output. If we give the correct path and correct file name for renaming the file, then our file is renamed successfully, and it doesn’t throw an exception.
Conclusion
In this tutorial, we have explained how to rename a file in C# programming. We have discussed this renaming file concept in detail and show you how to give the path and the file name for renaming the existing file. In this tutorial, we have used two different methods for renaming the existing file. We also show you what happens if the file does not exist. And how it throws exceptions when the file does not exist in the directory. I hope you will understand this tutorial, and it will be helpful for you when you want to rename your existing file.
Source: linuxhint.com