C# Mutex
Here, in this guide, we will explain to you how we use the Mutex class in C# programming. We provide different examples of using this Mutex() class in our C# program. We perform the given examples in Ubuntu 20.04.
Example # 1
We will perform an example using this Mutex() class. As we are using the Ubuntu 20.04 for performing these examples, we have to open the text editor of this Ubuntu 20.04 and then create a file with any name of our choice and save this file with the file extension of “.cs”. Then type the following code in this file. We also explain each line of this given program in detail below.
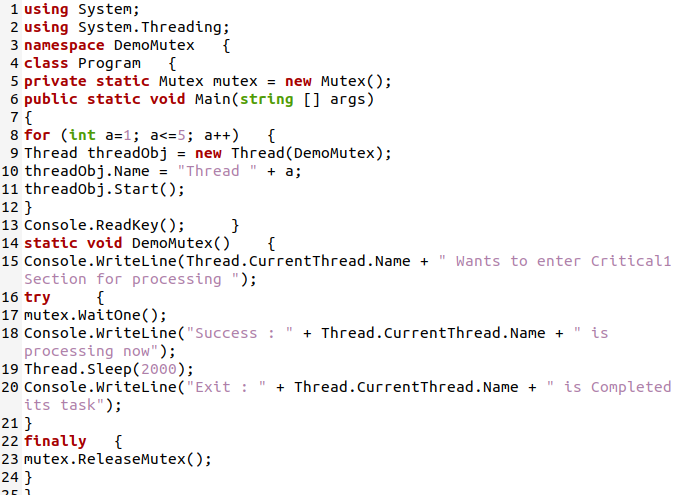
The first line of this C# code is “using System”, a library, and by using this library, we can get different classes and functions of our C# code. We get the “Console” class and “WriteLine” function by using this library. The keyword “using” is used for receiving parameters. The “System. Threading” is here for generating tasks and receiving objects from the class. Now, we will import the namespace with the name “DemoMutex”. We also created a class called “Program”. We create an instance called “mutex” which is equal to “new Mutex()”. The “new” is a keyword for creating a new instance.
Then call the “main” function in our C# code. In this “main” function, we have a “for” loop used to create five different threads. As this loop initializes “a” with “1”, the condition here is “a<=5” which means there are 5 iterations in the loop or the loop iterates 5 times and creacreatestiple threads. Each time the value of “a” increments when the loop executes and the condition is true. Then we create a Thread object with the name “threadObj” by using the “new” keyword. When this loop executes, it creates an object of the Thread. Now, we give the “name” to the “threadobj” which is equal to the value of “a”. It will store the name as “Thread” + a means the “Thread” and the value of “a” that “a” depends on the value of the loop iteration.
Then we have “threadObj.Start()” in which “Start()” is used for changing the state of the “threadObj” to the running state. Outside this “for” loop, we have “Console.ReadKey()”. This will use for waiting for a keypress. We have a method below this with the name “DemoMutex” which is “static”. We use this method for implementing synchronization using the “Mutex”. The “Console.WriteLine” is here for printing the statement written inside it. After this “Console.WriteLine” statement, we will use the “try” method.
Then again, we have the “Console.WriteLine” statement. When you see the output, it will be clear to you how this “Console.WriteLine” prints the given statement. The “Thread.Sleep(2000)” is for suspending or pausing the current thread’s execution for a time that is given as a parameter here. After this, we again use the “Console.WriteLine” statement. We use the keyword “keyword” to clean the resources that we allocate in the try block or the statement inside this “finally” block executed when the try statement leaves the control. Inside the “finally” statement, we will call the “ReleaseMutex” method, which is used for unblocking so that another thread starts the execution that is trying to execute.
We also give the output of this code in the image below. You can see how this code gives the output on the screen. We compile our code with this command, and when the code is error-free, it will create an exe file for us. This “exe” file is then executed by using the “mono” command. And remember that when we use this “mono” command, we must use the “.exe” file extension with the file name and then run this command to get the output.
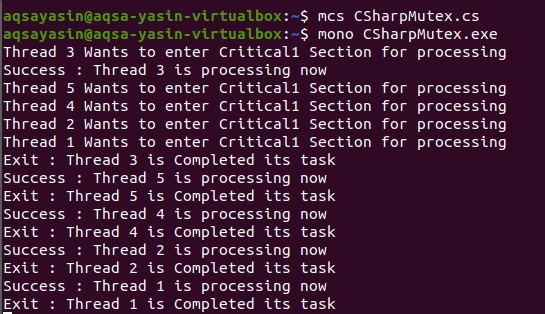
In this output, you can see that when one thread wants to enter the critical section, the other threads also want to enter, but they have to wait until the first thread completes execution because we use the Mutex “WaitOne()” function. When this thread completes its execution, the next thread enters and starts its execution and exists after completing its task. It allows the next thread to enter and start execution. The same steps are repeated until the condition is true.
Example # 2
Here, we have another illustration using the Mutex() method. Let’s try this example to understand this concept.
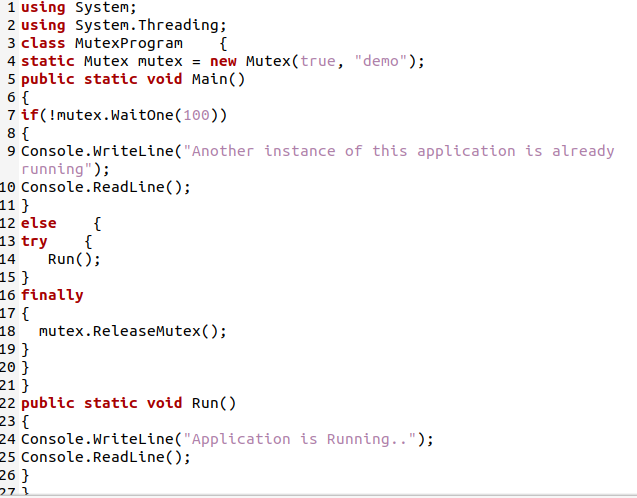
The same statements used in this C# code are “using System” and “System.Threading”. The class is “MutexProgram” and in the class, we have created an instance of the Mutex class with the name “mutex” by using the “new” keyword and then calling the “main” function below this. The WaitOne() method tries to get a lock. If the mutex is not available, then “WaitOne()” blocks and waits till it is available. We also specify a time limit here. If we call WaitOne() method on the “Mutex object” and the time limit passes without being able to acquire the Mutex, then WaitOne returns false. When it returns false, the statement written below will be executed: the “Console.WriteLine” statement. And this statement is used for printing.
If we get true, we go to the code section executed, which is the “Run()” function, and this function is defined below. When “Run()” ends, then the “finally” block executes, which releases the mutex using “MutexRelease”. We explain this “MutexRelease” in the previous code. We define the “Run()” function here in which we are going to print a statement using “Console.WriteLine()” and at last, we have the “Console.ReadLine()”. This “Console.ReadLine” is here for the reading of complete strings until the enter key is pressed.

The output only shows the “Run()” statements because it returns true and moves to the “Run()”. If we execute this on the other terminal simultaneously, then on the other terminal, it will show the statement which is written inside the if statement as it tries to get the “Mutex” but the “Mutex” is already in the use of another application, so it has to wait for the “Mutex” to release.
Conclusion
This tutorial explores the “Mutex” in C# programming. We demonstrate two examples here and use this “Mutex” so that you will understand this concept. This “Mutex” class will provide us with “WaitOne()” and “RealeaseMutex()” functions. This “WaitOne()” is used for locking, and the “ReleaseMutex()” is used for unlocking the task or thread. We use both methods in our examples and explain all these in detail. I hope you will learn this “Mutex” concept after a thorough study of this guide and also be able to use this “Mutex” class in your project.
Source: linuxhint.com