C++ Mutex Lock
C ++ is known to be one of the fastest programming languages with good performance, high precision, and an adequate memory management system. This programming language also supports the concurrent execution of multiple threads with the sharing of multiple resources between them. In multithreading, the thread is only to perform the read operation that makes no issues since the thread does not get affected by what the other threads are doing at that time. But if these threads had to share the resources between them, one thread can modify the data at that time which makes the issue. To deal with this problem, we have the C++ “Mutex” which prevents the access of multiple resources towards our code/object by providing the synchronization which states that the access to the object/code can be provided to only one thread at one time, so that multiple of threads would not be able to access that object simultaneously.
Procedure:
We will get to know how we can stop the access of multiple threads to an object at a single time using mutex lock. We will talk about the syntax of the mutex lock, what is multiple threading, and how we can deal with the issues caused by multiple threading using the mutex lock. Then, we will take an example of the multiple threading and implement the mutex lock on them.
Syntax:
If we want to learn how we can implement the mutex lock so that we may prevent the access of multiple threads simultaneously towards our object or code, we may use the following syntax:
$ mut_x. lock ();
Void func_name () {
$ // code we want to hide from the multiple threads would be written here
$ mut_x. unlocks ();
}
We will now use this syntax on the dummy example and in the pseudo code (that we can’t just run as it is in the code editor) to let you know how we can exactly use this syntax as mentioned in the following:
Void block () {
$ mut_x. lock ();
$ std :: cout << “hello”;
$ mut_x. unlocks ();
}
Example:
In this example, let’s try to create the multithread operation first and then surround this operation with mutex lock and unlock to provide the synchronization of operation to the code or object created. Mutex deals with race conditions which are the values that are quite unpredictable and they are dependent on the switching of the threads that are time conscious. To implement the example for mutex, we first need to import the important and required libraries from the repositories. The required libraries are:
$ # include <thread>
$ # include <mutex>
The “iostream” library provides us with a function to display the data as Cout, read the data as Cin, and terminate the statement as endl. We use the “thread” library to utilize the programs or functions from the threads. The “mutex” library allows us to implement both the mutex lock and unlock in the code. We use the “# include” because this allows all the programs related to the library included in the code.
Now, after the previous step is done, we define the mutex class or a global variable for the mutex using the std. Then, we create a function for mutex lock and unlock that we could call afterward in the code. In this example, we name this function as block. In the body of the block function, we first call the “mutex.lock()” and start writing the logic of the code.
The mutex.lock() denies the access of the other threads to reach our created object or code so that only one thread can read our object at one time. In the logic, we run a for loop that runs on the index from 0 to 9. We display the values in the loop. Once this logic is created in the mutex lock after its operation is done or after exiting the logic, we call the “mutex.unlock()” method. This method call allows us to unlock the created object from mutex lock since the object’s access to one single thread was provided earlier and once the operation on that object is done by one thread at one time. We now want the other threads to access that object or code, too. Otherwise, our code moves in the “deadlock” situation which causes the created object with the mutex to remain in the locked situation forever and no other thread would be able to access that object. Hence, an incomplete operation keeps on executing. After this, we exit the block function and move to the main.
In the main, we simply display our created mutex by creating the three threads using the “std :: thread thread_name (calling the already created block function here in which we created the mutex)” with the names thread1, thread2, and thread3, etc. This way, the three threads are created. We then join these three threads to be executed simultaneously by calling the “thread_name. join ()” method. And then, we return the value equal to zero. The previously mentioned explanation of the example is implemented in the form of the code that can be shown in the following figure:

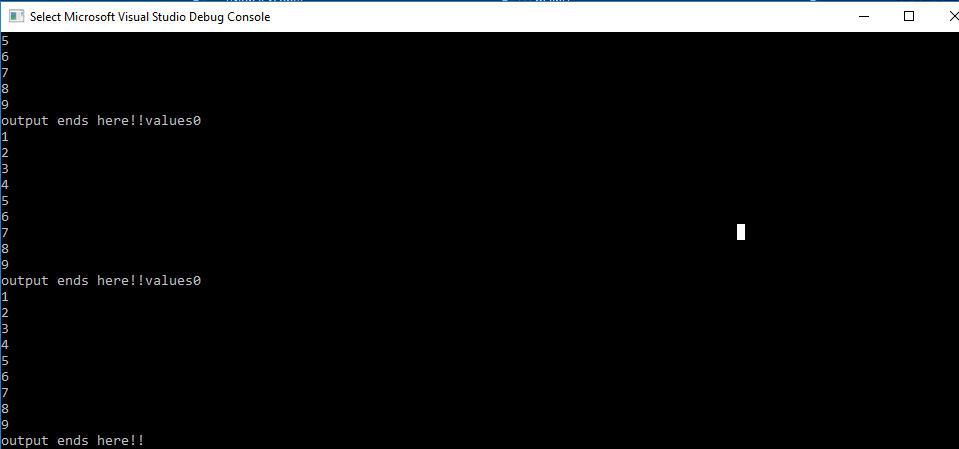
In the output of the code, we can see the execution and display of all the three threads one by one. We can see even if our application falls under the category of multithreading. Still, none of the threads has overwritten or modified the data and shared the modified resource because of the implementation of the mutex of the “function block”.
Conclusion
This guide gives a detailed explanation of the concept of the mutex function used in C++. We discussed what are the multithreading applications, what problems we have to encounter in multithreading applications, and why we need to implement the mutex for multithreading applications. We then discussed the syntax for the mutex with the dummy example using the pseudo-code. Then, we implemented a complete example on the multithreading applications with the mutex on the C++ visual studio.
Source: linuxhint.com
C++ Mutex Lock
C ++ is known to be one of the fastest programming languages with good performance, high precision, and an adequate memory management system. This programming language also supports the concurrent execution of multiple threads with the sharing of multiple resources between them. In multithreading, the thread is only to perform the read operation that makes no issues since the thread does not get affected by what the other threads are doing at that time. But if these threads had to share the resources between them, one thread can modify the data at that time which makes the issue. To deal with this problem, we have the C++ “Mutex” which prevents the access of multiple resources towards our code/object by providing the synchronization which states that the access to the object/code can be provided to only one thread at one time, so that multiple of threads would not be able to access that object simultaneously.
Procedure:
We will get to know how we can stop the access of multiple threads to an object at a single time using mutex lock. We will talk about the syntax of the mutex lock, what is multiple threading, and how we can deal with the issues caused by multiple threading using the mutex lock. Then, we will take an example of the multiple threading and implement the mutex lock on them.
Syntax:
If we want to learn how we can implement the mutex lock so that we may prevent the access of multiple threads simultaneously towards our object or code, we may use the following syntax:
$ mut_x. lock ();
Void func_name () {
$ // code we want to hide from the multiple threads would be written here
$ mut_x. unlocks ();
}
We will now use this syntax on the dummy example and in the pseudo code (that we can’t just run as it is in the code editor) to let you know how we can exactly use this syntax as mentioned in the following:
Void block () {
$ mut_x. lock ();
$ std :: cout << “hello”;
$ mut_x. unlocks ();
}
Example:
In this example, let’s try to create the multithread operation first and then surround this operation with mutex lock and unlock to provide the synchronization of operation to the code or object created. Mutex deals with race conditions which are the values that are quite unpredictable and they are dependent on the switching of the threads that are time conscious. To implement the example for mutex, we first need to import the important and required libraries from the repositories. The required libraries are:
$ # include <thread>
$ # include <mutex>
The “iostream” library provides us with a function to display the data as Cout, read the data as Cin, and terminate the statement as endl. We use the “thread” library to utilize the programs or functions from the threads. The “mutex” library allows us to implement both the mutex lock and unlock in the code. We use the “# include” because this allows all the programs related to the library included in the code.
Now, after the previous step is done, we define the mutex class or a global variable for the mutex using the std. Then, we create a function for mutex lock and unlock that we could call afterward in the code. In this example, we name this function as block. In the body of the block function, we first call the “mutex.lock()” and start writing the logic of the code.
The mutex.lock() denies the access of the other threads to reach our created object or code so that only one thread can read our object at one time. In the logic, we run a for loop that runs on the index from 0 to 9. We display the values in the loop. Once this logic is created in the mutex lock after its operation is done or after exiting the logic, we call the “mutex.unlock()” method. This method call allows us to unlock the created object from mutex lock since the object’s access to one single thread was provided earlier and once the operation on that object is done by one thread at one time. We now want the other threads to access that object or code, too. Otherwise, our code moves in the “deadlock” situation which causes the created object with the mutex to remain in the locked situation forever and no other thread would be able to access that object. Hence, an incomplete operation keeps on executing. After this, we exit the block function and move to the main.
In the main, we simply display our created mutex by creating the three threads using the “std :: thread thread_name (calling the already created block function here in which we created the mutex)” with the names thread1, thread2, and thread3, etc. This way, the three threads are created. We then join these three threads to be executed simultaneously by calling the “thread_name. join ()” method. And then, we return the value equal to zero. The previously mentioned explanation of the example is implemented in the form of the code that can be shown in the following figure:
In the output of the code, we can see the execution and display of all the three threads one by one. We can see even if our application falls under the category of multithreading. Still, none of the threads has overwritten or modified the data and shared the modified resource because of the implementation of the mutex of the “function block”.
Conclusion
This guide gives a detailed explanation of the concept of the mutex function used in C++. We discussed what are the multithreading applications, what problems we have to encounter in multithreading applications, and why we need to implement the mutex for multithreading applications. We then discussed the syntax for the mutex with the dummy example using the pseudo-code. Then, we implemented a complete example on the multithreading applications with the mutex on the C++ visual studio.
Source: linuxhint.com