C++ Map Functions
For two primary purposes, C++ programmers may find the map structure useful. First, by use of the key, a map enables quick and easy accessibility to the value. Creating any type of index or pointer can benefit from this attribute. A key must be unique throughout the integrated data framework, which the map provides to do. This prevents data duplication; therefore, it is another benefit of using the map.
For example, if you’re creating a trading app and have to keep asset values by ticker sign, a map is a useful approach due to these two benefits. A map would be an efficient method to provide and check the existing weather in many cities all over the world if we had been developing a weather app. We will probably use a map at an online marketplace to locate products by brands or categories.”
When to Avoid Using a C++ Map?
C++’s map function is suitable for efficiently locating values by key. But, finding elements of the map by the use of an integer involves traversing the complete map one time. Iterating through a map might become time-consuming as a map grows in size if we would like to be able to locate values in it. A bi-directional map is provided by the Boost module, which makes it more effective when we fetch the data frequently. Because the standard C++ module does not contain this data model, the user must either acquire the Boost library on every computer where the program is executed or integrate the Boost package as part of the static linking.
A map might not be the best structure to employ if we realize that we need to find a map by element in a straightforward application. Use a C++ array, buffer, stack, or any other data type that could make the application easier to understand and more effective.
Let’s discuss the working of map functions in C++.
Example no 1
We will run the code in this instance to show how to implement map functions. We may iterate the map’s components. To do this, we only need to construct an iterator and then utilize it.
#include <iterator>
#include <map>
using namespace std;
int main()
{
map<int, int> assignment1;
assignment1.insert(pair<int, int>(2, 60));
assignment1.insert(pair<int, int>(4, 80));
assignment1.insert(pair<int, int>(6, 70));
assignment1.insert(pair<int, int>(8, 90));
assignment1.insert(pair<int, int>(10, 50));
assignment1.insert(pair<int, int>(12, 80));
assignment1[14]=40;
map<int, int>::iterator itr;
cout << "\nThe map of the assignment1 is : \n";
cout << "\tKEY\tELEMENT\n";
for (itr = assignment1.begin(); itr != assignment1.end(); ++itr) {
cout << ‘\t‘ << itr–>first << ‘\t‘ << itr–>second
<< ‘\n‘;
}
cout << endl;
map<int, int> assignment2(assignment1.begin(), assignment1.end());
cout << "\nThe map of the assignment2 after"
<< " assign from assignment1 is : \n";
cout << "\tKEY\tELEMENT\n";
for (itr = assignment2.begin(); itr != assignment2.end(); ++itr) {
cout << ‘\t‘ << itr–>first << ‘\t‘ << itr–>second
<< ‘\n‘;
}
cout << endl;
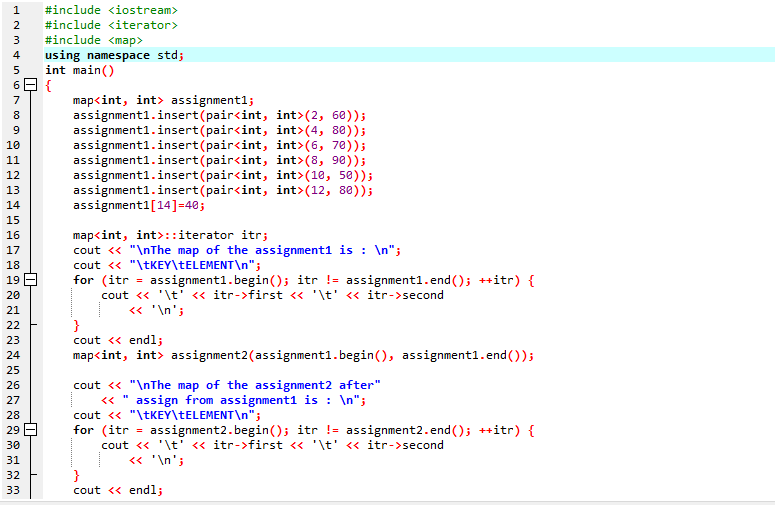
Here we are going to integrate the required header files. <iostream> <iterator> and <map> at the commencement of the code. Now we invoke the main() function. We will utilize the map command. Within this command, we initialize two integers. Now we have to insert different random values of elements. So we have been using the function insert().
The “pair” argument will have two integers. We specify the values of 6 different assignments. Now we have to utilize another method of introducing the value in a map. Then we will print the map assignment by using the map command. Along with this, we use an iterator. The “cout” statement is being used to print the line. Then the “cout” statement will be used to show the keys and elements. Then we do an increment in the value of “itr”. Next, we will use the “cout” statement. We have created a pointer that points to the iterator. We will use the ‘endl’ term to do coding in the next line.
Now we will assign the items from assignment1 to assignment2. We will again use the map command. Along with this, we have been utilizing the begin() and end() function assignment1. These functions are used to start and terminate the values of assignment1. Now we will demonstrate all the elements of the needed map. The “cout” statement will be applied to print the line “the map of assignment2 after assign from assignment1 is”. Then “cout” is used to show the keys and elements.
Once again, we apply the “for” loop. We have to satisfy the condition. Then we do an increment in the iterator. We will construct the pointer of the first and second elements of assignment1. To start the code from the new line, we use “endl”. Now we will remove all the items up to the element having the “3” key value in assignment1.
" elements having the key value of less than 3 : \n";
cout << "\tKEY\tELEMENT\n";
assignment2.erase(assignment2.begin(), assignment2.find(3));
for (itr = assignment2.begin(); itr != assignment2.end(); ++itr) {
cout << ‘\t‘ << itr–>first << ‘\t‘ << itr–>second
<< ‘\n‘;
}
int n;
n = assignment2.erase(4);
cout << "\nassignment2.erase(4) : ";
cout << n << " removed \n";
cout << "\tKEY\tELEMENT\n";
for (itr = assignment2.begin(); itr != assignment2.end(); ++itr) {
cout << ‘\t‘ << itr–>first << ‘\t‘ << itr–>second
<< ‘\n‘;
}
cout << endl;
cout << "assignment1.lower_bound(10) : "
<< "\tKEY = ";
cout << assignment1.lower_bound(10)–>first << ‘\t‘;
cout << "\tELEMENT = " << assignment1.lower_bound(10)–>second
<< endl;
cout << "assignment1.upper_bound(10) : "
<< "\tKEY = ";
cout << assignment1.upper_bound(10)–>first << ‘\t‘;
cout << "\tELEMENT = " << assig>nment1.upper_bound(10)–>second
<< endl;
return 0;
}
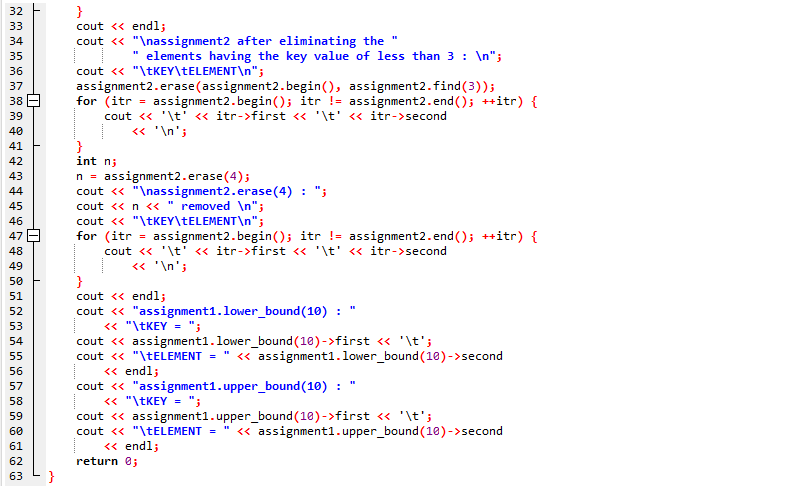
The “cout” statement is being employed to print the statement “assignment2 after eliminating the elements having the key value less than 3”. The “cout” statement also prints the keys and their values. We have applied the erase() function. Here we have been using the begin() method. Due to this function, it begins the key values of assignment2. Then we have to utilize the find() method to acquire the element in the map. We use the begin() and end() function, which is associated with the iterator. Then we construct the pointer of the first and second element of the iterator and use the “cout” statement to print these values.
Now we want to eliminate the element which has key value 4. By doing this, we have to initialize the “n” variable. The data type of this variable is an integer. Then we will be using the erase() function. This function contains the parameter of the value which we want to be removed. The “cout” statement will be used to delete that element. Once again, we have been using the “for” loop and the pointer of the iterator. We will print the lower limit and upper limit of the map for assignment1 by using the “cout” statement.
In the next line, we will utilize the “cout” statement to create a pointer that points to the second value of assignment1. We also enter the “endl” keyword to go to the next line for coding. Now the upper_bound() method of assignment1 will be called. The pointer will be created to point to the second value of the upper bound of assignment1.

Example no 2
In this illustration, the key value and the value linked with the key both have different data types. It is not possible to configure the values one at a time; they must be provided in pairs.
#include <iostream>
#include <map>
#include <utility>
using namespace std;
int main()
{
map<int, string> Workers;
Workers[221] = "Anikaa";
Workers[320] = "Zeeshan";
Workers[345] = "Daniyal";
Workers[237] = "Dania";
Workers[189] = "Azka";
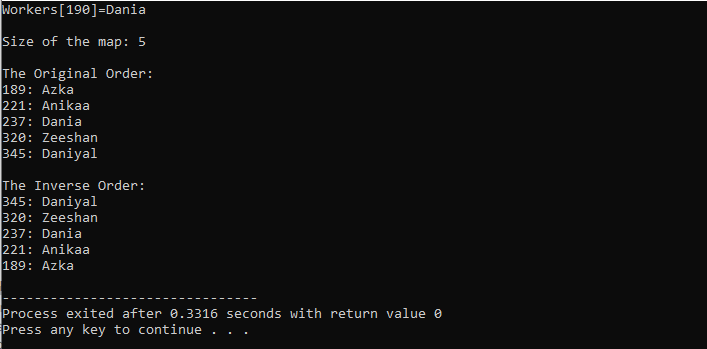
cout << "Workers[190]=" << Workers[237] << endl << endl;
cout << "Size of the map: " << Workers.size() << endl;
cout << endl << "The Original Order:" << endl;
for( map::iterator jj=Workers.begin(); jj!=Workers.end(); ++jj)
{
cout << (*jj).first << ": " << (*jj).second << endl;
}
cout << endl << "The Inverse Order:" << endl;
for( map::reverse_iterator jj=Workers.rbegin(); jj!=Workers.rend(); ++jj)
{
cout << (*jj).first << ": " << (*jj).second << endl;
}
}
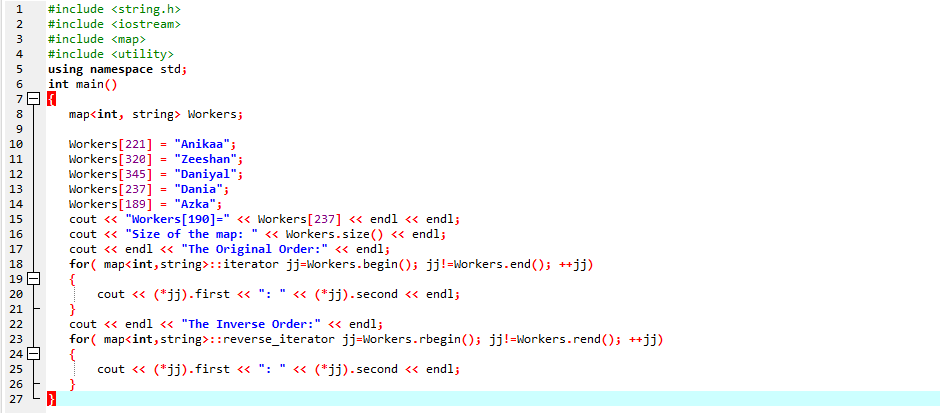
At the start of the program, we will include four important libraries, which include <string.h>, <iostream>, <map>, and <utility>. After all, the standard namespace will be used as a std. We construct the map of the workers. We will provide two data types as the arguments of the map. The data type includes integer and string. Now we are going to assign the ids to the workers respectively. We utilize the array index format to allocate the values. The “cout” statement is being used to show the name of the worker whose id is 190.
Further, we have been using the “cout” statement to display the map size. The size will be printed after the statement “Size of the map”. Next, the “cout” statement will be used to display the original order of the ids. Within for loop, we will use the “map” command. We initialize the string and iterator. Then we start the map of the workers by using the begin() method. To terminate the map of the workers, we have been using the end() function.
In the last portion of the “for” loop, we have increased the value of the iterator. The “cout” statement will be used to show the elements of the map. Then we will again use the “cout” statement to show the line “The inverse Order”. We will utilize the begin() and end() method to start and terminate the elements of the map. We will iterate the elements until the condition is fulfilled. In the end, the “cout” statement is used to print the elements in a reverse manner.
Example no 3
A few of the map functions are used in the succeeding program. Before iterating for such a value that matches a specific key, it initially adds other items to the map.
#include <iostream>
#include <map>
#include <utility>
using namespace std;
int main()
{
map<int, string> Std;
Std.insert ( std::pair<int, string>(736,"Jamil") );
Std.insert ( std::pair<int, string>(233,"Dua") );
Std.insert ( std::pair<int, string>(837,"Aima") );
Std[348] = "Snobar";
Std[646] = "Tania";
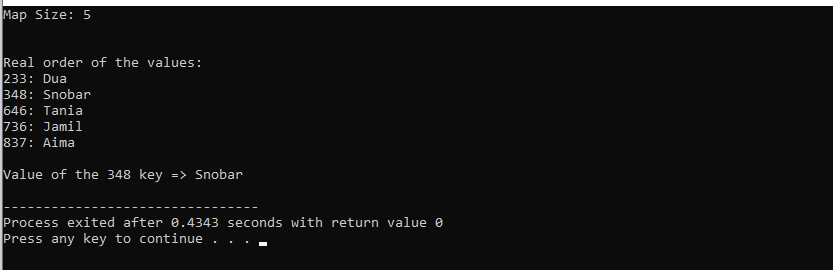
cout << "Map Size: " << Std.size() << endl << endl;
cout << endl << "Real order of the values:" << endl;
for( map::iterator iter=Std.begin(); iter!=Std.end(); ++iter)
{
cout << (*iter).first << ": " << (*iter).second << endl;
}
std::map<int, string>::iterator it = Std.find(348);
if (it != Std.end()){
std::cout <<endl<< "Value of the 348 key => " << Std.find(348)–>second << ‘\n‘;
}
}
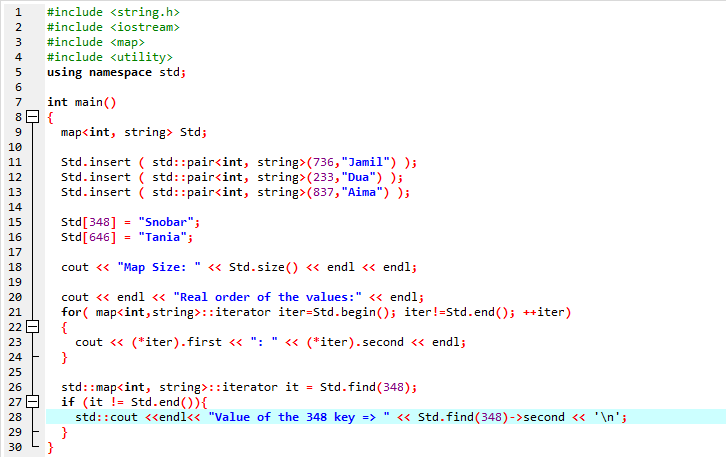
First of all, we will incorporate the header files. The header file <string.h> deals with the strings in the code. The header file <iostream> deals with the input and output functionalities. The header file <map> deals with the map. And the last header file <utility> deals with the utility functionalities. Let’s start the coding in the body of the main() 0f function. We will run the “map” command. With the help of this, we will initialize a map by the keys and their appropriate values. The data type of the keys is an integer, and the data type of their values is “string”.
Now we will insert the marks and the names of students in the map with the help of the insert() function. We use this function to add the data of the three students. Next, we will use the array index format to insert the marks and names of the students. The data of two students will be inserted by using the array index format.
Further, we will apply the “cout” method. The “cout” statement displays the line “Map size” on the screen before the map. Within this “cout” statement, we will use the size() method. Now we will show the names and the numbers of the students in the original format. The “cout” statement is being used to print the text “Real order of the values”. We utilize the “endl” command on both sides of this text to print this text on a separate line. Now we have been using the “for” loop. We will also utilize the begin() function to start printing the first name and marks of the student on a map.
Similarly, the end() method is being used to show the last name of the student on a map. The “cout” statement will show these first and last values. At the end of the program, we will use another map function to find(). We want to discover the name of the student, whose number is 348. So we will call the find() method. We use std::map and std::iterator. Then we have been using the “if” condition. We apply the end() map function to fulfill the “if” condition. To print the name of the student whose marks are 348, we will employ the std::cout method. We also create the pointer, which points to the second value of the map.
Conclusion
We have discussed a C++ map and how to utilize map functions in this article. We briefly demonstrated adding items and retrieving them by the use of the map in different examples. Maps are the component of the Standard Template Library. Maps are associative receptacles that contain ordered key-value pairs; almost every key is distinct and may only be added or completely removed. Key values can have their related values that will be modified. In a map, the defined values hold the data relating to the key, whereas the key values are typically utilized to arrange and identify particular components.
Source: linuxhint.com