Bit Masking in C++
Syntax of Bit Masking in C++
Bitwise operators and bit patterns can be used in C++ to provide bit masking. Here is an illustration of bit masking syntax. First, we utilize the bitwise OR operator (|) with a bit pattern that contains a “1” in the location of the bit that we wish to set and a “0” in all other positions to set a specific bit in an integer variable.

Second, the bitwise AND operator (&) with a bit pattern contains a “0” in the location of the bit that we wish to clear and a “1” in all other positions to clear a specific bit in an integer variable.

Third, we use the bitwise XOR operator () and a bit pattern with a “1” in the location of the bit that you wish to toggle and a “0” in all other positions to toggle a specific bit in an integer variable.

Utilizing the Bit Masking in Converting the 32-Bit Color Code to RGB Value
To understand the concepts, we demonstrate a simple example where we convert the 32-bit color code of red, green, and yellow into RGB values. First, we include the basic header files in the program. By including this header file, we gain access to several useful classes and functions to work with input and output operations.
Then, we build three-bit masks with the following hexadecimal values: redMask with a value of 0xFF0000, greenMask with a value of 0x00FF00, and blueMask with a value of 0x0000FF. We can now extract the specific RGB values because of this. We use the bit masks to separate the bits that correspond to the color code of red, green, and blue values.
Then, we apply each bit mask to the color code using the bitwise AND operator (&). With all other bits set to 0, the outcome is a new binary value that only contains the bits that correspond to the red, green, or blue value depending on the RGB value that we extract. The bits are then shifted to the right by the necessary number of positions using the right shift operator (>>).
The bits that we wish to extract are not in the least significant bit position, that’s why this is required. RedValue, greenValue, and blueValue are integer variables that hold the extracted red, green, and blue values, respectively. To confirm that we properly retrieved the right RGB values from the color code, we output these values using the cout commands.
using namespace std;
int main()
{
int colorCode = 0x7FFFB5;
int redMask = 0xFF0000;
int greenMask = 0x00FF00;
int blueMask = 0x0000FF;
int redValue = (colorCode & redMask) >> 16;
int greenValue = (colorCode & greenMask) >> 8;
int blueValue = colorCode & blueMask;
cout << "Red: " << redValue << endl;
cout << "Green: " << greenValue << endl;
cout << "Blue: " << blueValue << endl;
return 0;
}
Here is the output of the previously-implemented example:

Performing Different Bitwise Operations on Two Integers
This code demonstrates how to perform the different bitwise operations on two integers. First, we add the “iostream” library so that we can get the input and output. Next, we use the keyword to bring the entire std namespace into the current scope of our program. Then, we call the main() function. In the main() function, we define two integer variables, “a” and “b”, and give each of them the numbers 10 which is binary 1010 and 12 which is binary 1100. Then, we use the bitwise AND, OR, XOR, NOT, left shift, and right shift operators.
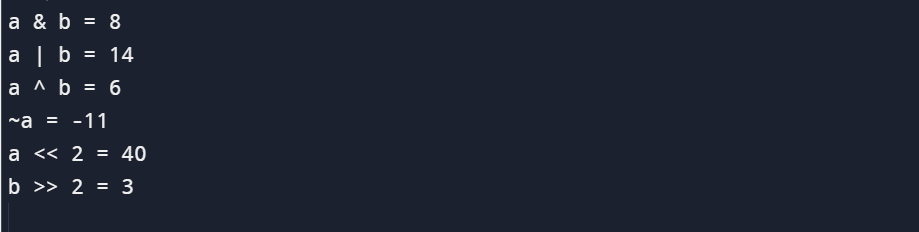
First, we perform the bitwise AND operation. The two integer variables “a” and “b” are bitwise operated on using the bitwise AND operator. The binary representations of “a” and “b” are compared using the & operator which creates a new value with each bit set to “1” if and only if both input bits are “1”. So, the value of c is assigned to the result of the bitwise AND operation which is 8 (binary 1000).
The bitwise OR operation is done next. If either of the input bits is “1”, the OR operator compares the bits in the binary representations of “a” and “b” and creates a new value in the “d” variable with each bit set to “1”.
Now, moving on to the next operation is bitwise XOR. In XOR, the two input values “a” and “b” are bitwise combined and produce the output 6 that is stored in “e” variable. Next, we have a NOT operator that is applied to the single input value. The bitwise NOT operation flips all of the bits in the value and adds “1” to the result. So, we get the “-11” output (binary 11111111111111111111110101) in the “f” variable.
using namespace std;
int main() {
int a = 10;
int b = 12;
int c = a & b;
cout << "a & b = " << c << endl;
int d = a | b;
cout << "a | b = " << d << endl;
int e = a ^ b;
cout << "a ^ b = " << e << endl;
int f = ~a;
cout << "~a = " << f << endl;
int g = a << 2;
cout << "a << 2 = " << g << endl;
int h = b >> 2;
cout << "b >> 2 = " << h << endl;
return 0;
}
The next operator is the left shift operator () which moves the input value’s bits to the left by a predetermined number of places. The a << 2 produces the output 40 of binary value 101000 because the bits of “a” are shifted two positions to the left. Similar to the left shift operator, the right shift operator (>>) moves the bits of the input value to the right by a predetermined amount, so b >> 2 results in output 3. At the end of the program, we return “0” to the main() function so that the execution of the program stops and it displays the output.
Conclusion
This article demonstrated what bit masking in C++ programming is. We have many operators to carry out the various bit masking operations. To better comprehend the idea, we practiced the various scenarios as well as learned how to implement the bit masking in C++ programming language.
Source: linuxhint.com