Bash Cut Command with Examples
Linux provides us with many commands and utilities that allow us to cut out pieces and parts of specific files and process and filter those files. “cut” is also a command line utility in Linux that allows us to cut specific parts and sections of files and show us the data as standard output by printing it. We can use it to cut out the parts of files by delimiter, field, bytes, position, and characters.
Cut breaks up a line and takes out the text in it. It is mandatory to provide the options while writing the command; otherwise it will throw an error. If we operate on multiple files by providing more than one file name, then data from both files will not be preceded by its name. This command comes with a list of options that are as follows:
-f (–fields= LIST): Selects using a field specified by the user.
-b(–byte= LIST): Selects using a byte specified by the user.
-c(–character= LIST): Selects using a character specified by the user.
-d(–delimiter): It uses a default “TAB” delimiter but if we specify the delimiter using the option, it will use the specified delimiter.
–complement: It instructs the “cut” command to execute all characters, bytes, or fields instead of the selected part.
-s(–only-delimited): By default, the lines that contain delimiters are not printed. Specifying –s along with the cut command instructs it to not print the lines that do not have any delimiter.
–output-delimiter: It is specified for using the string as an output. By default, the string acts as an input.
–help: It is used to view the help manual.
–version: It is used to verify the version.
These are the options that we already discussed above.
If we want to cut from a specific file, we will have to specify the filename at the end of our command. We can cut single or multiple bytes depending on our requirements.
Syntax:
The syntax to use the cut command is shown below where any option can be any flag that is used to perform additional operations on the content that is to be cut from the file. We can use multiple options at a time. [File] parameter takes the name of the file that we want to extract from. If we do not specify the file name to our “cut” command, it will read from the standard input and start working according to it. In that case, this command will filter the “pipeline”
Example no. 1:
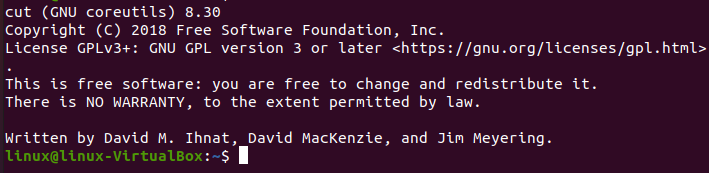
In this example, we will use the cut command to have a better understanding of how the cut command works. Let us first verify the version of the cut we have right now. For that, we will run the below-mentioned command.
To verify the version of the cut, we will simply run the cut command along with the “version” flag that we have studied above. As displayed in the snippet, in our case it is the 8.30 version.
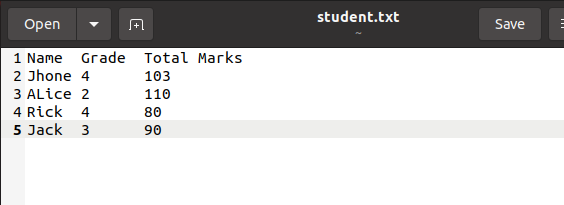
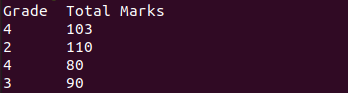
Let us suppose we have a file in our home directory that stores the data of five students along with their “names”, “grades” and “marks”.
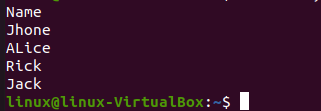
Printing Some Bytes of FileNow, we will perform some actions on this file using the cut command. For printing the bytes of the file, we will simply run the command that is displayed below.
When we try to run the above command, it will give the output as can be seen below in which it enlisted the number of bytes starting from 1 to 6, which are the names of the students.
Printing the Range of Bytes
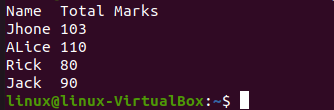
Same as above, we can also print the multiple ranges of bytes. Let us suppose we want to print the name along with the marks of the students. For that, we will range from 1 to 6 and then from 14 to 24.
After running the above command, we will get the output displayed below in which the name and total marks of the students are displayed.
Displaying the Content from the Start or End Position
To print the content from the starting specified point, we will simply run a single command that is mentioned below. Let us suppose we want to print the character from the index “6”.
As shown below, the characters from index 7 up to the last index have been displayed in our terminal. This included the students’ grades and marks.
Same as above, we can instruct the cut command to print the content to the limited index. For that, we will run the command that is mentioned in the next line.
When we run this command, we will get the content from the start of the index “1” until the index “13” is reached. As shown below, in the output, the name and the grades only are displayed where the marks of the students are excluded.

Using Cut Command by Fields
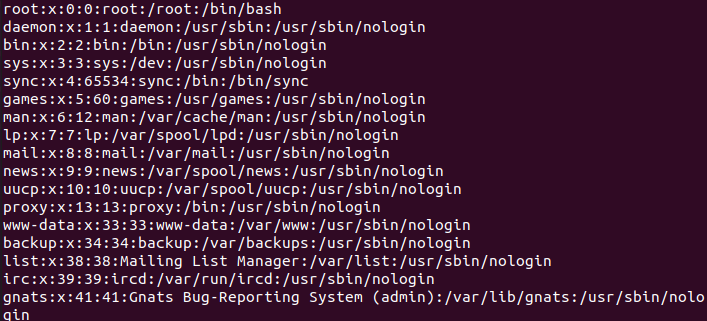
Now, we will try another file to cut the content using fields. For that, we will be using the “/etc/passwd” file. Let us check the user’s details that are allowed to access this system, for this we will run the cat command along with the file name as listed below.
Below are the details of the users that are allowed to access the system.
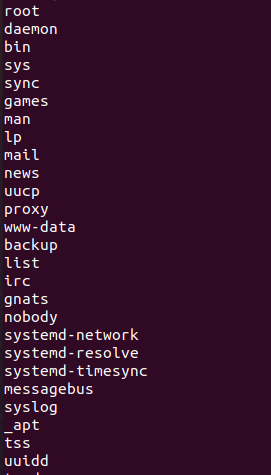
Now, it contains all details of the users. But we just want the names of the users, for that we will run the following command.
After running the above command in which, we specified the cut command to just print the first field of the file using the delimiter “:”.
Conclusion
Today we introduced you to the Linux command “cut” which is used to cut some part of the specified portion of any file. After giving its overview, we explained the syntax and performed some operations of cutting the portions from files to make it easy for you to understand the concept of the cut command.
Source: linuxhint.com