Apply Yaml Manifest Using “kubectl apply”
This blog will demonstrate:
- What is the “kubectl apply” Command?
- What is the Difference Between “kubectl create” and “kubectl apply” Command?
- Prerequisite: Install kubectl, minikube, and Docker Desktop
- How to Apply Yaml Manifest to Create a Pod Using the “kubectl apply” Command?
- How to Apply Yaml Manifest to Create a Deployment Using “kubectl apply” Command?
- How to Apply Yaml Manifest to Create a ConfigMap Using “kubectl apply” Command?
- Conclusion
What is the “kubectl apply” Command?
Users can create and configure the Kubernetes resources imperative and declaratively. In the declarative approach, the resource configuration instructions are encapsulated in the Yaml file in the form of a key-value pair. After that, these instructions are applied in the Kubernetes cluster to create and run the Kubernetes resources. The “kubectl apply” command is the Kubectl command that is used to apply the Yaml manifest to deploy the Kubernetes resources such as Kubernetes deployment, pods, and configmap declaratively.
Syntax
To apply the Yaml manifest using the “kubectl apply” command, the following syntax will be used:
Options
The “kubectl apply” command supports different options to provide extra functionality or to specify how to deploy Kubernetes resources. Some commonly used options are listed below in the given table:
| Option | Description |
| –all | It is utilized to select and access all resources in the namespace of the resource types. |
| –cascade | Its value can be “background”, “foreground”, or “orphan”. It is used to choose the deletion cascading strategy. |
| –dry-run=’none’ | Its value can be “none”, “server”, or “client”. If the value is client, it will only show or print the object that would be sent.
If the value is server, it will only submit server-side requests. |
| -f, –filename | It is used to specify the file that contains the configurations to apply. |
| –force | Its default value is false. But, if it is true, it will quickly delete the resources from the API object and bypass graceful deletion. |
| –grace-period=-1: | It is a time period, and its value range is “-1, 0, 1”. It is used to give the time to the resource for graceful termination. Ignored if negative. If its value is “1”, it will quickly terminate or shut down. |
| -k, –kustomize | It is utilized to process a kustomization directory. This option cannot be used with -f or -R. |
| –openapi-patch | By default, its value is false. But if it is set as true, it will use openapi to find the diff when the openapi presents and the resource can be found in the openapi spec. |
| –overwrite | It is used to automatically resolve conflicts between the modified and live configuration by providing the value of the modified configuration |
| –prune | By default, its value is set as false. But if it is true, it will automatically remove the objects that are removed from the configs and are created by kubectl apply or kubectl create –save-config. |
| -R, –recursive | It is used to read the folder that is used in the -f option recursively. It is helpful when users want to manage all related manifests within the same directory. |
| -l, –selector | It is a label or selector. Its value can be ‘=’, ‘==’, and ‘!='(e.g. -l key1=value1,key2=value2). |
| –server-side | By default, it is false. But if true, it will execute on the server instead of on the client. |
| –timeout=0s | It is used to specify the time period in which an object waits before giving up on a delete. If its value is set as “0s”, it means determining a timeout from the size of the object. |
| –validate | Its value can be “strict”, “warn”, or “ignore”. If it is “strict”, it will validate the input.
If its value is “warn”, it will warn about duplicate and unknown fields. If its value is “ignore”, it will not perform any validation. |
| –wait | If its value is set as true, it will wait for resources to be gone before returning. |
What is the Difference Between “kubectl create” and “kubectl apply” Command?
The “kubectl create” and “kubectl apply” both commands can be used to create and deploy the Kubernetes resources. However, both commands are not similar and totally used in different ways.
To take a deep insight into the difference between the “kubectl create” and “kubectl apply” commands, go through the following table:
| kubectl create Command | kubectl apply Command |
| This command creates the Kubernetes resources | This command creates or applies the configuration on Kubernetes resources. |
| It follows the imperative approach and specifies the series of steps to achieve the goal. | It follows the declarative approach and specifies the desired outcome or result and does not require to achieve result or goal on each step. |
| It does not apply the configuration on existing Kubernetes resources (always create new ones) | It applies the configuration or modification on existing Kubernetes resources. |
| If the Kubernetes resource already exists, it will show the error every time(already exists). | If this command is executed, this will never show an error and apply the configurations on existing resources. |
Prerequisite: Install kubectl, minikube, and Docker Desktop
To apply the yaml manifest on Kubernetes resources or to deploy the Kubernetes resources using the “kubectl apply” command, first, install the following tools on the system:
- Kubectl Tool: Kubectl is a Kubernetes command line tool that manages, controls, and deploys the Kubernetes cluster and its resources such as Kubernetes Pods, Deployment, and ConfigMap.
- Minikube Tool: Minikube is a Kubernetes cluster implementation system that provides a virtual machine on the system using different tools such as HyperV to start the Kubernetes cluster. It can execute single-node clusters and is utilized for testing.
- Docker Desktop: Docker Desktop is a containerization application that develops, deploys, and shares the application in containers. It gives support to the minikube to run the Kubernetes cluster.
To get started with Kubernetes and to install essential components like “kubectl” and “minikube”, go through our linked “Get Started With Kubernetes and Kubectl” article. To install the Docker Desktop, follow our associated “Install Docker Desktop on Windows” article.
How to Apply Yaml Manifest to Create a Pod Using the “kubectl apply” Command?
The Pods are smaller units of the Kubernetes cluster that encapsulate the containerized application and shared volume. To create the Pod or to apply the configuration on the existing pod using the “kubectl apply” command, go through the following demonstration.
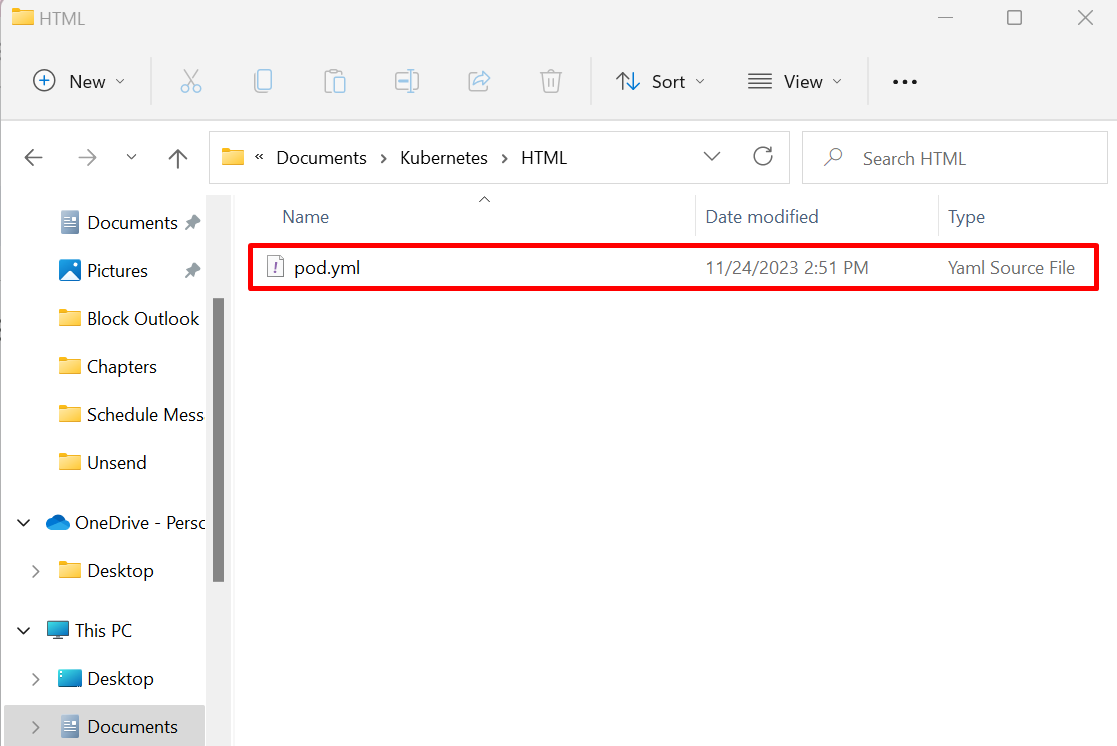
Step 1: Create “pod.yml” File
To create the Pod or to apply the declarative configuration on Pod, first, create the Yaml file named “pod.yml”:
After that, paste the following instructions into the file:
kind: Pod
metadata:
name: nginx-pod
spec:
containers:
- name: nginx
image: nginx:stable-perl
ports:
- containerPort: 80
In the above instructions:
- “kind” key specifies the Yaml manifest type. This will apply the configuration on Pod.
- “name” key is used to specify the name of Pod.
- “containers” key is utilized to deploy the container inside the pod.
- “name” under the “containers” key defines the name of the container.
- “image” defines the base image to containerize the application.
- “ports” key is used to specify the port where the container can be exposed.
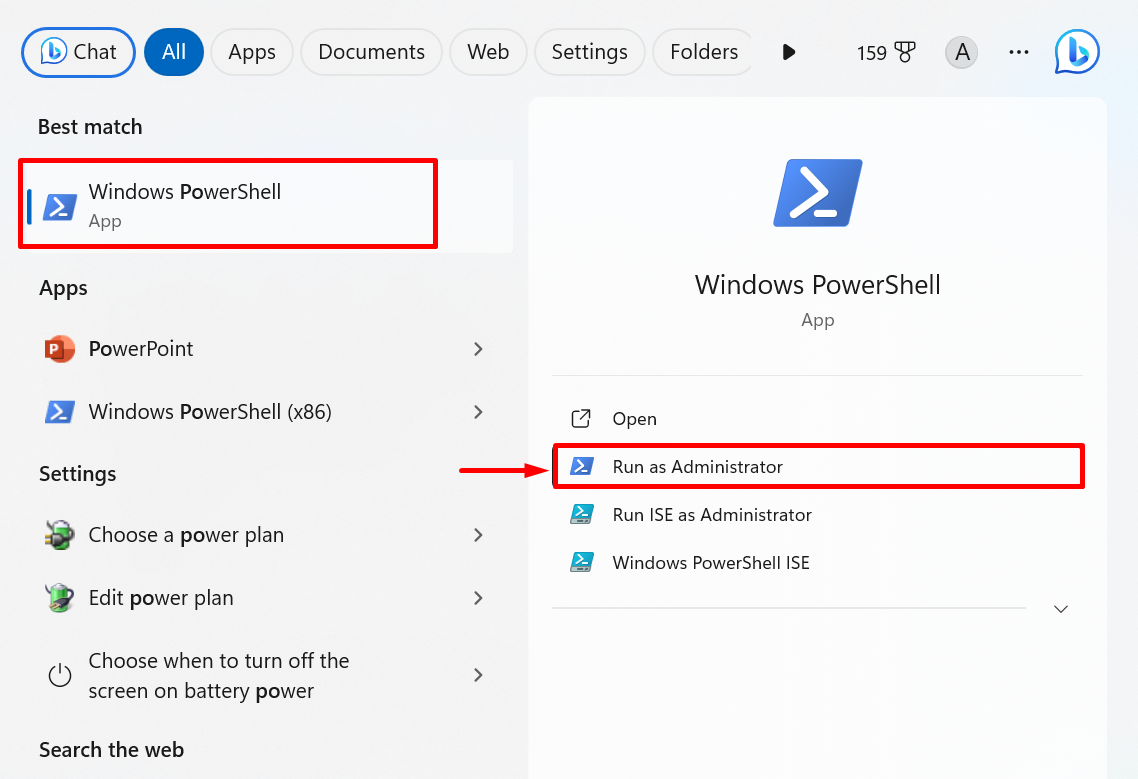
Step 2: Launch Windows PowerShell
Launch the Windows PowerShell with administrator rights via the Start menu:
Step 3: Start Kubernetes Cluster
Next, start the Kubernetes cluster using the below command:
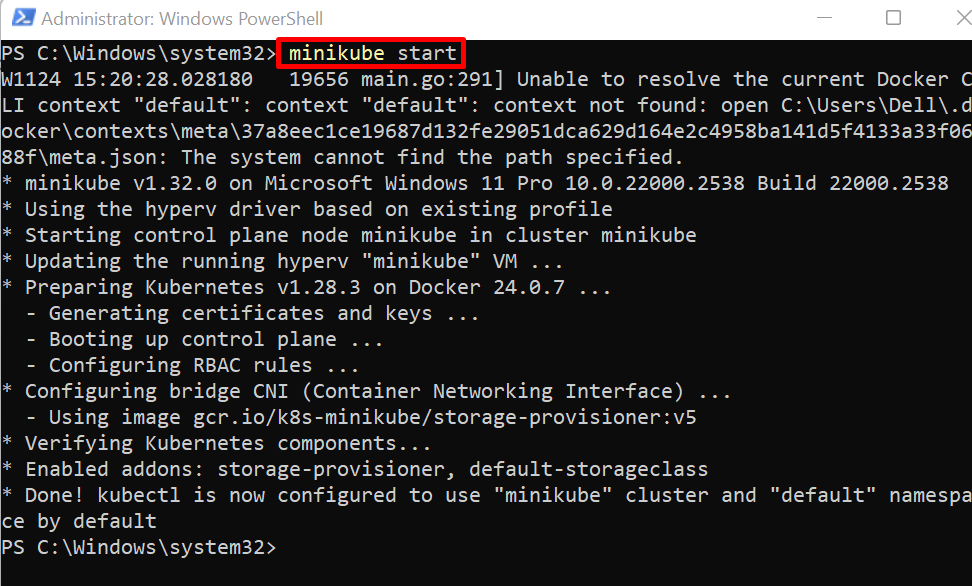
Note: At that point, the user may encounter an error. To resolve the error, try to start the Docker service on the system by launching the Docker Desktop application. After that, run the “minikube delete” command:
Now, again try to start the Kubernetes cluster using the “minikube start” command:
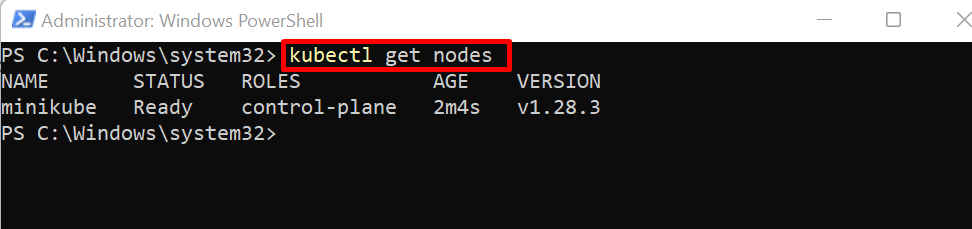
For verification, check the Kubernetes nodes and confirm that if Kubernetes cluster is executing or not:
The output shows the “control plane” master node is successfully executing in minikube Kubernetes cluster:
Step 4: Navigate to Working Directory
Next, navigate to the working directory where “pod.yml” file is created. To do so, utilize the “cd <path to working directory>” command:

Step 5: Apply Yaml Manifest Using “kubectl apply”
Now, apply the yaml manifest using “kubectl apply -f <filename.yml>” command:
If this command is executed for the first time, this will create and deploy a new pod. Otherwise, it will apply the configuration on the existing pod:

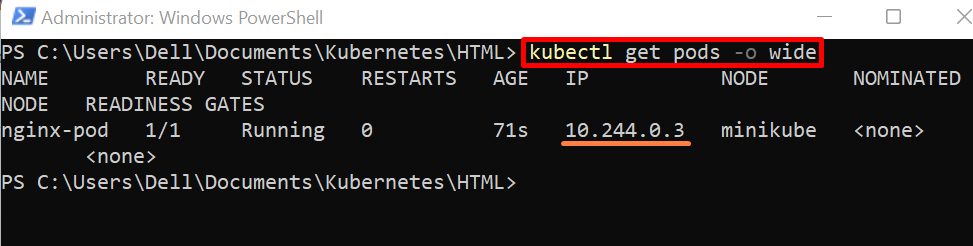
Step 6: Verification
For verification, access the Kubernetes pods using the “kubectl get pods” command. Here, the “-o” option specifies the output format. To view the IP address of pod, we have used “wide” output format:
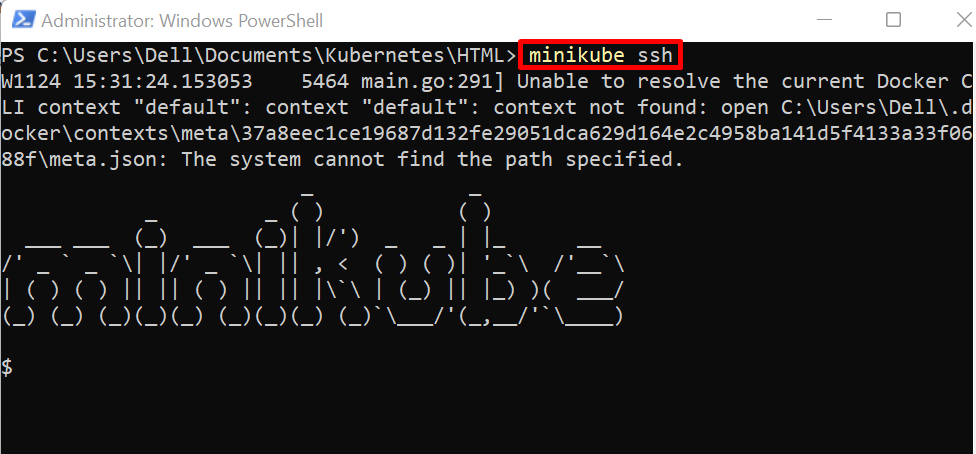
Step 7: Access Kubernetes Cluster
To access the application running in Kubernetes cluster, first access the cluster shell using “minikube ssh” command:
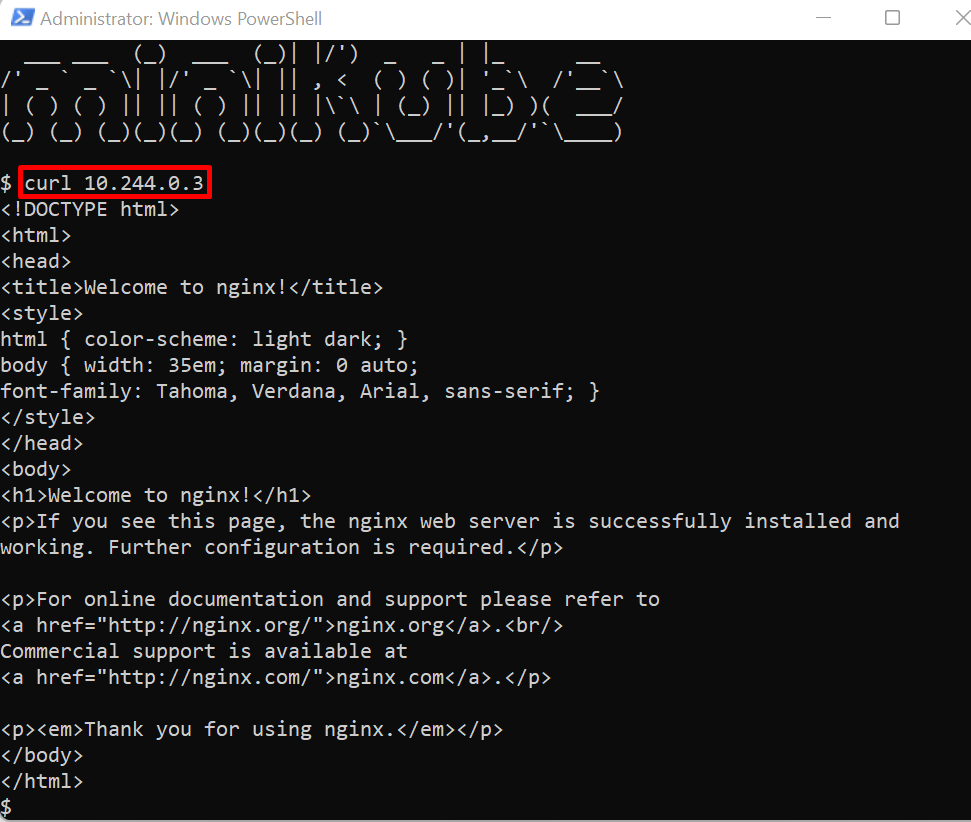
Step 8: Access Executing Application
Now, access the application through the Pod IP address using the “curl” command:
Alternatively, the user can access the running application outside the cluster on their local machine. To do so, the user needs to forward the container port that is specified in the “pod.yml” file to the user system through the below command:

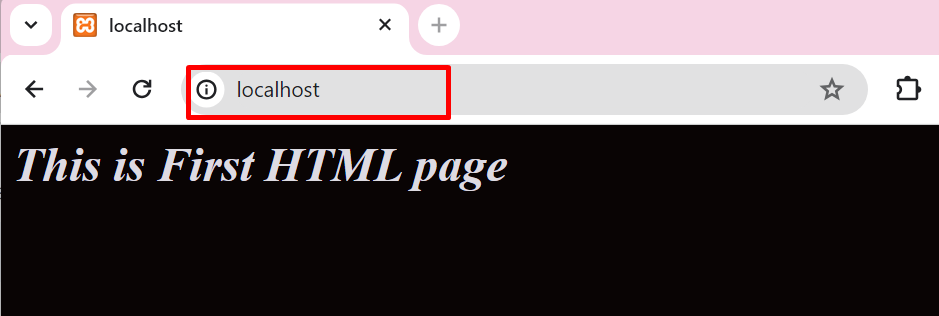
For confirmation, navigate to the “http://localhost:80” URL from the browser and verify that if the application is executing or not:

How to Apply Yaml Manifest to Create a Deployment Using “kubectl apply” Command?
The Kubernetes Deployment is one of the Kubernetes resource objects that permits the developer to easily keep and deploy a group of the same pods running with a common configuration. It provides declarative instruction and updates to its major elements such as Pods, ReplicaSet, and containerized applications.
To apply the Yaml manifest to create a Kubernetes deployment using the “kubectl apply” command, follow the listed instructions.
Step 1: Create “deployment.yml” File
First, create the Yaml file named “deployment.yml”. After that, add the given code into the file:
kind: Deployment
metadata:
name: html-deployment
labels:
app: nginx
spec:
replicas: 2
selector:
matchLabels:
app: nginx
template:
metadata:
labels:
app: nginx
spec:
containers:
- name: html
image: rafia098/html-img:1.0
ports:
- containerPort: 80
The description of the above code is as follows:
- The “kind” key is set as “deployment” to create a new Deployment or to apply configuration on the Deployment.
- The “name” key sets the name of the Kubernetes Deployment.
- The “labels” key is utilized to label the deployment object. Here the “app” key specifies the app running inside the Deployment pod.
- The “replicas” key is used to specify the number of pod replicas.
- Under the “containers” key, the essential information for containerized application is demonstrated such as container name, image, and container’s exposed port.
Step 2: Create Kubernetes Deployment Using “kubectl apply”
To apply the “deployment.yml” manifest to create the new Kubernetes deployment, utilize the below command:
This command will create and deploy a new Kubernetes deployment along with its objects such as RelicaSet and Pods:

Step 3: Access Deployment Objects
To get the Kubernetes deployment, execute the “kubectl get deployment” command:

The ReplicaSet is an important object of Kubernetes deployment and known as the Deployment controller. It is responsible for running the specified number of Pods within a Kubernetes Deployment. To get the ReplicaSet, utilize the “kubectl get rs” command:
Here, the “DESIRED” column shows the desired number of pods that are needed to execute within the deployment, and the “CURRENT” shows the currently executing pods. The ReplicaSet is basically responsible for matching the desired and actual state:

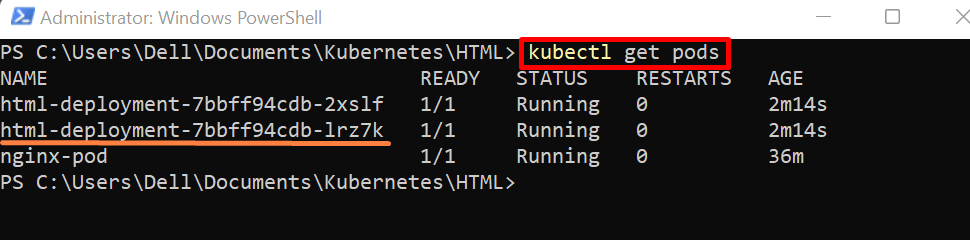
To access the running pods within the Kubernetes Deployment, utilize the “kubectl get pods” command:
Let’s access the application running inside the second pod.
Step 4: Apply Port Forwarding on Pod
To access the containerized application outside the cluster on the local machine, forward the container port that is specified in the “deployment.yml” file to the system through “kubectl port-forward <pod-name> <container-port>” command:

Now, navigate to the “http://localhost:80” URL and check if the application is executing in Kubernetes deployment or not:
How to Apply Yaml Manifest to Create a ConfigMap Using “kubectl apply” Command?
The ConfigMap is a Kubernetes API object that is used to store and manage the data of other Kubernetes resources. The Pods can utilize the ConfigMap from the kubectl command line, environment variable, or by configuring the files in volume.
To save the non-confidential information in ConfigMap through the “kubectl apply” command, follow the below instructions.
Step 1: Create “configmap.yml” File
First, create a file named “configmap.yml” file and add the below instructions into the file:
kind: ConfigMap
metadata:
name: test-configmap
data:
# property-like keys; each key maps to a simple value
User: "Linuxhint"
Pass: "Linuxhint123"
dp_port: "3306"
In the above code:
- The “kind” key specifies the type of Yaml manifest. For instance, we are creating the “test-configmap” using yaml manifest.
- The “data” is used to store the information in ConfigMap. Here, we have specified the “User”, “Pass”, and “db-port” to store Username, password, and database port, respectively.
Step 2: Create ConfigMap Using “kubectl apply”
Now, create the ConfigMap or apply the Yaml manifest on Kubernetes ConfigMap using “kubectl apply -f <Filename.yml>” command:

Step 3: Verification
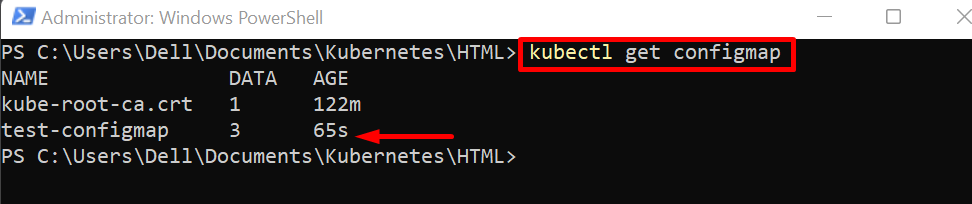
For verification, get the Kubernetes ConfigMap using below command:
The output shows that we have successfully created the ConfigMap using the “kubectl apply” command:
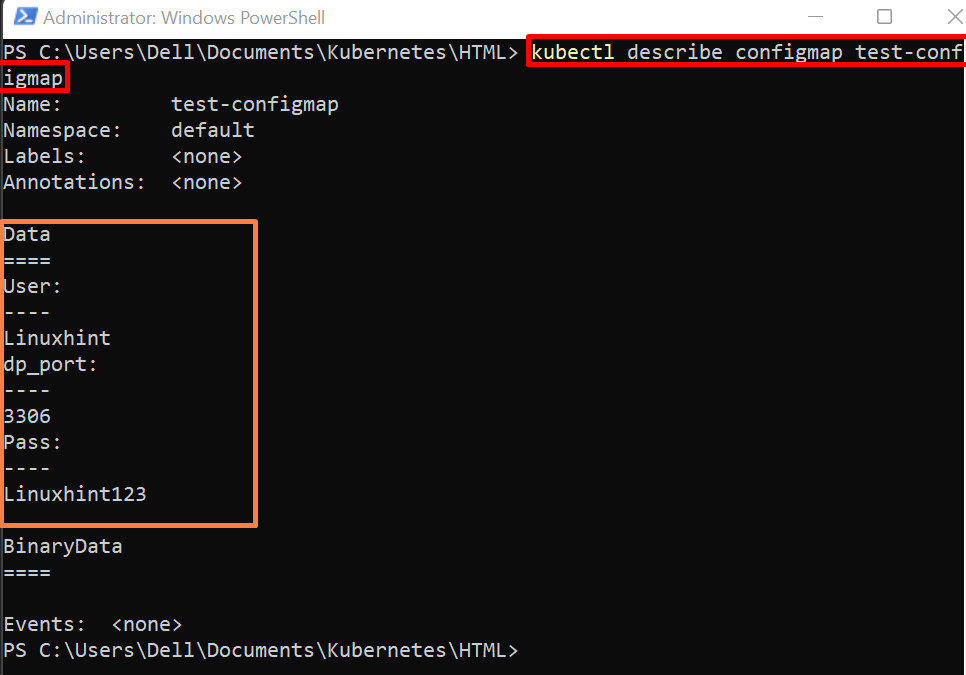
Step 4: Inspect the ConfigMap
To inspect the ConfigMap, utilize the “kubectl describe configmap <ConfigMap-name>” command:
Here, you can see we have effectively stored the data that is specified in “configmap.yml” file in “test-configmap”:
That is all about applying a yaml manifest to deploy Kubernetes resources using the “kubectl apply” command.
Conclusion
To apply the Yaml manifest, first create a Yaml file and specify its “kind” inside the file such as pod, deployment, or configmap to create and apply Pod, Kubernetes deployment, or ConfigMap, respectively. After adding the essential configuration in the Yaml file, execute the “kubectl apply -f <path-to-file>” command. This will deploy the Kubernetes resource according to configuration. If the resource already exists, this will apply the configuration only. This blog has illustrated how to apply the yaml manifest in Kubernetes using the “kubectl apply” command.
Source: linuxhint.com