Ansible Roles Tutorial
The structure of roles in Ansible allows us to import specific parameters automatically, actions, documents, scripts, and controllers that are based according to a predefined document format in Ansible. The main method for partitioning a playbook into many documents is the role. It facilitates the creation of complicated playbooks and it also facilitates how we will reuse them in Ansible. By dividing the playbook, you may separate it into multiple reusable parts. So, every role is restricted to a specific feature or intended results. Each of the procedures, required to deliver the conclusion that was being kept within that particular role itself, are defined as dependents in other roles.
Structure of Roles in Ansible
Now, let us understand the basic structure of Ansible roles. For utilizing roles in ansible, we will create a new directory with the exact identity of every role. In the role hierarchy, the documents are arranged in a subdirectory manner. To create the directory, we will employ the following ansible-galaxy role command:
After running the command above, we will get the following desired outcome:
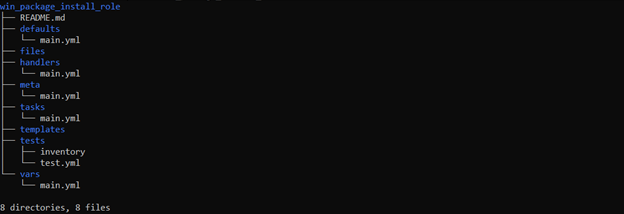
Since ansible-galaxy itself is included in the ansible tool, we do not need to install any further components for it. If you want to check the hierarchical structure of the role and several directories with modifiable layout, documents will be displayed after running the command below:
As shown, we now have a total of 8 available directories in the role named “win_package_install_role” and 8 changeable documents.
Sometimes, we need to update documents like README.md and meta/main.yml to properly describe your role even though it is not necessary for the role to function. It is essential to include any requirements in meta/main.yml if the role needs to access additional roles to run. This will enable Ansible to accomplish this as necessary. To Enter into the new directory, which we have recently created, we will write the statement below in the terminal.
Then, it will show the new directory added to the main path shown below:
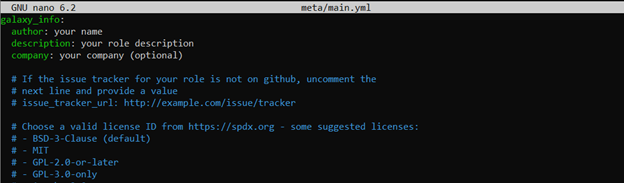
There are no prerequisites necessary for your win_package_install_role role. A functioning meta-file format is shown here as an example. If you want to change it to reflect your name, the name of your business, and, if appropriate, also change the license by writing the following command:
Specifying the Tasks of Role in Ansible
Most often, the role would carry out one or even more activities to set up the remote device under the role’s criteria. Installing and setting up win_package_install_role is what we should do in this situation.
win_package_install_role /tasks/main.yml:
When we run a role, it searches by default the “tasks” subfolder for a document called main.yml and then we will list all the tasks in it. For more complex roles, you can divide the tasks into multiple documents and call them from main.yml using the include tasks or import tasks modules. Below is the command we will use to get into the task’s directory.
- name: Fetching {{product_name}} installation status
win_shell:'Get-ItemProperty HKLM:\Software\Wow6432Node\Microsoft\Windows\CurrentVersion\Uninstall\* | Where-Object -Property DisplayName -like "*{{product_name}}*" |Format-Table IdentifyingNumber, Name, DisplayName, LocalPackage -AutoSize'
register: installation_status
- debug:
msg:
- "Product already installed"
- "{{installation_status.stdout_lines}}"
when: installation_status.stdout_lines is defined and installation_status.stdout_lines | length > 0
- meta: end_play
when: installation_status.stdout_lines is defined and installation_status.stdout_lines | length > 0
- name: Create target directory if not exists
win_file:
path: "{{target_machine_path}}"
state: directory
- name: Download the installer
win_get_url:
url: "{{url_to_download_setup}}"
dest: "{{target_machine_path}}"
register: download
when: url_to_download_setup is defined and url_to_download_setup != ""
- set_fact:
package_name_zip: "{{download.dest}}"
when: download.failed == false
- name: Decompress the package
win_unzip:
src: "{{package_name_zip}}"
dest: "{{target_machine_path}}"
delete_archive: yes
register: decompress_status
when: (package_name_zip is defined) and (".zip" in package_name_zip or ".gz" in package_name_zip or ".gz" in package_name_zip)
- name: Find setup file location
win_find:
paths: "{{target_machine_path}}"
patterns: [ "{{setup_name}}" ]
recurse: true
register: result
- name: Setting setup path for provided windows package
set_fact:
setup_path: "{{result.files[0].path}}"
when: result.failed == false and result.matched > 0
- name: Installing "{{setup_name}}"
win_package:
path: "{{setup_path}}"
product_id: auto
state: present
arguments: /q
register: status
- debug:
msg: "{{setup_name}} installed successfully"
when: status.rc == 0
- set_fact:
reboot_required: true
when: status.reboot_required is defined and status.reboot_required
notify:
- Reboot the windows server
In this document, we have done tasks like we have retrieved the name of the product. We have made a target directory if the directory is not available. We have to download the URL, uncompress the package, found the location of the setup, and we have also set the location for window package, etc.
win_package_install_role /default/main.yml:
The default parameters are defined inside the default directory. The default parameters are those with the utmost significance, making them simple to modify. The parameter defined in defaults/main.yml would be utilized if it is not defined anywhere.
# defaults file for win_package_install_role
target_machine_path: C:\ProgramFiles
win_package_install_role /var/main.yml:
To specify the parameters required for the role, we build a var document in this step. To avoid any title disputes with parameters from outside the role, it is a smart option that we will prefix the identifiers of the role parameters.
url_to_download_setup: https://archive.apache.org/dist/httpd/binaries/win32/httpd-2.2.25-win32-x86-no_ssl.msi
product_name: apache
setup_name: httpd-2.2.25-win32-x86-no_ssl.msi
target_machine_path: C:\Installers
win_package_install_role /handlers/main.yml:
The handlers of the Ansible will be stored inside the handler’s directory. The tasks in the document are known as handlers that can be marked throughout a play for execution after it is over. We could employ handlers as we deem necessary.
- name: Reboot windows server
win_reboot:
when: reboot_required
win_package_install_role /meta/main.yml:
Once we decide to broadcast the role on galaxy.ansible.com, we will utilize the meta directory to contain author metadata. Ansible role information includes the publisher which is “kalsoom”, supporting systems and dependents.
author: kalsoom
description: Install provided windows package
company: NG Pvt Ltd
license: license (GPL-2.0-or-later, MIT, etc)
min_ansible_version: "2.9"
platforms:
- name: Windows
Creating role_main.yml Playbook:
In this playbook, we will pass the name of the role which we initially created along with the host. We will also gather the information related to the hosts. The following is the command used to create the playbook in Ansible:
hosts:
Windows_Host:
ansible_host: 192.168.5.220
ansible_user: ansible
ansible_password: ******
ansible_connection: winrm
ansible_port: 5986
ansible_winrm_server_cert_validation: ignore
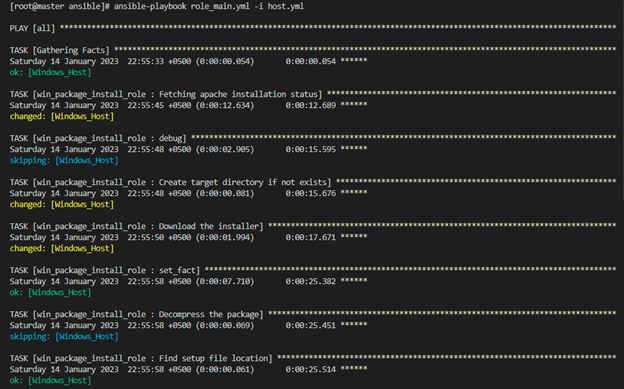
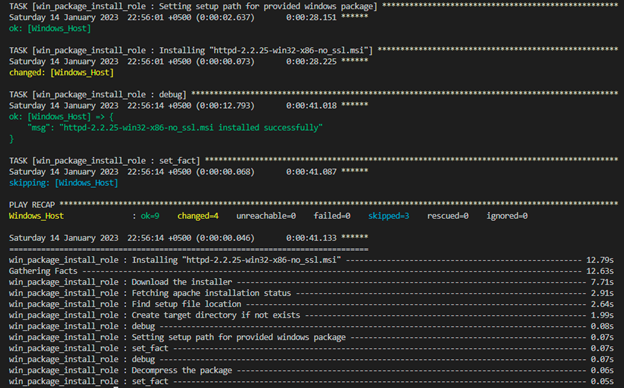
After that, we will now run the statement to get the desired output in the terminal:
Conclusion
The concept of roles and how to construct a role in Ansible was covered in this article. The roles’ hierarchical structure has been also covered. Every directory that was stored under the role was explained in detail. To comprehend how roles are used in Ansible, we have additionally developed an example.
Source: linuxhint.com