Ansible 101: Install, Configure, and Automate Linux in Minutes
In this technologically rich era, businesses deploy servers in no time and also manage hundreds of devices on the cloud. All this is possible with the assistance of Ansible-like automation engines.
Ansible is an automation server that manages multiple remote hosts and can deploy applications, install packages, troubleshoot systems remotely, perform network automation, configuration management, and much more, all at once or one by one.
In today’s guide, we’ll elaborate on the steps to install, configure, and automate Linux in minutes. This guide is broadly divided into 2 categories:
- Install and Configure Ansible → Practical demonstration of installing and configuring Ansible on Control Node.
- Ansible Playbooks | Automate Linux in Minutes → Creating Ansible Playbooks and implementing playbooks on managed nodes.
Let’s have a look at the brief outline:
- Install and Configure Ansible | Control Node and Host Nodes
- Step 1: Install and Configure Ansible on the Control Node
- Step 2: Create an Inventory/Hosts File on the Control Node
- Step 3: Install and Configure SSH on the Host Nodes
- Step 4: Create an Ansible User for Remote Connections
- Step 5: Set up SSH Key | Generate and Copy
- Step 6: Test the Connection | Control Node to Host Nodes
- Ansible Playbooks | Automate Linux in Minutes
- Conclusion
Install and Configure the Ansible | Control Node and Host Nodes
As already discussed, Ansible is the automation server that has the control node and some managed nodes to manage the overall server. In this section, we’ll demonstrate how you can install and configure Ansible to work properly.
Prerequisites: Understanding the Basics | Control Node, Managed Nodes, Inventory File, Playbook
Before proceeding to the real-time automation, let’s have a look at the list of components that we need to understand before proceeding:
- Control Node: The system where Ansible is installed. In this guide, the Ansible Server is set up on OpenSUSE Linux.
- Managed Nodes: The servers that are being managed by the Ansible control node.
- Inventory/Host File: The inventory file contains a list of host(s) IP(s) that a control node will manage.
- Playbook: Playbook is an automated script based on YAML that Ansible utilizes to perform automated tasks on the Managed Nodes.
Let’s now start the initial configuration:
Step 1: Install and Configure Ansible on the Control Node
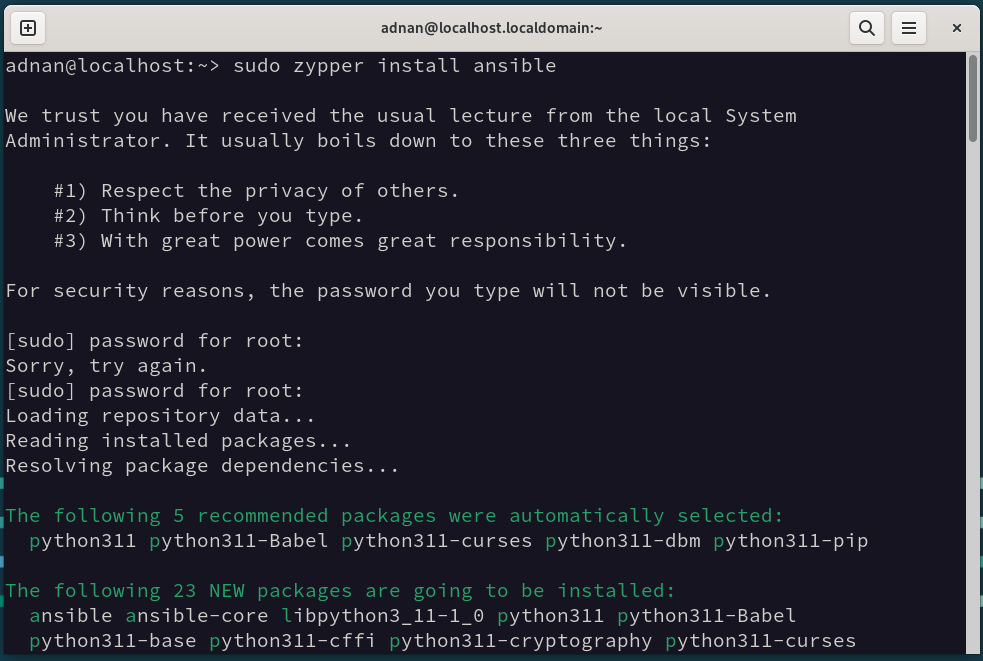
Let’s set up Ansible on the control node, i.e., installing Ansible on the Control node:
The command will automatically select the required essentials (Python and its associated dependencies, especially):
Here are the commands to install Ansible on other Linux distros:
sudo apt install ansible
sudo pacman -S ansible
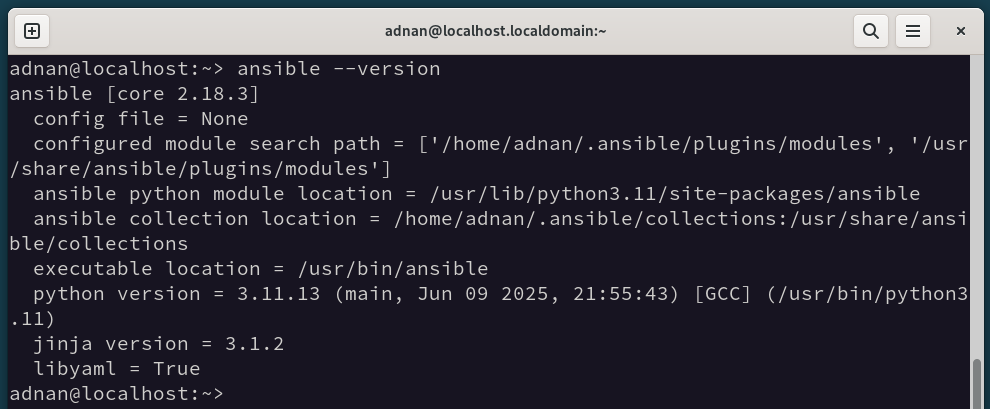
Let’s check the installed version:
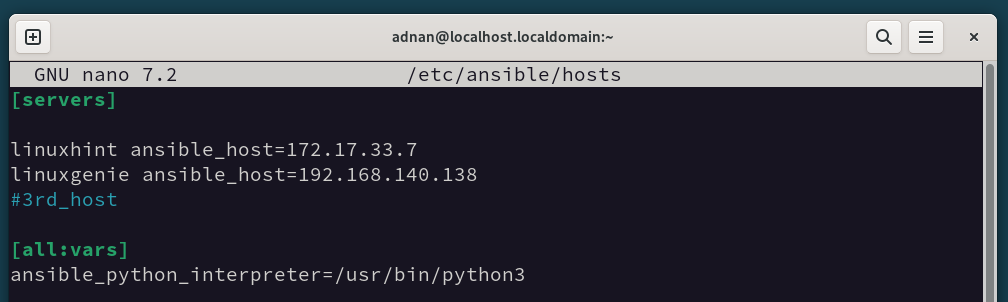
Step 2: Create an Inventory/Hosts File on the Control Node
The inventory file is by default located in the “/etc/ansible/hosts”. However, if it is not available, we can create it manually:
Here, the [main] is the group representing specific servers. Similarly, we can create multiple groups in the same pattern to access the servers and perform the required operation on the group as a whole.
Step 3: Install and Configure SSH on the Host Nodes
Ansible communicates with the host nodes via SSH. Now, we’ll set up SSH on the host nodes (managed nodes). The process in this “Step” is performed on all the “Managed Nodes”.
Let’s first install SSH on the system:
If you have managed nodes other than Ubuntu/Debian, you can use one of the following commands, as per your Linux distribution, to install SSH:
sudo zypper install openssh
sudo pacman -S openssh
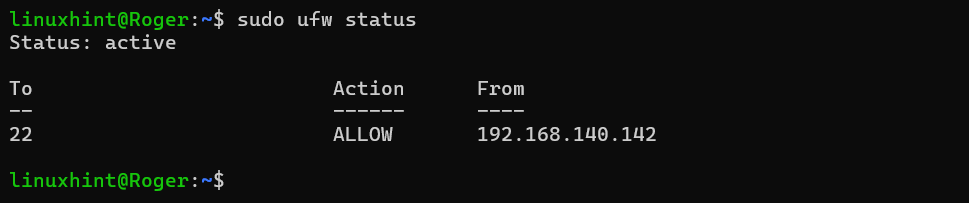
Since we have only one “Control Node”, for better security, we add a rule that only the SSH port can be accessed from the Control Node:
Note: If you have changed the SSH default port, then you have to mention the port name to open that specific port.
- Allow Specific IP on SSH Port: When configuring the Firewall on the Managed Nodes, you can only allow a specific IP to interact with the managed node on SSH. For instance, the command below will only allow the IP “192.168.140.142” to interact over the SSH port.
Let’s reload the firewall:

Confirming the firewall status:
Step 4: Create an Ansible User for Remote Connections
Let’s use the “adduser” command to create a new user for Ansible. The Control Node only communicates through the Ansible user:
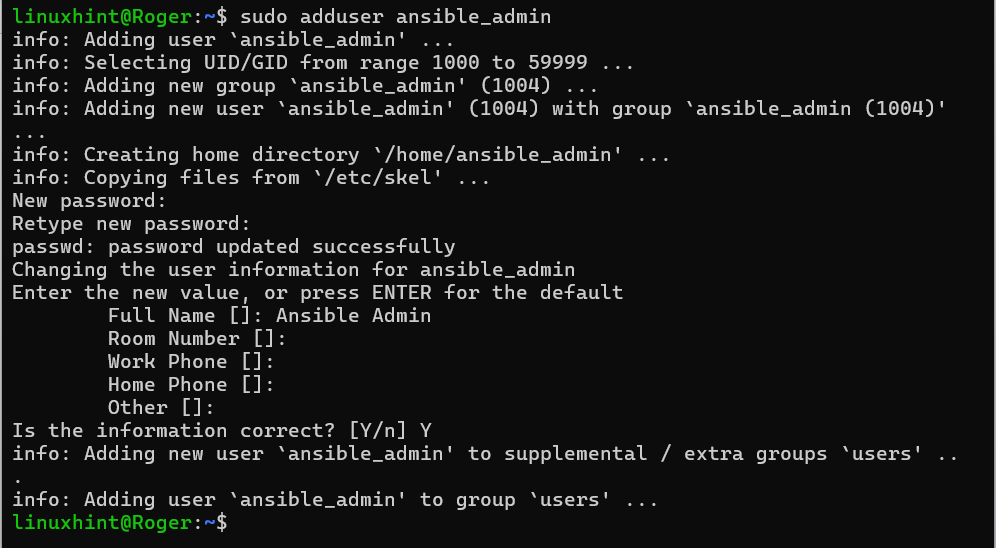
Adding it to a sudo group:

Creating a no-password login for this user only. Open the “/etc/sudoers” file and add the following line at the end of the file:

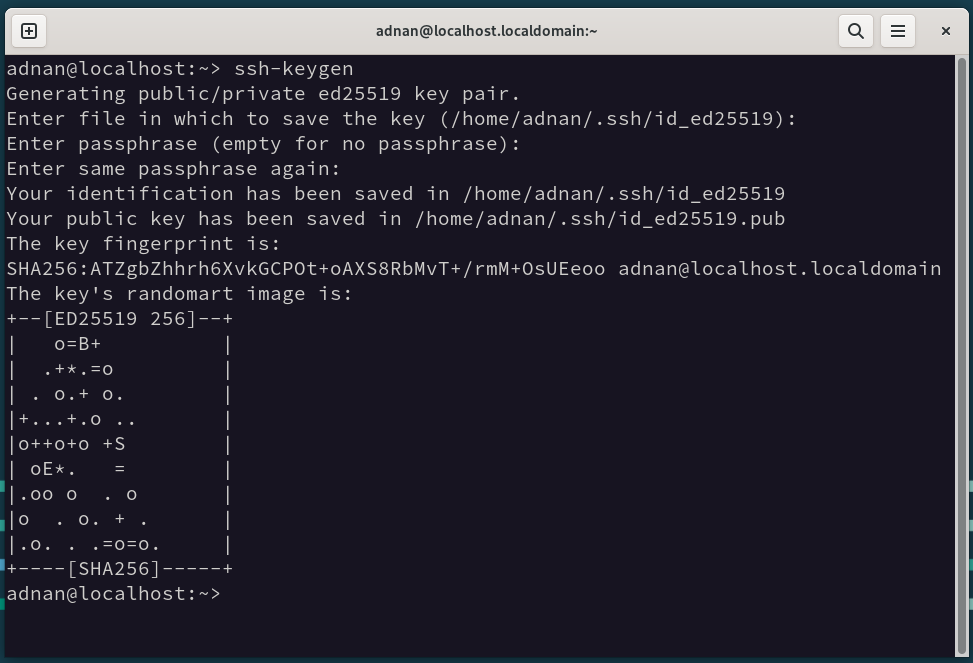
Step 5: Set up SSH Key | Generate and Copy
Let’s generate the SSH keys on the control node:
Now, copy these keys to the remote hosts:
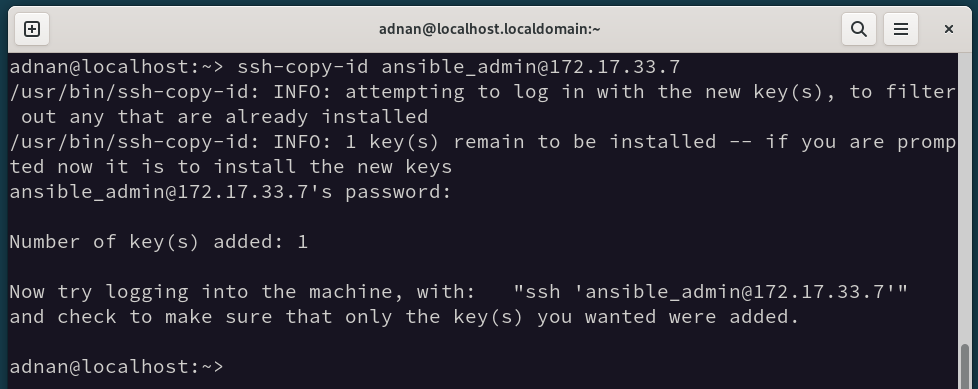
Note: There are multiple ways of generating and copying the SSH keys. Read our dedicated guide on “How to Set up SSH Keys” to have a detailed overview of how SSH keys work.
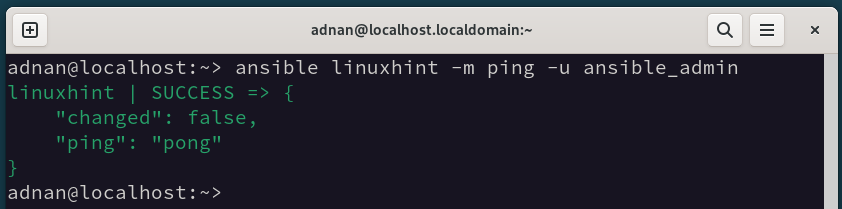
Step 6: Test the Connection | Control Node to Host Nodes
Once every step is performed error-free, let’s test the connection from the control node to the managed hosts. There are two ways to test the connection, i.e., one-to-one connection and one-to-many.
The Ansible command below uses its “ping” module to test the connection from the Control Node to one of the hosts, i.e., linuxhint.
Here, the following Ansible command pings all the hosts that a Control Node has to manage:
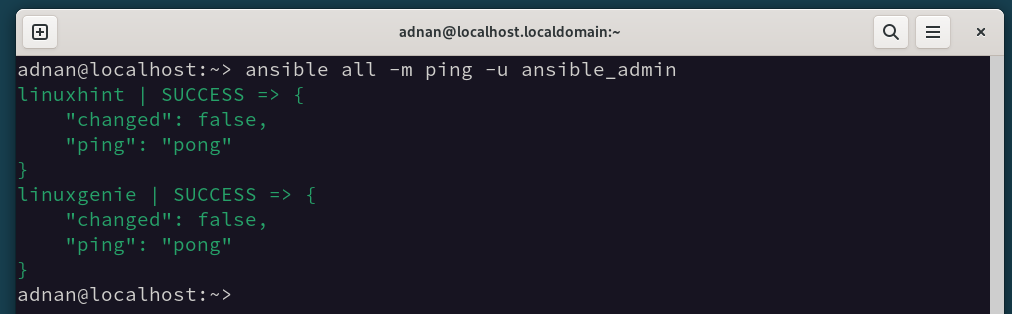
The success status paves the way to proceed further.
Ansible Playbooks | Automate Linux in Minutes
Ansible Playbook is an automated script that runs on the managed nodes (either all or the selected ones). Ansible Playbooks follow the YAML syntax that needs to be followed strictly to avoid any syntax errors. Let’s first have a quick overview of the YAML Syntax:
Prerequisites: Understanding the YAML Basics
YAML is the primary requirement for writing an Ansible playbook. Since it is a markup language thus its syntax must be followed properly to have an error-free playbook and execution. The main components of the YAML that need to be focused on at the moment to get started with Ansible playbooks are:
- Indentation → Defines the hierarchy and the overall structure. Only 2 spaces. Don’t use Tab.
- Key:Value Pairs → Defines the settings/parameters/states to assist the tasks in the playbook.
- Lists → In YAML, a list contains a series of actions to be performed. The list may act as an independent or can assist with any task.
- Variables → Just like other scripting/programming languages. The variables in YAML define dynamic values in a playbook for reusability.
- Dictionaries → Groups relevant “key:value” pairs under a single key, often for module parameters.
- Strings → Represents text values such as task names, messages, and optional quotes. The strings also have the same primary purpose, just like in other scripting/programming languages.
That’s what helps you write Ansible playbooks.
Variable File | To be used in the Ansible Playbook
Here, we will be using a variable file, which is used in the Playbook for variable calling/assignment. The content of the Vars.yml file is as follows:
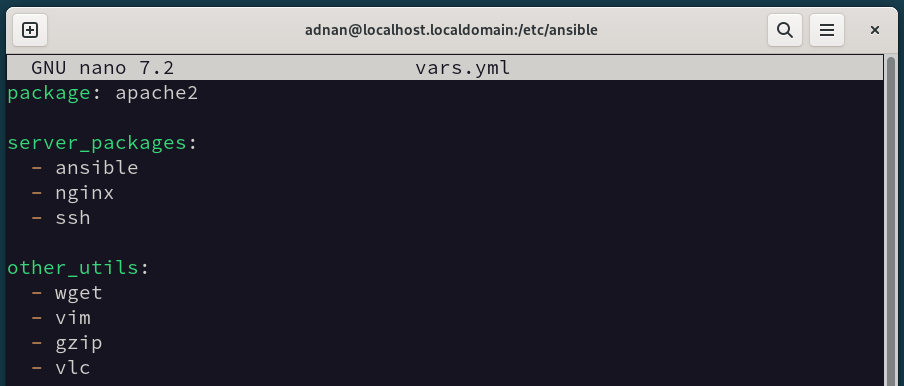
There are three variables in this file, i.e., the package contains only one package, and the other two variables are “server_packages” and “other_utils,” which contain a group of packages.
Step 1: Create an Ansible Playbook
Let’s create a playbook file:
Here, the variables file named “vars.yml” is linked to this Playbook. At our first run, we will use the first variable named “package”:
- hosts: allbecome: yes
vars_files:
- vars.yml
tasks:
- name: Install package
apt:
name: "{{ package }}"
state: present
Here:
- The “hosts: all” states that this playbook will be implemented on all the hosts listed in the hosts/inventory file.
- “become: yes” elevates the permissions, i.e., useful when running the commands that require root privileges.
- “Vars_file” calls the variable files.
- The “tasks” contain the tasks to be implemented in this playbook. There is only one task in this playbook:
- The task is named “Install package”, with the “apt” module, and the variable “name” to be used from the variable file.

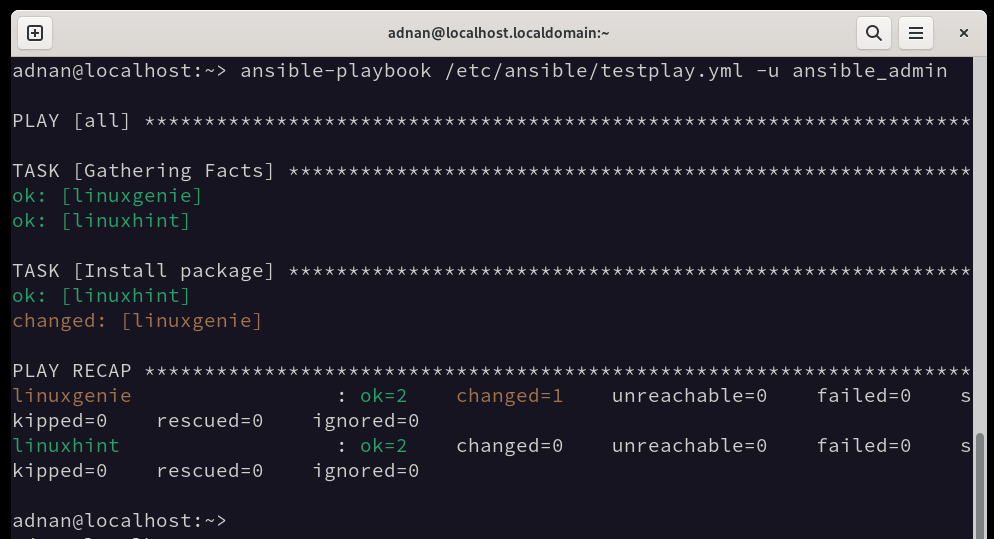
Step 2: Automate the Tasks
Before implementing this playbook, we can have a dry run of the playbook on all the servers to check for its successful execution. Here’s the command to do so:
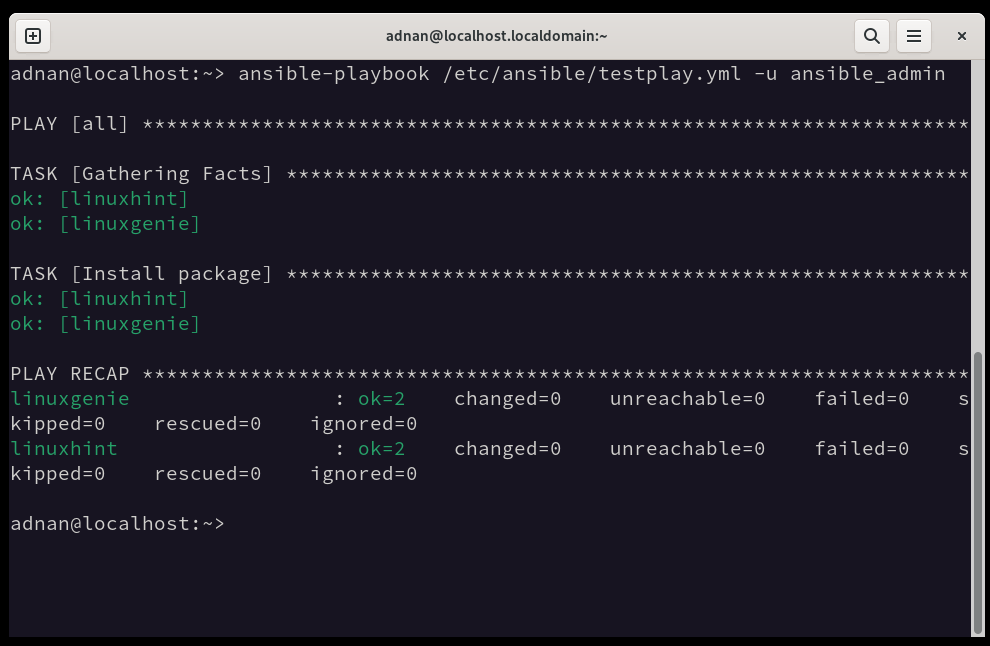
Let’s run the newly created playbook with the created user:
Note: We can also provide the hosts/inventory file location (if it is not at the default location, i.e., /etc/ansible/) here as well, i.e., using the “-i” option and providing the path of the inventory file.
Similarly, we can use other variable groups mentioned in the variable file as well.
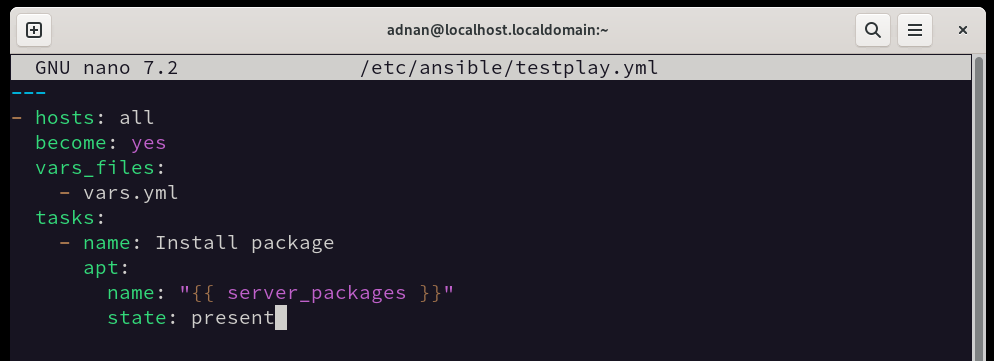
For instance, the following playbook now calls the “server_packages” variable and installs the server as per their availability:
- hosts: allbecome: yes
vars_files:
- vars.yml
tasks:
- name: Install package
apt:
name: "{{ server_packages }}"
state: present
Here, the “become: yes” is used for the root permissions. This is used when the tasks require root privileges. The task in this playbook utilizes different variables from the variable file.
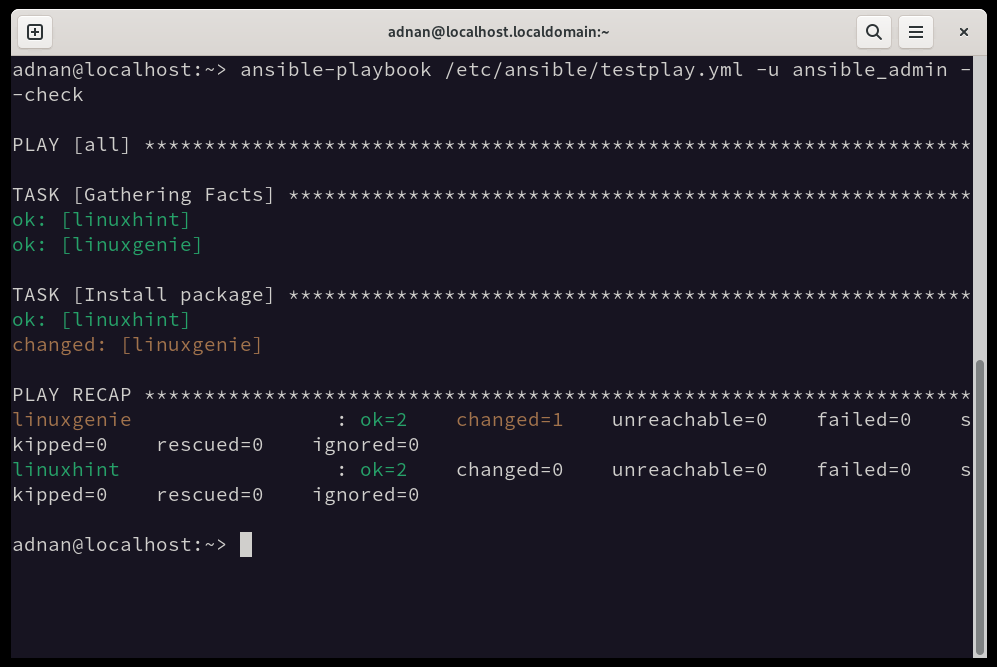
Let’s dry-run the playbook on the managed nodes using the below command:
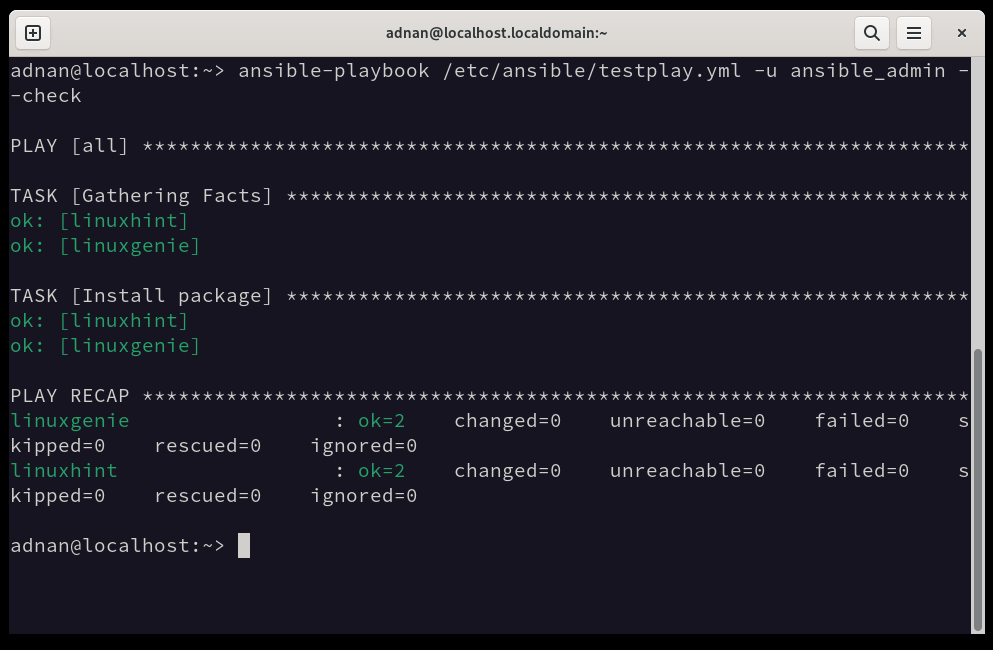
All green states that the playbook will be successfully implemented. Remove the “–check” flag from the above command to implement the playbook.
That’s all about the main course of this article. Since Ansible is backed up by a list of commands, we have compiled a list of commands necessary for beginners to understand while using Ansible.
Bonus: Ansible 101 Commands
Ansible is an essential automation server with a long list of its own commands to manage the overall server operations. Here’s the list of Ansible commands that would be useful for all those using Ansible or aiming to use Ansible in the future:
| Command(s) | Purpose |
|---|---|
| ansible -i <inventory/host-file> all -m ping | Test Ansible’s connectivity with all the hosts in the inventory/hosts file. |
| ansible-playbook -i <inventory/host-file> <playbook> | Executes the <playbook> to operate on the hosts/managed nodes. |
| ansible-playbook -i <inventory/hosts-file> <playbook> –check | Simulates the playbook without making changes to the target systems/managed nodes. |
| ansible-playbook -i <inventory/hosts-file> <playbook> –syntax-check | Checks the YAML syntax |
| ansible -i <inventory/hosts-file> <group> -m command -a “<shell-command>” | Executes a specific shell command on the managed nodes. |
| ansible-playbook -i <inventory/hosts-file> <playbook> -v | Executes the playbook with verbose output. Use -vv for more detailed options. |
| ansible-inventory -i <inventory_file> –list | Displays all hosts/groups in the inventory file to verify the configurations. |
| Note: If the inventory/hosts file is at the default location (/etc/ansible/), we can skip the “-i” flag used in the above commands. | |
For a complete demonstration of the Ansible CLI Cheat Sheet, please see the Ansible documentation – Ansible CLI Cheat Sheet.
Conclusion
To get started with Ansible, first, install Ansible on one system (Control Node), then install and configure SSH on the remote hosts (Managed Nodes). Now, generate the SSH keys on the Control Node and copy the key to the Managed Nodes.
Once the connectivity is resolved, configure the inventory file and write the playbook. That’s it. The Ansible will be configured and ready to run.
All these steps are practically demonstrated in this guide. Just go through the guide and let us know if you have any questions or anything that is difficult to understand. We would assist with Ansible’s installation and configuration.
Source: linuxhint.com