Add or Remove the Linux Capabilities in Kubernetes SecurityContext
It might be difficult to manage the degree of privileges that are provided to each Pod and container in a Kubernetes container. We may utilize the Kubernetes SecurityContext capabilities to add or delete the Linux capabilities from the Pod and Container to increase the security of the container. This article focuses on using the securityContext to implement a simple example of adding and deleting capabilities. The configuration of a yaml file to delete all capabilities and add just one capability to a container is provided in the sample example. In this article, the proc and capsh commands are used to display the container’s capabilities.
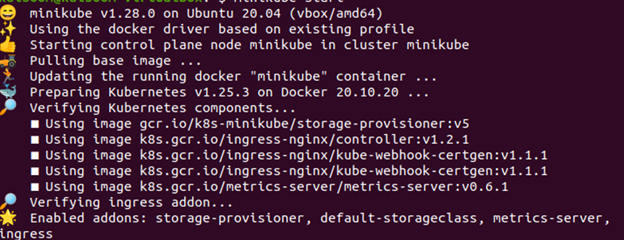
Step 1: Start the Minikube Server
First, start the minikube server so that you can run your application and use the kubectl instructions. You may deploy your nodes, pods, and even cluster using the minikube server in the Kubernetes environment. The following command must be used to maintain the minikube in active mode:
By doing so, the minikube server is turned on and the Kubernetes environment is ready for use.
Step 2: Create a Kubernetes YAML File
In the second step, create a YAML file to deploy a pod.
Follow the steps to create a yaml file using nano:
- Go to the directory path where you want to create the file or modify an existing file.
- Type in the nano command followed by the file name.
Run the following nano command. It creates a YAML configuration file named “nano podsample.yaml”.
Let’s move on to the next step which is to help you know how to configure a podsample.yaml file.
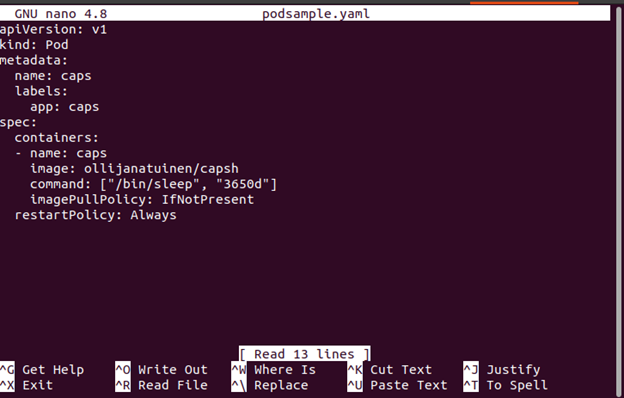
Step 3: Configure the YAML File
We add the capsh tool in the preceding step so that we can see the capabilities of our container.
Note that none of those parameters are configured for a securityContext section for this container. Thus, they are all set to system defaults. Consider the fact that this container operates as the default user which is supplied in the Dockerfile from which it is constructed if no user is defined for it in Kubernetes. For many containers, this default user is the root.
Step 4: Create a Pod
In this step, let’s create podsample.yaml with the following attached command:
![]()
Step 5: Check for Capabilities
In the previous step, a pod is created and running.
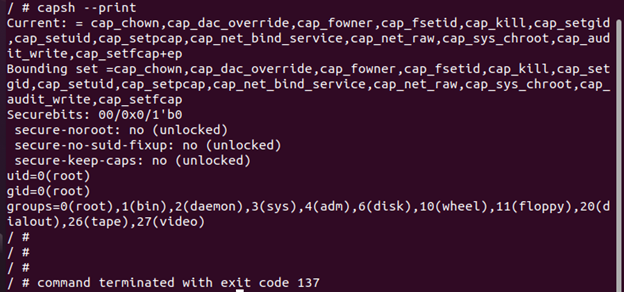
Now that we have a shell inside of it, we can use capsh to verify its capabilities using the following command:
Using the capsh command, it is possible to see the default capacities of the container which are listed as follows:
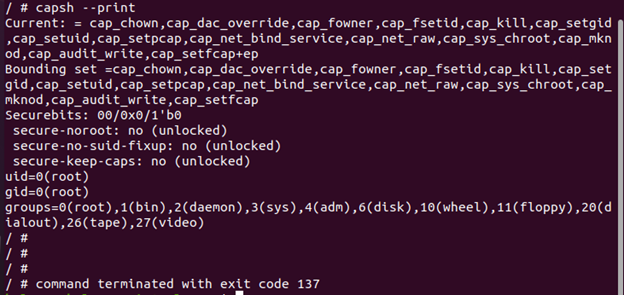
We can observe from the given output that the container has many default capabilities which are given to the container at runtime.
Step 6: Dropp the Single Capability in Kubernetes SecurityContext
In this step, we drop the single capability of the container.
Let’s configure the yaml file using the following command:
After that, move to configure the droppod.yaml file using the following given command:

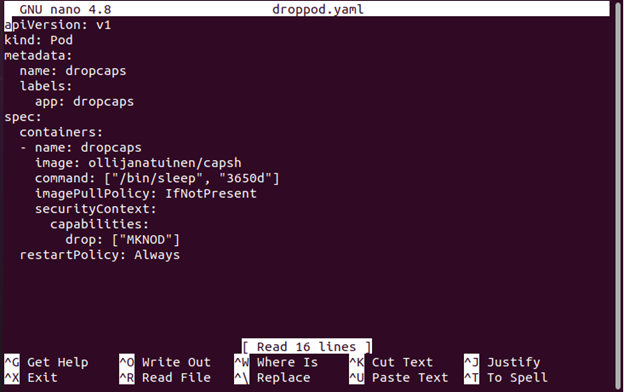
Step 7: Configure to Add the Single Capability in YAML File
In this step, open the yaml file (dropped.yaml) that was created in Step 6. Then, set the container such that it no longer has access to the CAP_MKNOD capability, which removes the ability to create the new file system nodes.
The configured file is as shown:
Step 8: Check for Capabilities
The yaml file is configured to drop the CAP_MKNOD capability.
In this step, execute and run the dropcaps.yaml file to check the capabilities of the container using the following command:
The capacities can be checked by running the dropcaps file:
We can observe that this pod dropped the CAP_MKNOD capability as compared to the first pod.
Step 9: Drop All Capabilities in Kubernetes SecurityContext
Since Kubernetes can drop a single capability, it can also drop all the capabilities through securityContext. In this step, drop all the capabilities of the container by implying the given command:
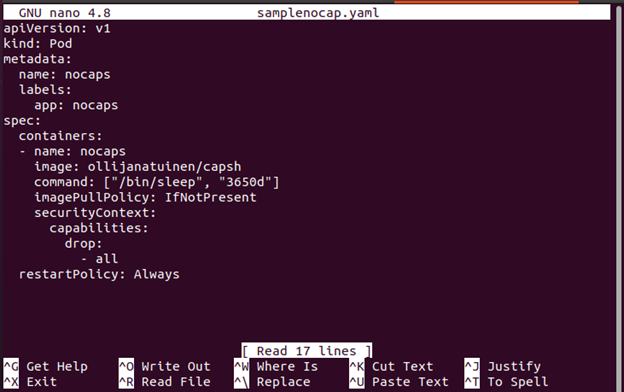
After that, configure the samplenocap.yaml file using the following command:

Now, let’s move to the next step to drop all of the capacities in our securityContext settings.
Step 10: Configure All the Capabilities in the YAML File
In this step, open the yaml file that was created in Step 9. Then, configure inside the container.securityContext and drop all the capabilities of the container.
The configured file is as shown:
Step 11: Check for Capabilities
Run the nocaps in capsh to see the information about capabilities. In this step, use the following command and display all the capabilities of the container:
The capacities can be checked in the following illustration by running the samplenocaps yaml file in capsh:
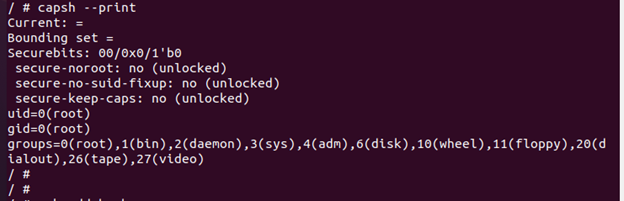
The previous output shows that the current=”” and bounding set=”” are empty now. The capabilities are dropped successfully.
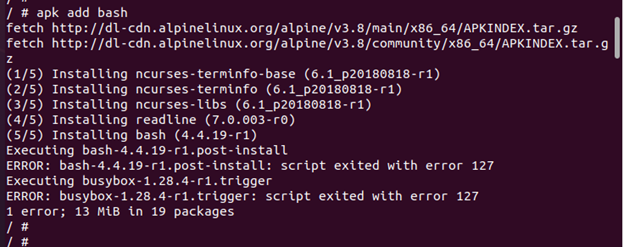
Step 12: Install the Bash
In this step, install Bash through apk since some system functions won’t work if we don’t have any capabilities at all. Even though our container is operating as a root, the installation of the Bash package fails.
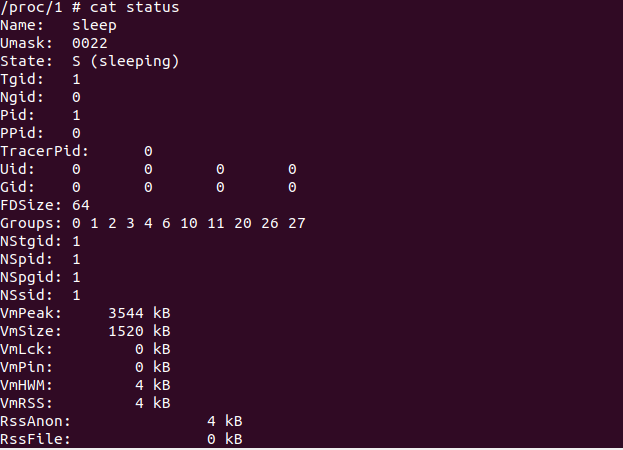
Step 13: Check the Capabilities Information
There are several ways to view the capabilities of our container such as using the capsh and proc commands. In this step, we display the container capacities using the proc command and proc displays capacities as a bitmap. Although it is not quite as readable as the result from capsh, each bit that is defined here stands for a certain capability.

Here, we can see that this particular container has no enabled capabilities; all of these values are zero.
Step 14: Adding a Single Capability in Kubernetes SecurityContext
In the previous steps, we dropped a single capability which is CAP_MKNOD and dropped all capabilities. But, in this step, we can add the capabilities back.
Execute the following command to create the yAML file:
After that, configure the sampleadd.yaml file.

Now, let’s try the sampleadd.yaml file and add a single capacity in our securityContext settings.
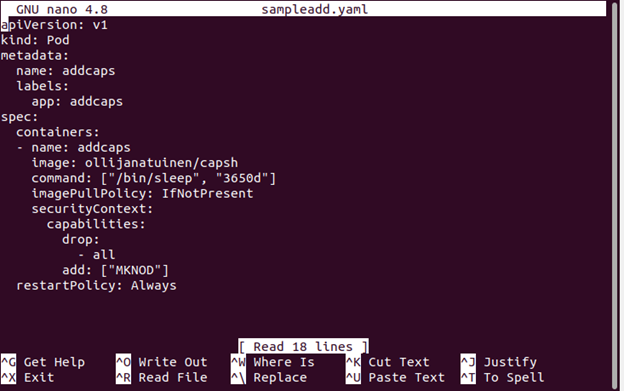
Step 15: Configure the Single Capability in the YAML File
Now, let’s configure the file by adding the capability in spec.container.securityContext into capabilities.add [“MKNOD”].
The capability is displayed in the YAML file.
Step 16: Check for Capabilities
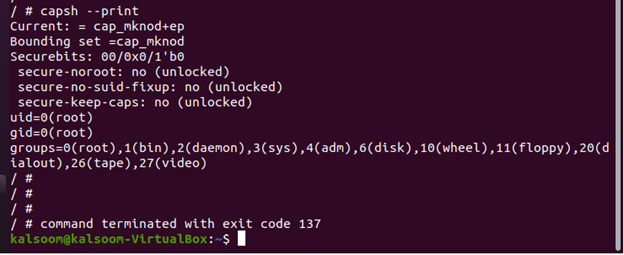
In this step, run the addcaps to check the capabilities using the following command:
The added capacity can be seen in the following given output:
current = cap_mknod+ep
Bounding set = cap_mknod
Conclusion
You first learned from the implemented example about the default capabilities of the container which are assigned at run time that is displayed with the capsh command. Next, you learned to drop a single capability in a container named CAP_MKNOD. Then, you also learned how to drop all capabilities of the container using the //drop: –all configuration. Then, we used two ways to display the capabilities of containers – using the capsh and proc commands.
Source: linuxhint.com