Add an SSL/TLS Certificate to Kubernetes Cluster
SSL certificates are used to secure the application that is made on Kubernetes for future safety. Let us take another secure certificate, TLS, that contains a very secure private key. Certificates are created with certificates: K8r.io API. We will teach about SSL certificate configuration with the help of detailed examples. Let us start with the SSL certificate in Kubernetes. SSL certificates are very important for browsers. The browser, with the help of SSL and TLS certificates, creates a secure connection with Kubernetes services.
Pre-requisites:
Every user must have Ubuntu’s latest version of their system. The user of the Windows operating system installs a virtual box and adds Ubuntu or Linux virtually to the system. Users must be familiar with Kubernetes, the kubectl command line, pods, and clusters, and know cluster DNS to understand this topic better.
Let us have a brief look at SSL certificate configuration in Kubernetes by breaking the whole procedure into different steps.
Step 1: Start Kubernetes Control Panel
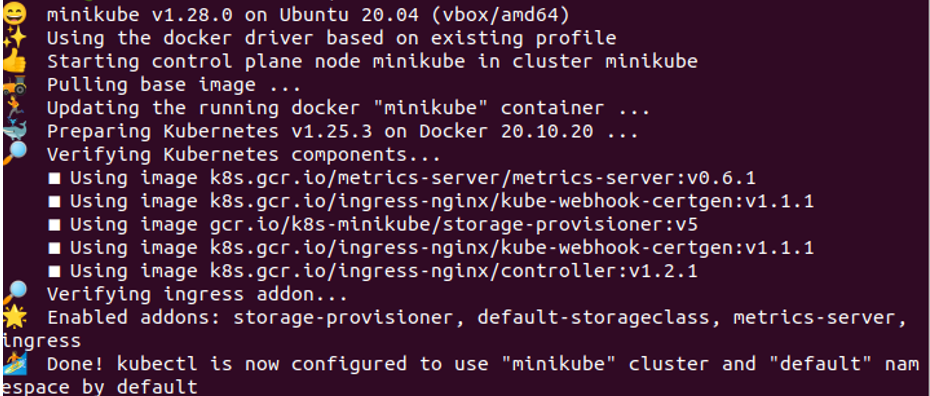
We want an environment in our application where we can run Kubernetes commands to perform Kubernetes tasks. As a result, Kubernetes provides us with a local-based container called “minikube.” At every Kubernetes application start, we will start a minikube in Kubernetes, which is basically a terminal, which is required for running Kubernetes commands. In this step, we run the command to initialize Minikube, which is:
When we run this command on our system terminal, the execution of the command starts by pressing the enter button. The command shows us a below-attached screenshot result in return.
Step 2: Generate Certificate Signing Request
After creating a cluster by using Minikube, we now want to create a certificate signing request. In exchange for this action, we run the command for signing the certificate request and generating a private key.
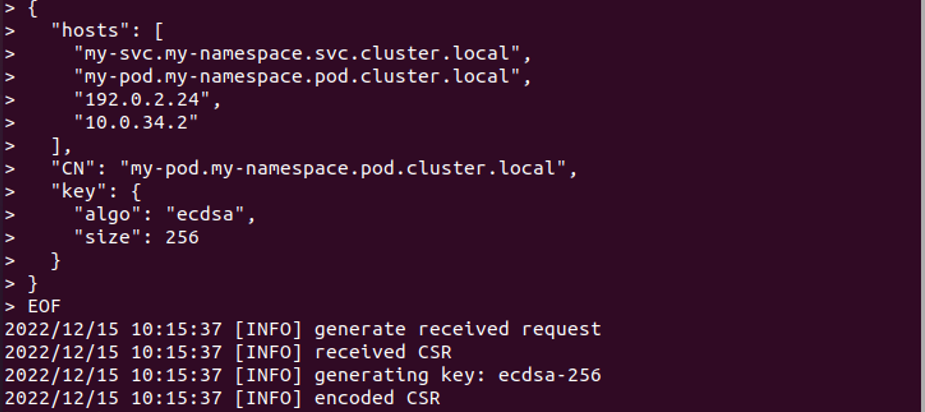
After query execution, the request is successfully generated with the private key. The result is attached above as a screenshot.
Step 3: Create a Certificate Signing Request Manifest in the YAML File
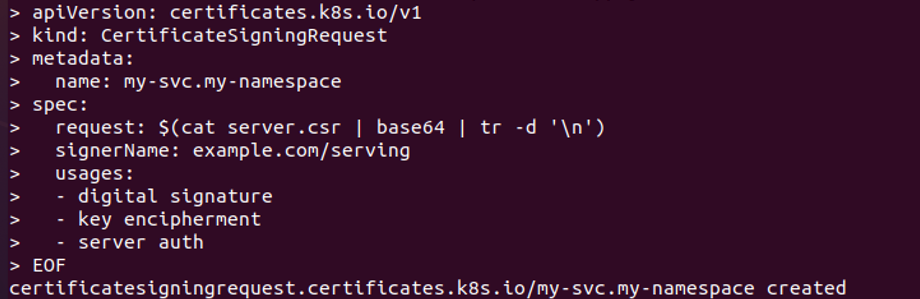
In this step, we will create a YAML file manifest for creating a CSR in Kubernetes. We run the command below:
Following the execution of this command, a YAML file is successfully created. And we send it to the API server, as shown in the attached screenshot.
Step 4: Get Certificate Signing Request Status
In this step, we will look at the CSR status as seen through the API. We can run the given command to retrieve the status of the certificate request.
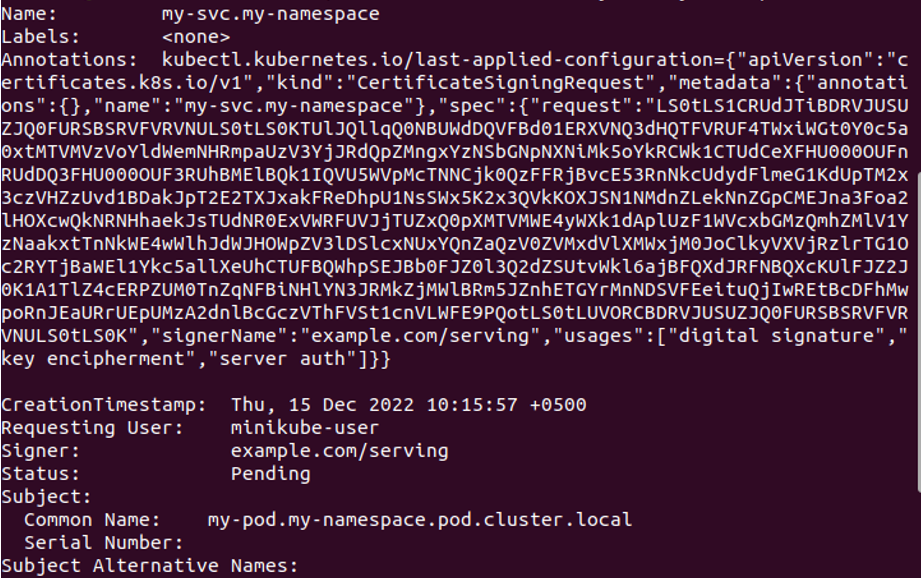
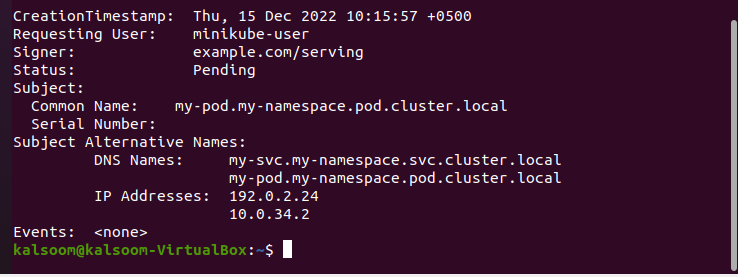
When the command is run, the CSR status is displayed in the output, as shown in the attached screenshot. The status of CSR is “pending,” and this status is coming from API. The name of the file is my-svc. my-namespace and annotations, requesting user and subject, subject alternative names having DNS names and IP addresses, events, etc. are included in the CSR description. The status is “pending,” which means the CSR certificate has not been approved yet.
Step 5: CSR Certificates Approvement
The CSR certificate’s status is still pending. So, in this case, we will send a query to Kubernetes’ API to approve the CSR certificate. We run this command for approval:
The command shows the output after execution. An authorized person, such as the Kubernetes administration, approves the CSR certificate. As we are authorized users, we create YAML files. As a result, the CSR certificate is easily approved using the command, as shown in the screenshot below for clarification.

my-svc.my-namespace is approved successfully through the certificates.k8s.io API.
Step 6: Fetch the CSR Certificate in Kubernetes
We are now waiting to see if the CSR certificate has been approved. So, we will run the command to get a list of all CSR certificates that are currently active in the system. Run the command:
 The name of the approved CSR certificate in Kubernetes is shown in the attached screenshot. This command returns the name, age, signer name, requestor, requested duration, and condition of the CSR certificate.
Step 7: Sign the Certificate by Creating Authority
In this step, we will see how certificates are signed in Kubernetes. The SSL certificate is approved but not signed yet. The name of the signer appears on the certificate in Kubernetes. We run the command through which the requested signer signs the certificate. The command is:
{
"CN": "My Example Signer",
"key": {
"algo": "rsa",
"size": 2048
}
}
EOF
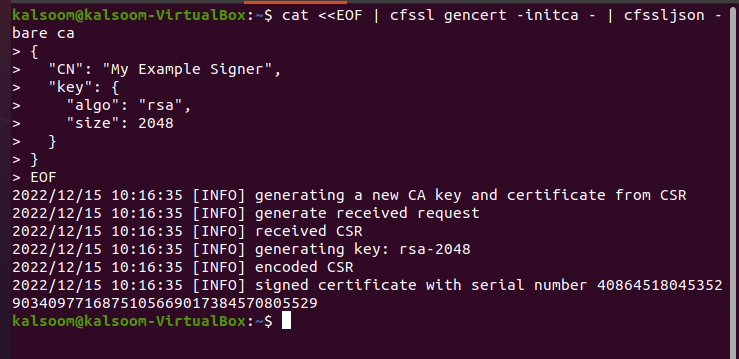
The command is run to sign the certificate digitally. Signer signs the requested certificates and updates the API status with the command, “SSL certificate.” We created a signing certificate by running the above command and the result is shown in the attached screenshot. A unique serial number has successfully been used to sign the certificate.
Step 8: Create a JSON File to Issue a Certificate
After the certificate signing, we create a JSON file from which we issue a certificate. We will create a JSON file by running the following command with the attached screenshot:
After the command is executed, the JSON file is created as can be viewed in the screenshot below.

Step 9: Use Server-Signing-config.json
In this step, we use the server-signing-config file that is in JSON to sign and issue the certificates. We run the command for certificate signing with a private key file.

After this command, the certificate that is already defined in the json file is signed. This CSR’s serial number is generated. Here, we generate a signed serving certificate file named “ca-signed-server.pem.”
Step 10: Signed Certificate Upload in API Object
In this step, we upload the signed certificate to the pending API status that we saw above. The command for uploading is:
'
$(base64 ca-signed-server.pem | tr -d '\n')' " ' | \> kubectl replace --raw /apis/certificates.k8s.io/v1/certificatesigningrequests/my-svc.my- namespace/status -f -
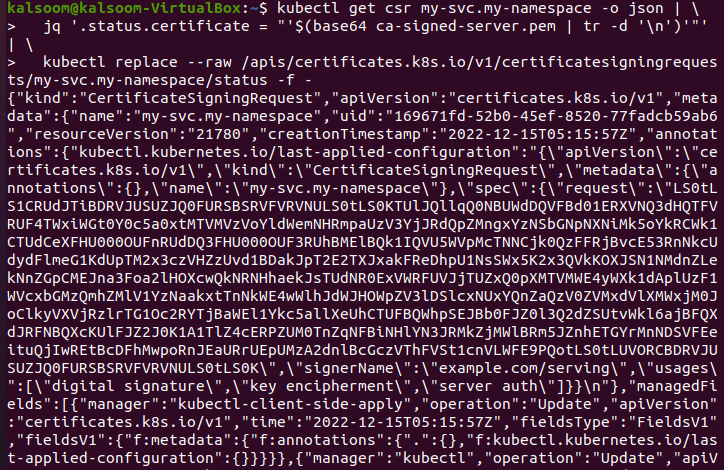
When this command is executed, the signed certificate is successfully uploaded whenever the CSR is approved. The screenshot attached aboved shows us a JSON format that uploads the signed certificate as API objects.
Step 11: Enlist Approved Certificates in Kubernetes
We again run the command to show the approved certificates in Kubernetes.

The certificate was approved and successfully issued, as shown in the screenshot above.
Step 12: Save the Certificate in the System
In this step, we will learn how to download the signed certificate and use it successfully in our system. We easily deploy the certificate on the server. The command is:
| base64 --decode > server.crt
Step 13: Populate the Certificate
In this step, we will learn how to populate the certificate on the server so that we can easily use the certificate for web security. We run the command:

The above-attached screenshot shows us that TLS secure or secret server is created successfully with name cert server.cr and having private key server-key.pem.
Step 14: Config Map the Certificate
In this step, we will configure the certificate to ensure that it is a secure serving certificate by running the command below:

As shown in the attached screenshot, the config map/example-serving-ca is successfully created in Kubernetes for a secure connection on the web server.
Conclusion
SSL certificates are used for providing security to Kubernetes applications on the web server. We explained every step-in detail for your understanding. You can also run the same commands on your Kubernetes application to install the SSL certificate.
Source: linuxhint.com