A Step-by-Step Guide on How to Create a Batch File for Beginners
We’ll go through the fundamentals of generating a batch file in this step-by-step tutorial for beginners, complete with code samples.
Step 1: Understanding Batch Files
It’s crucial to comprehend a batch file before starting to create one. Batch files are used to automate repetitive activities on a Windows system and frequently have the .bat or.cmd extension.
Step 2: Launch a Text Editor
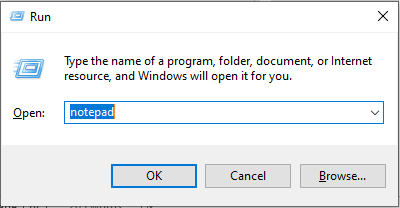
A batch file can be made using any text editor, such as Notepad, Notepad++, or WordPad. Windows comes with Notepad, an easy-to-use text editor, pre-installed. Open Notepad by:
- Press Win + R simultaneously to launch the Run dialog box.
- Press Enter after typing “notepad”.
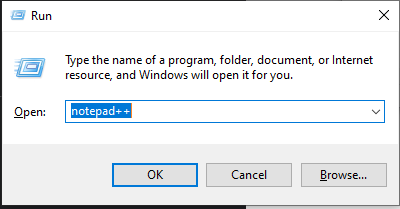
Since we use Notepad++, a more sophisticated version of Notepad, in this article, you should download it from the official website and install it on a machine with the Windows operating system.
Step 3: Type the Batch File Commands
When we run the batch file (either by command prompt or directly), the commands written in the text editor will be executed. A straightforward batch file that displays the message “Hello, Press enter to continue!” to the console is shown here as an example. You can copy the below code into a text editor of your choice:
echo Hello, Press enter to continue!
pause
Here are the functions of each line:
- echo off: In order to make the script more explicit, this line disables the display of each command as it is carried out on the command prompt screen.
- “Hello, Press enter to continue!” appears in the command prompt as the second line’s display.
- Pause: As long as the user doesn’t press a key, this line stops the script from running.
Step 4: Save the File as a .bat File
After creating the batch script with the .bat extension, the user must save it by following these steps:
- Tap the “File” menu located in the top left corner of Notepad, WordPad, or Notepad++.
- Select the “Save As” option from the File Menu item.
- Go to the “Save as type” menu and choose “Batch File” in Notepad++, but in simple Notepad, select the “All Files” option from the drop-down menu, and at the end, add .bat extension to the filename.
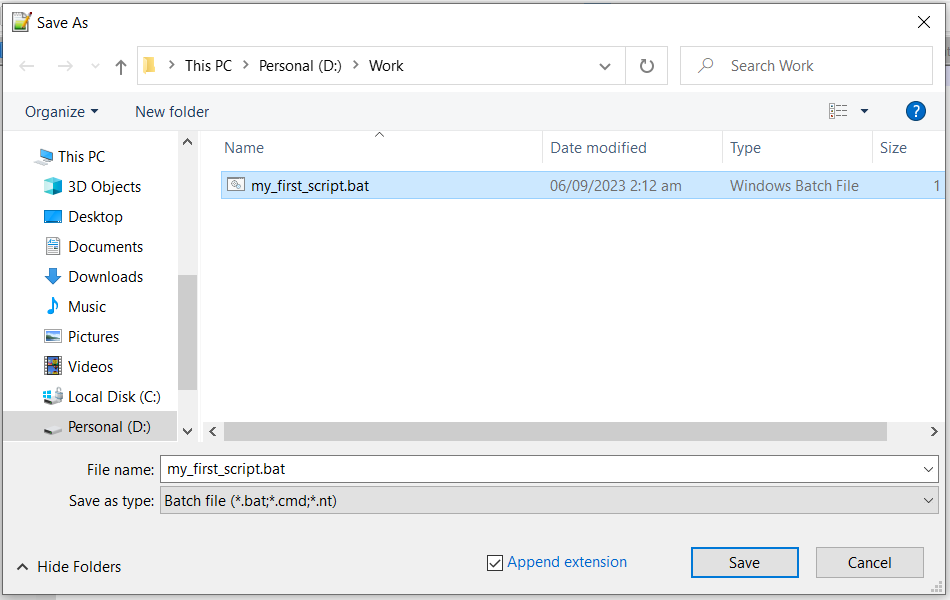
4. Provide a name for the file that ends in “.bat,” such as “my_first_script.bat.”
5. Press the “Save” button within the Save As dialogue after deciding where to save the batch file.
6. The user’s computer will store the batch file in the specified place.
Note that when you save the file, make sure to give it a .bat extension. This tells Windows that the file is a batch file.
Step 5: Run the Batch File
There are two ways to run the batch file:
Double-click the Batch File: When you double-click the batch file in your working directory, it will execute. Here is the screenshot of what happens when we double-click on the batch file.
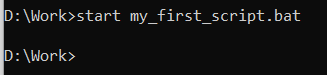
Using Windows Command Prompt: You can also run it from the command prompt by typing the following command:
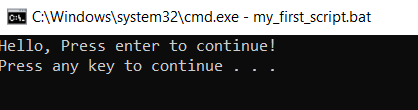
However, in order to run this command, you must first launch the Windows command prompt, navigate to the working directory, or provide the complete path to the the batch file. After entering the command, press the Enter key on the keyboard. This will launch an additional prompt window and show the results there. This is the outcome:
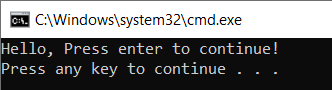
Simply type the batch file’s name, including the .bat extension, to view the output within the same currently open and active command prompt. The command and output are shown below:
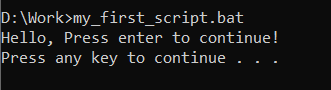
When the user presses any key, the control is shifted to the command prompt screen again.
Step 6: Verify the Output
The batch file will execute the commands you’ve entered, and the Command Prompt window will display the results. The previous example, it will show “Hello, Press enter to continue!” and keep the command screen until we press a key. Congratulations! You’ve written and run a batch file successfully. In a Windows environment, you can add more commands and make more complex batch files to automate different tasks.
Calculator Example
Here’s a more advanced example of a batch file that can perform basic calculator operations, including addition, subtraction, multiplication, and division:
The first line, @echo off, blocks the echo command from showing its output. This is done to prevent the batch file from showing the menu and other messages multiple times.
The next line, setlocal enabledelayedexpansion, enables delayed expansion. In other words, variables are not enlarged until they are really used. This is done to prevent the batch file from expanding undefined variables.
The batch file’s main loop starts with the menu label. This cycle will continue until the user decides to close the calculator.
The cls command clears the screen.
The user sees a message when they use the echo command.
The user is asked for input using the set /p command, which is then saved in a variable.
The if statement jumps to the proper label following a check of the variable choice’s value.
The GOTO statement jumps to the label that is supplied.
The pause command stops the batch file while waiting for the user to press a key.
The batch file is terminated using the exit command.
The batch file is terminated with the exit /b command, which also produces a unique exit code.
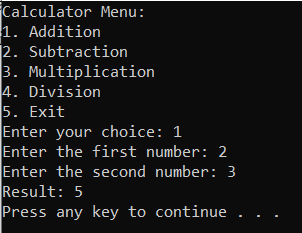
In conclusion, this batch file generates a straightforward calculator that enables addition, subtraction, multiplication, and division. The calculator will not let the user divide by zero.
Code Snippet:
setlocal enabledelayedexpansion
:CalcMenu
REM Clear screen
cls
REM Print Menu for Calculator
echo Choose from Below Menu:
echo 1. Addition
echo 2. Subtraction
echo 3. Multiplication
echo 4. Division
echo 5. Close
set /p menuchoice=Enter your choice:
if "%menuchoice%"=="1" goto ADD
if "%menuchoice%"=="2" goto SUB
if "%menuchoice%"=="3" goto MUL
if "%menuchoice%"=="4" goto DIVD
if "%menuchoice%"=="5" goto CLOSE
echo Invalid Menu Option. Please try again.
pause
goto CalcMenu
:ADD
set /p first_number=Enter the first number:
set /p second_number=Enter the second number:
set /a result=first_number+second_number
echo Result of (%first_number% + %second_number%)= %result%
pause
goto CalcMenu
:SUB
set /p first_number=Enter the first number:
set /p second_number=Enter the second number:
set /a result=first_number-second_number
echo Result of (%first_number% - %second_number%)= %result%
pause
goto CalcMenu
:MUL
set /p first_number=Enter the first number:
set /p second_number=Enter the second number:
set /a result=first_number*second_number
echo Result of (%first_number% x %second_number%)= %result%
pause
goto CalcMenu
:DIVD
set /p first_number=Enter the first number:
set /p second_number=Enter the second number:
if "%second_number%"=="0" (
echo Division by zero is not allowed.
) else (
set /a result=first_number/second_number
echo Result: %result%
)
pause
goto CalcMenu
:CLOSE
echo Closing the calculator batch file.
exit /b
Here is the output:
Conclusion
A batch file can be easily developed, making it the perfect tool for automating routine Windows operations. Learn scripting fundamentals, including variables, loops, and conditional statements, and use them to create a working batch file. Running batch files in a controlled environment can help to find and correct any errors during testing and debugging.
Source: linuxhint.com