How Can I Set a CSS Border on One Side Only?
Developers can apply multiple CSS properties to make their web pages more attractive, like “height” and “width” properties for setting size, “text-align” for adjusting text, “border-style” and “border-radius” properties for setting the border around the element. Additionally, you can add a border according to your requirements, such as on one side of the element, only to make things behind the objects more visible.
This post will demonstrate:
Method 1: Set Border on One Side
In CSS, users can set the border on one side of the desired element. For this purpose, the “border-left”, “border-right”, “border-top” and “border-bottom” properties are used for adding borders at the left, right, top, or bottom side.
In this section, we will specifically set the border on the left side of the container. To do so, follow the below-mentioned instructions.
Step 1: Create a div Container
First, create a div container with the help of the “<div>” tag. Insert an “id” attribute and assign a name to the id.
Step 2: Insert Heading
Next, utilize the “<h1>” tag to add a heading inside the div container. Moreover, you can also use other heading tags according to the requirement, such as “<h1>” to “<h6>” tags:
<h1> Border at One Side</h1>
</div>
It can be seen that the container has been created successfully:
Step 3: Access div Container
Now, access the HTML div container, and access the class name. To do so, a class selector “#” is used with the class name.
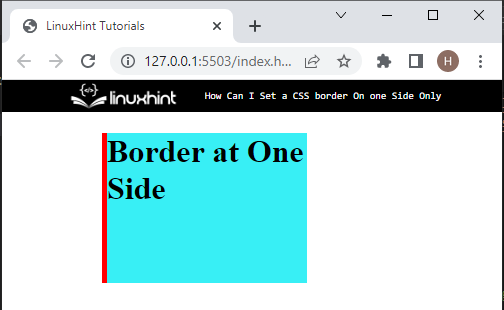
Step 4: Insert Border on One Side Only
After accessing the div container, apply the below-mentioned CSS properties:
border-left: 5px solid red;
background:rgb(56, 239, 245);
margin: 20px 100px;
width:200px; height:150px
}
Here:
-
- “border-left is a shorthand property for setting the border-left width, style, and color.
- “background” property is utilized for adjusting the background color of the element.
- “margin” properties set the space outside of the boundary.
- “width” defines the element width size in a container.
The resultant image shows the border with one side only:
Method 2: Set Border on All Sides With Different Styles
To set the border on all sides with different colors, utilize the above HTML code. Then, access the div container with the help of the id name and selector:
margin: 80px;
border-width: 8px 2px 1px 10px;
border-radius: 50px;
border-style: inset solid double dotted;
border-color: rgb(40, 5, 235) rgb(238, 146, 9) rgb(255, 0, 242) rgb(19, 19, 18);
}
In the above-provided code:
-
- “margin” specifies the blank space outside of the element.
- “border-width” sets the width with different values for each side. For instance, we have added different values in pixels.
- “border-radius” is utilized for making the round curve of the border.
- “border-style” property is used for setting the style of the border. In this scenario, four different types of styles are set for each side of the border.
- “border-color” property is utilized for allocating the color to the border. Here, the value for each side is set as a different color.
As a result, the border with different styles on each side will be applied:

In this article, you have learned different ways to set the CSS border on one and multiple sides.
Conclusion
To set the border on one side only, first, create a div using the “<div>” element. Next, access the div container and apply the CSS properties. After that, use any property among these, including “border-left”, “border-right”, “border-top” and “border-bottom” to set the one side border. Furthermore, users can also set the “border-width”, “border-style” and “border-color” separately on each side of the border. This post explained the method for setting the CSS border on one side only.
Source: linuxhint.com