SQLite NOT NULL Constraint
Constraints are said to be limitations or restrictions that are applied to specific columns of a table. Sometimes, it refers to the extra privileges that are assigned to the particular columns. One of that constraints is NOT NULL constraints in SQL database. Whichever column has been specified with the NOT NULL constraint, that column cannot be left without a value. Thus, we have decided to cover the use of the NOT NULL constraint within the SQLite database while implementing this article on Ubuntu 20.04. Before going to the illustration of using the NOT NULL constraint in the SQLite database, we have to open the Ubuntu terminal via the Ctrl+Alt+T instruction and update and upgrade our system using the shown-below instruction.

Make sure to have SQLite C-library of SQL already installed on your Linux system. After that, you need to launch it within the shell terminal with the use of the keyword “sqlite3”. The static shell will be opened within the shell of Ubuntu 20.04 for the SQLite database.
Let’s list all the tables that are found in the SQLite database. Thus, we will be trying the “.tables” instruction to do so. The Sqlite3 database doesn’t contain any database yet (i.e. according to the “.tables” instruction.)

The constraints can only be applied to the columns of a table. If we don’t have any table, then we don’t have any columns. Thus no constraints. Therefore, we have to create a table in the database on which we can apply the NOT NULL constraint. So, the database allows us to use the CREATE TABLE instruction to create one table with the name “Test”. This table will contain a total of 2 columns “ID” and “Name”. The column ID will be of integer type and will be used as a primary key for the table. The “Name” column will be of text type and must not be Null as per the use of the NOT NULL constraint specified at the time of creating a table. Now, we have a new table “Test” in the database as per the “.tables” instruction.

The use of SELECT instruction to fetch the records of a Test table is showing that the table is empty right now. So, we need to add some records to it first.
\
We will be using the SQL’s INSERT INTO instruction followed by the name of a table and its column to insert the data records within its columns. You need to add records after the “VALUES” keyword followed by the simple brackets holding a total of 10 records. No record has been specified NULL for the column “Name” so far as presented below.
(5, "Ketty"), (6, "Angelina"), (7, "Nina"), (8, "Dilraba"), (9, "Tom"), (10, "Tyalor");
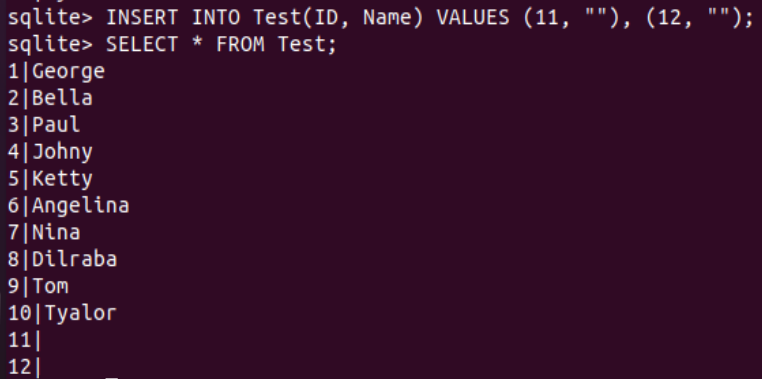
INSERT INTO Test(ID, Name) VALUES (11, ""), (12, "");
INSERT INTO Test(ID, Name) VALUES (11), (12);
INSERT INTO Test(ID, Name) VALUES (13, NULL), (14, NULL);

After inserting the records into the Test table, we have tried the SELECT instruction to display all the data on our SQLite shell. It displayed 10 records for the ID and Name column.

Let’s see how the NOT NULL constraint reacts to the spaces and NULL keyword while inserting data into column “Name” of the Test table. So, we have used the empty value “” the place of the “Name” column within the VALUES part of the INSERT INTO instruction. The record has been successfully added to the table Test. After using the SELECT instruction on the shell, we have found that it has been displaying nothing for column “Name” at records 11 and 12 and taking space as a NOT NULL value.
If you try the INSERT INTO instruction with the use of column names that contain a constraint NOT Null and doesn’t add the value for a particular column, then it will throw an error: “1 values for 2 columns” as presented below. To remove this error, you need to put a value for the “Name” column and do not leave it empty.

Let’s put the NULL Keyword within the VALUES part of the INSERT INTO instruction to add the null records for the column “Name” that contains the NOT NULL constraint. Execution of this instruction with the NULL keyword is throwing an error “NOT NULL constraint failed: test.Name”. This means we cannot put NULL as a value to the column “Name” due to its NOT NULL constraint restriction.

Let’s take a look at another example. So, we have created a new table Actor with the three columns ID, Name, and Age via the CREATE TABLE instruction. None of the columns contains a NOT NULL constraint on it.
![]()
Right now the table Actor is empty as per the SELECT “*” instruction below.

We have to put some records in the table “Actor” first with the INSERT INTO instruction. So, we have added 5 records for all three columns: ID, Name, and Age.
(3, "Leonardo", 50), (4, "Tom", 55);

We have tried the SELECT instruction to fetch all the newly added records of an “Actor” table. A total of 5 records have been displayed on our screen with no NULL values.

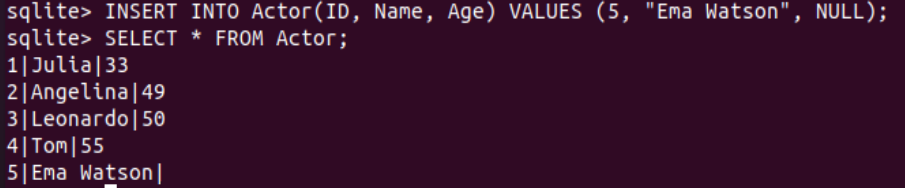
Let’s add a new record within the Actor table that contains a NULL value using the INSERT INTO instruction. So, we have tried the instruction for all the 3 columns and added a NULL value for the column “Age”. The record has been successfully inserted in the table and didn’t throw any error because we haven’t set any NOT NULL constraint for any of the columns of a table “Actor”. The use of SELECT instruction for the table Actor has been displaying all the first 5 added records and the 6th record with a NULL value at its column “Age”.
<blockquote>> SELECT * FROM Actor;
Conclusion:
So, this was about the use of NOT NULL constraints for specific columns of SQLite tables. We have demonstrated how the database reacts to not putting the values within the columns with NOT NULL constraints and how we can use the NULL value with the column values.
Source: linuxhint.com