5 Hacks to Fix Headset Mic Not Working
How to Fix Headset Mic Not Working?
To fix the headset mic not working, methods are given below:
- Set microphone as default
- Update drivers
- Allow apps to access microphone
- Make sure mic is enabled
- Use different jack
Let’s explore each of the methods one by one to resolve the stated problem.
Fix 1: Set Microphone as Default
Setting the Microphone as default might fix the stated issue. To set the microphone as default, the guide is provided below:
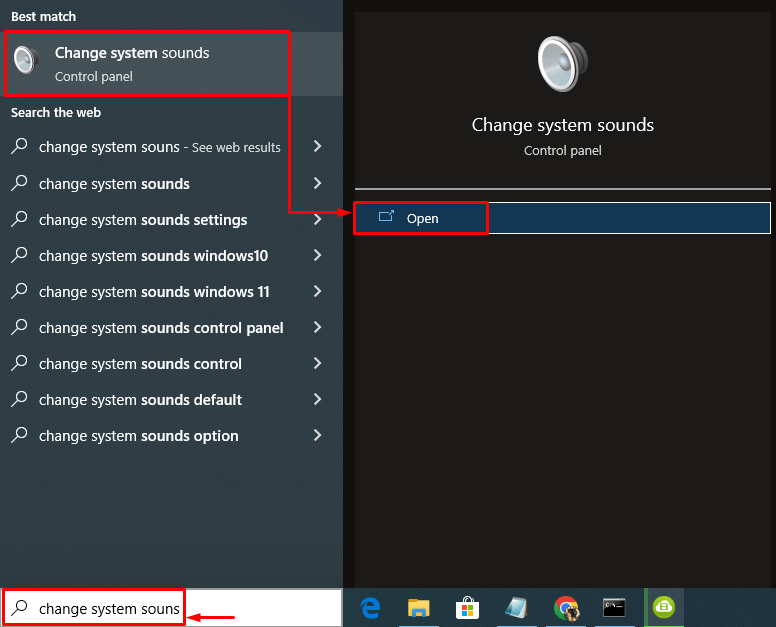
Step 1: Open Change System Sounds
First of all, open “Change system sounds” from the Start panel:
Step 2: Set Mic as the Default Device
Switch to the “Recording” tab. Right-click on the microphone and select “Set as Default Device”:

Hit the “OK” button to save changes:

The green tick indicates that the microphone has been set as default.
Fix 2: Update Audio Drivers
Updating audio drivers may resolve the “headset mic not working” issue. For that reason, follow the steps mentioned below:
Step 1: Open Device Manager
Firstly, launch “Device Manager” from the Windows Start panel:

Step 2: Update Audio Drivers
Expand the “Audio inputs and outputs” section. Click on the audio driver, then select “Update Driver”:

Click on “Automatically find updated driver software”:

As you can see, the device manager has started to search for audio driver updates:

After updating the audio drivers restart the system and check if the issue is resolved or not.
Fix 3: Allow Apps to Access Microphone
Allowing the apps to access the microphone may resolve the stated error. As some apps don’t have access to use a microphone, and they show the stated error.
Step 1: Open Settings
First of all, open the “Settings” app from the Windows Start menu:

Step 2: Navigate to the Privacy Settings
Click on “Privacy” settings:

Step 3: Enable Microphone Access
Navigate to the “Microphone” section. Toggle on “Allow apps to access your microphone” settings:

This will allow all the apps to access the microphone.
Fix 4: Make Sure Mic is Enabled
Maybe the mic is disabled from the settings. To enable the mic, follow the steps below given:
Step 1: Launch Settings
First, open “Settings” from the “Start menu”. Select “System” from the below window:

Step 2: Open Manage Sound Devices
Navigate to the “Sound” section. Click “Manage sound devices”:

Step 3: Enable Microphone
If the mic is visible under the “Disabled” section. It means the mic is disabled. Click on the mic and select “Enable”:

This will enable the mic. Now, check if the “headset mic not working” problem is resolved or not.
Fix 5: Use Different Jack
The reason behind the “headset mic not working” problem could be that the jack into which the mic is plugged is faulty. So, try changing the audio jack. If the mic is working fine on other jacks, then you need to repair the faulty jack. If it is not working on other audio jacks, then the mic is faulty, and you need to buy a new one.
Conclusion
The “Headset mic not working” problem can be fixed using multiple methods. These methods include setting the microphone as default, updating sound drivers, allowing apps to access the mic, enabling the mic, or using a different jack. This blog post has demonstrated multiple methods to fix the stated error.
Source: linuxhint.com