30 Examples of the C++ Vectors
In C++, Vector is a one dimensional data structure which dynamically increases itself based on the requirement. Data organization (insertion/modification/deletion) can be done efficiently in this data structure. Its applications include the following:
- Representing the mathematical vectors in scientific and engineering applications
- Queues, stacks can be implemented using this data structure, etc.
Most of the common CRUD operations and functions related to this data structure are discussed scenario-wise in detail with syntax and code snippets.
Topic of Contents:
- Insert an Element into a Vector
- Insert Multiple Elements into a Vector
- Access the Elements from a Vector
- Update the Element in a Vector
- Remove a Specific Element from a Vector
- Remove All Elements from a Vector
- Union of Vectors
- Intersection of Vectors
- Check Whether the Vector Is Empty or Not
- Traverse a Vector Using Const_Iterator
- Traverse a Vector Using Reverse_Iterator
- Push the Elements into the Vector
- Pop the Elements from the Vector
- Swap the Vectors
- Fetch the First Element from the Vector
- Fetch the Last Element from the Vector
- Assign New Values to a Vector
- Extend the Vector Using Emplace()
- Extend the Vector Using Emplace_Back()
- Maximum Element of a Vector
- Minimum Element of a Vector
- Sum of Elements in a Vector
- Element-Wise Multiplication of Two Vectors
- Dot Product of Two Vectors
- Convert a Set into a Vector
- Remove the Duplicate Elements
- Convert a Vector into a Set
- Remove the Empty Strings
- Write a Vector to a Text File
- Create a Vector from a Text File
Insert an Element into a Vector
The std::vector::insert() function in C++ STL is used to insert the elements at the specified position.
Syntax:
Let’s utilize this function and pass the first position as a parameter that specifies the position where the element has to be inserted and provide the element as the second parameter.
The begin() function can be utilized here to return an iterator that points to the first element of the input vector. By adding the position to this function, the element is inserted at that position.
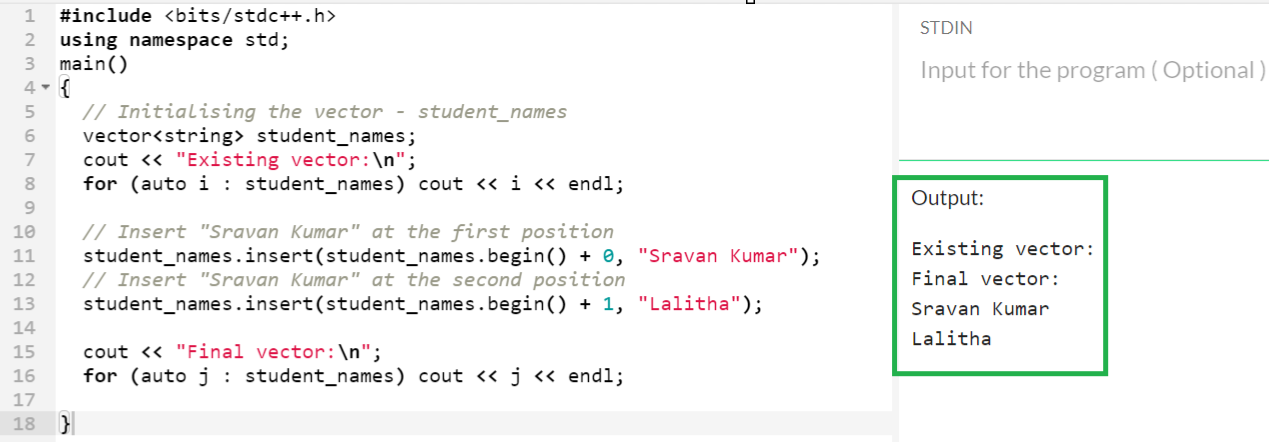
Let’s create the “student_names” vector of type string and insert two strings at the first and second positions, one after another, using the insert() function.
using namespace std;
main()
{
// Initialising the vector – student_names
vector<string> student_names;
cout << "Existing vector:\n";
for (auto i : student_names) cout << i << endl;
// Insert "Sravan Kumar" at the first position
student_names.insert(student_names.begin() + 0, "Sravan Kumar");
// Insert "Sravan Kumar" at the second position
student_names.insert(student_names.begin() + 1, "Lalitha");
cout << "Final vector:\n";
for (auto j : student_names) cout << j << endl;
}
Output:
Previously, the “student_names” vector was empty. After insertion, the vector holds two elements.
Insert Multiple Elements into a Vector
We use the same function which is std::vector::insert() in this scenario. But we need to pass the extra/different parameters to the same function to insert multiple elements into a vector.
Scenario 1: Inserting a Single Element Multiple Times
In this scenario, we add the same element multiple times.
Syntax:
To do this, we need to pass the size as the second parameter to the insert() function. The total parameters that are passed to this function is three.
Here:
- The position parameter specifies the element position to be inserted. If the size is greater than 1, the start position index will be the position.
- The size parameter specifies the number of times an element is to be inserted.
- The element parameter takes the element to be inserted into a vector.
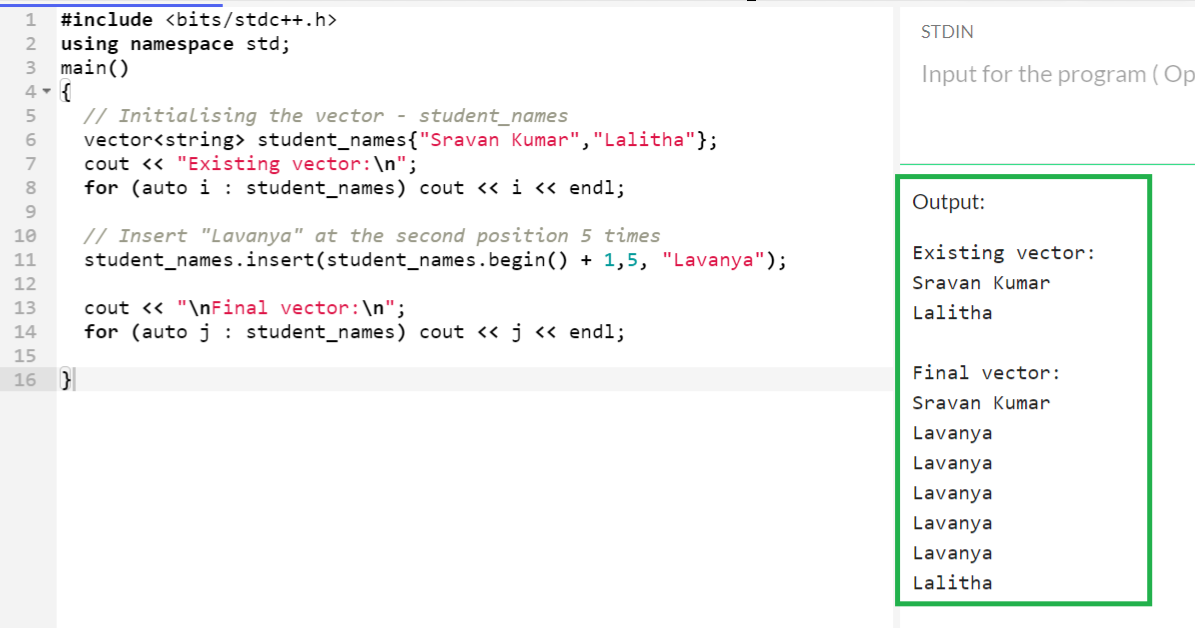
Consider the “student_names” vector with two strings. Insert the “Lavanya” strings five times at the second position.
using namespace std;
main()
{
// Initialising the vector – student_names
vector<string> student_names{"Sravan Kumar","Lalitha"};
cout << "Existing vector:\n";
for (auto i : student_names) cout << i << endl;
// Insert "Lavanya" at the second position 5 times
student_names.insert(student_names.begin() + 1,5, "Lavanya");
cout << "\nFinal vector:\n";
for (auto j : student_names) cout << j << endl;
}
Output:
In the existing vector, “Sravan Kumar” is in the first position and “Lalitha” is in the second position. After inserting “Lavanya” five times (from the second position to the sixth position), “Lalitha” moved to the seventh position (last).
Scenario 2: Inserting Multiple Elements
In this scenario, we add the different elements at a time from another vector. We also use the same function here but the syntax and parameters will change.
Syntax:
To do this, we need to pass the size as the second parameter to the insert() function. The total parameters that are passed to this function is three.
Here:
- The position parameter specifies the element position to be inserted.
- The “first_iterator” specifies the starting position from which the elements are to be inserted (basically, using the begin() function, an iterator is returned which points to the first element that is present in the container).
- The “second_iterator” specifies the ending position until which the elements are to be inserted (basically, using the end() function, an iterator is returned which points next to the last point that is present in the container).
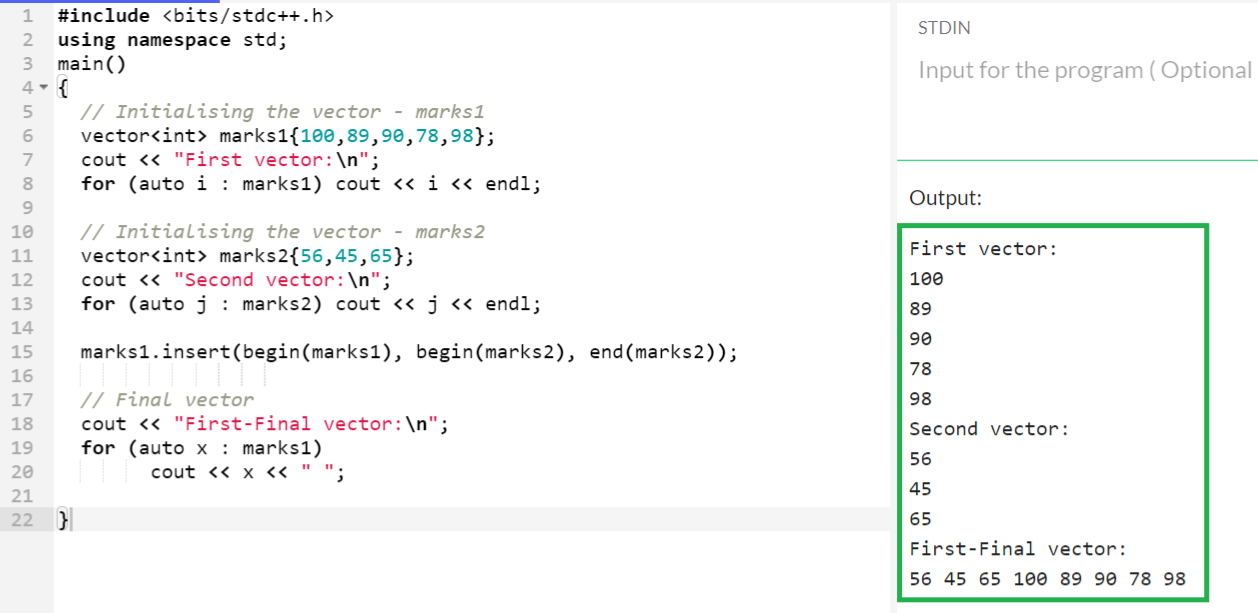
Create two vectors, “marks1” and “marks2”, of integer type. Insert all the elements that are present in the “marks2” vector into the first position of the “marks1” vector.
using namespace std;
main()
{
// Initialising the vector – marks1
vector<int> marks1{100,89,90,78,98};
cout << "First vector:\n";
for (auto i : marks1) cout << i << endl;
// Initialising the vector – marks2
vector<int> marks2{56,45,65};
cout << "Second vector:\n";
for (auto j : marks2) cout << j << endl;
marks1.insert(begin(marks1), begin(marks2), end(marks2));
// Final vector
cout << "First-Final vector:\n";
for (auto x : marks1)
cout << x << " ";
}
Output:
The first vector (marks1) holds five elements and the second vector (marks2) holds three elements. We passed the begin (marks1), begin(marks2), end(marks2) parameters to the “insert” function such that all the elements that are present in the second vector are iterated and inserted into the first vector at the beginning. So, the first vector holds eight elements.
Access the Elements from a Vector
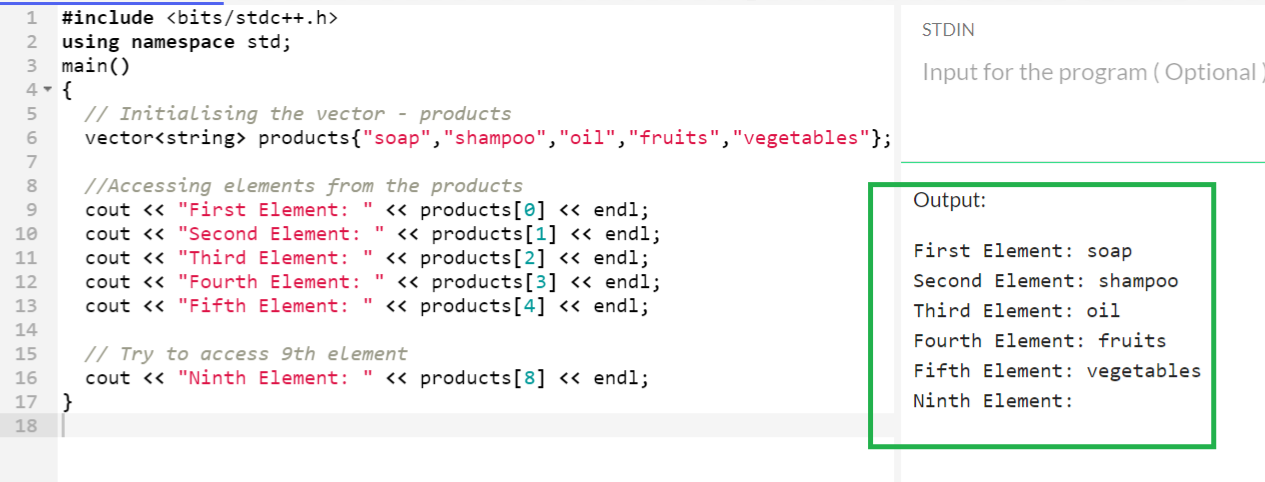
1. Using the [] Operator
In some scenarios, you may have a requirement to return only the specific elements from the vector. Returning all the elements is not needed. So, to return only the specific elements based on the index, the index operator and at() functions are utilized.
Syntax:
In C++, indexing starts from 0 for any data structure. If the element does not exist, it returns empty (No error or a warning is raised).
Consider the “products” vector with five items. Access all the elements one by one using the index position.
using namespace std;
main()
{
// Create vector – products with 5 strings
vector<string> products{"soap","shampoo","oil","fruits","vegetables"};
//Accessing elements from the products
cout << "First Element: " << products[0] << endl;
cout << "Second Element: " << products[1] << endl;
cout << "Third Element: " << products[2] << endl;
cout << "Fourth Element: " << products[3] << endl;
cout << "Fifth Element: " << products[4] << endl;
// Try to access 9th element
cout << "Ninth Element: " << products[8] << endl;
}
Output:
There is no element present at index 8. So, empty is returned.
2. Using the At() Function
At() is a member function which is similar to the previous use case but it returns the “std::out_of_range” exception when the index out of range is provided to it.
Syntax:
We need to pass the index position to this function.
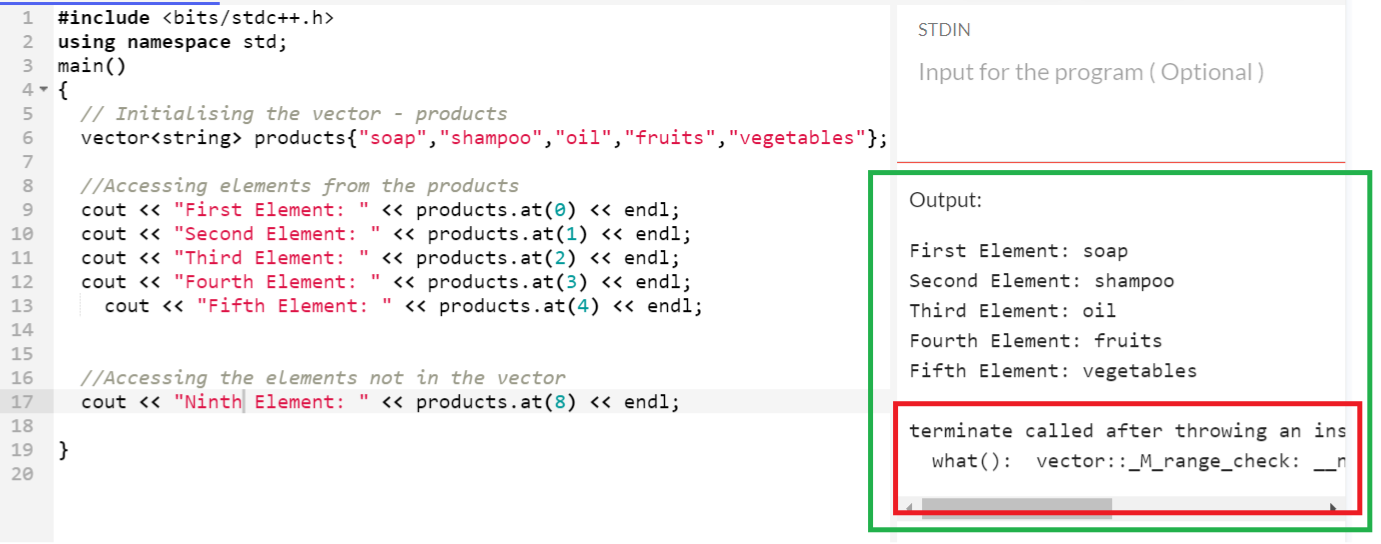
Consider the “products” vector with five items. Access all the elements one by one using the index position and try to access the element that is present at the 9th position.
using namespace std;
main()
{
// Create vector – products with 5 strings
vector<string> products{"soap","shampoo","oil","fruits","vegetables"};
//Accessing elements from the products
cout << "First Element: " << products.at(0) << endl;
cout << "Second Element: " << products.at(1) << endl;
cout << "Third Element: " << products.at(2) << endl;
cout << "Fourth Element: " << products.at(3) << endl;
cout << "Fifth Element: " << products.at(4) << endl;
//Accessing the elements not in the vector
cout << "Ninth Element: " << products.at(8) << endl;
}
Output:
An error occurs for accessing the 9th element:
what(): vector::_M_range_check: __n (which is 8) >= this–>size() (which is 5)
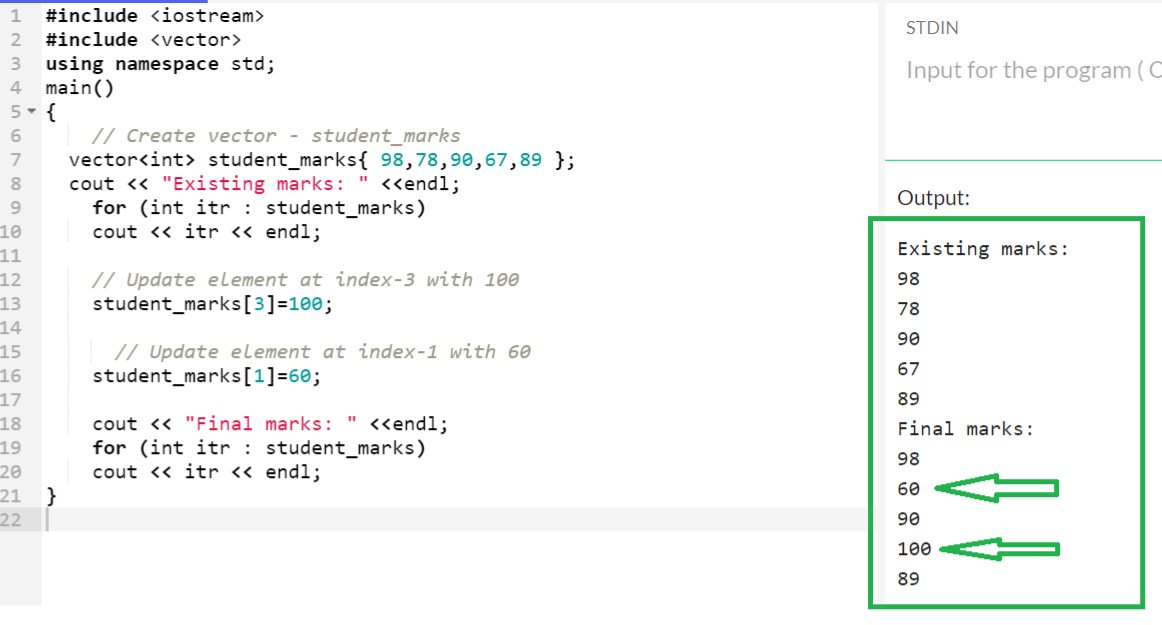
Update an Element in a Vector
1. Using the [] Operator
Using the index position, we can update the element in the vector. The [] operator takes the index position of the element that has to be updated. The new element will be assigned to this operator.
Syntax:
Consider the “student_marks” vector with five values. Update the elements present at indices 1 and 3.
#include <vector>
using namespace std;
main()
{
// Create vector – student_marks
vector<int> student_marks{ 98,78,90,67,89 };
cout << "Existing marks: " <<endl;
for (int itr : student_marks)
cout << itr << endl;
// Update element at index-3 with 100
student_marks[3]=100;
// Update element at index-1 with 60
student_marks[1]=60;
cout << "Final marks: " <<endl;
for (int itr : student_marks)
cout << itr << endl;
}
Output:
We can see that the final vector holds the update elements at indices 1 and 3.
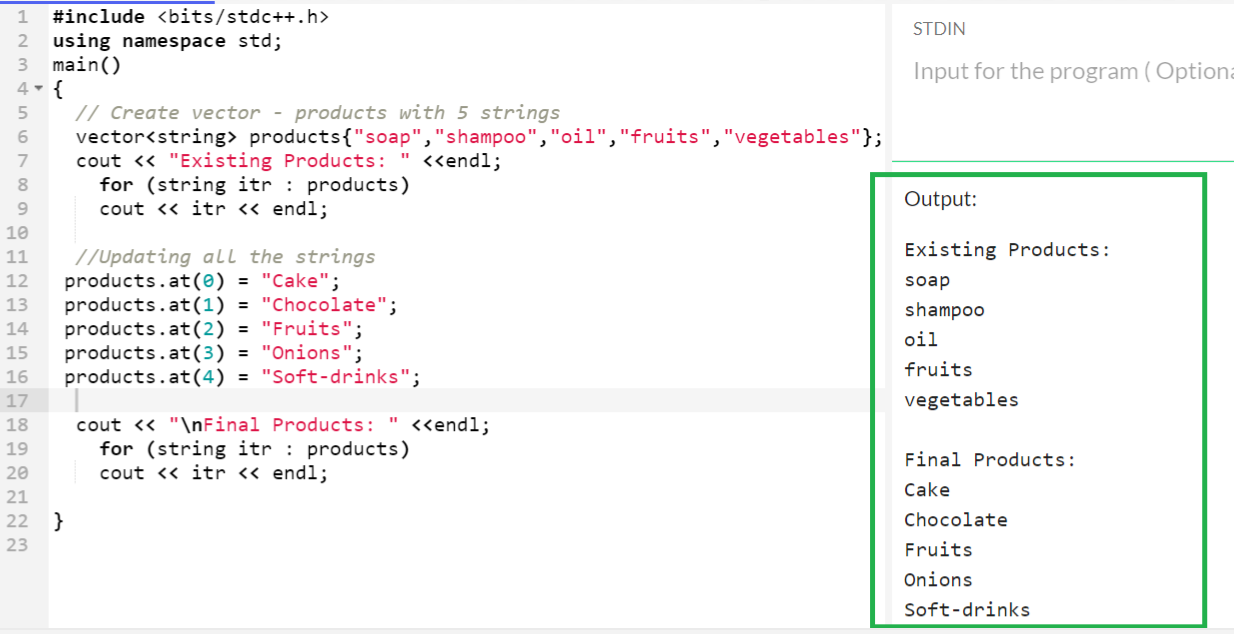
2. Using the At() Function
Similar to the index operator, at() is basically a member function which updates the value based on the index in an iterator. If the index that is specified inside this function doesn’t exist, the “std::out_of_range” exception is thrown.
Consider the “products” vector with five items. Update all the elements present in the vector with other elements.
using namespace std;
main()
{
// Create vector – products with 5 strings
vector<string> products{"soap","shampoo","oil","fruits","vegetables"};
cout << "Existing Products: " <<endl;
for (string itr : products)
cout << itr << endl;
//Updating all the strings
products.at(0) = "Cake";
products.at(1) = "Chocolate";
products.at(2) = "Fruits";
products.at(3) = "Onions";
products.at(4) = "Soft-drinks";
cout << "\nFinal Products: " <<endl;
for (string itr : products)
cout << itr << endl;
}
Output:
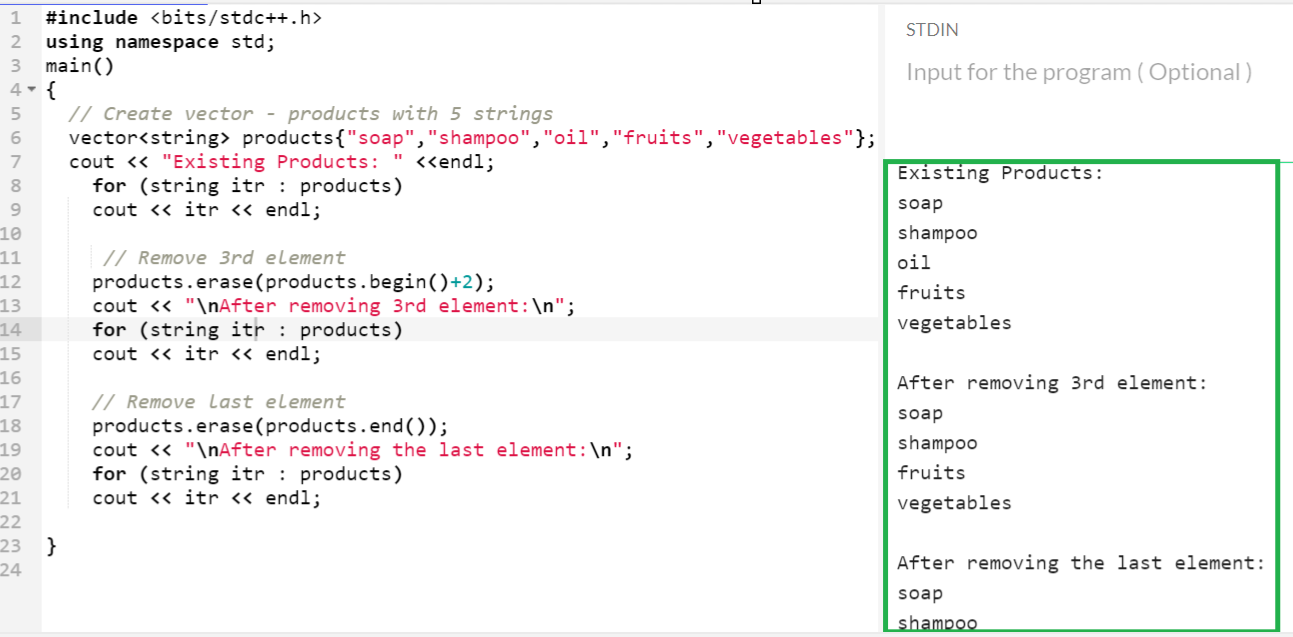
Remove a Specific Element from a Vector
In C++, the std::vector::erase() function is used to remove a specific element/range of elements from a vector. The elements are removed based on the iterator positions.
Syntax:
Let’s see the syntax for removing the specific element from a vector. We can utilize the begin() or end() functions to get the position of the element that is present in the vector to be removed.
Consider the “products” vector with five items.
- Remove the third element by specifying the begin() iterator. Begin() points to the first element in the vector. If we add two to this function, it points to the third element.
- Remove the last element by specifying the end() iterator. End() points to the last element in the vector.
using namespace std;
main()
{
// Create vector – products with 5 strings
vector<string> products{"soap","shampoo","oil","fruits","vegetables"};
cout << "Existing Products: " <<endl;
for (string itr : products)
cout << itr << endl;
// Remove 3rd element
products.erase(products.begin()+2);
cout << "\nAfter removing 3rd element:\n";
for (string itr : products)
cout << itr << endl;
// Remove last element
products.erase(products.end());
cout << "\nAfter removing the last element:\n";
for (string itr : products)
cout << itr << endl;
}
Output:
Now, there are only three elements (“soap”, “shampoo”, “fruits”) that exist in the “products” vector.
Remove All Elements from a Vector
Scenario 1: Remove a Range of Elements from a Vector
Let’s use the std::vector::erase() function to remove multiple elements in a range.
Syntax:
The two iterators (begin() points to the first element and end() points to the last element functions) are used to specify the range.
Consider the “products” vector with five items and remove all the elements from the second position. To achieve this, the first iterator is begin (products)+1 that points to the second element and the second iterator is end (products).
using namespace std;
main()
{
// Create vector – products with 5 strings
vector<string> products{"soap","shampoo","oil","fruits","vegetables"};
cout << "Existing Products: " <<endl;
for (string itr : products)
cout << itr << endl;
// Remove all the elements from the second position
products.erase(begin(products)+1,end(products));
cout << "\nFinal Products:\n";
for (string itr : products)
cout << itr << endl;
}
Output:
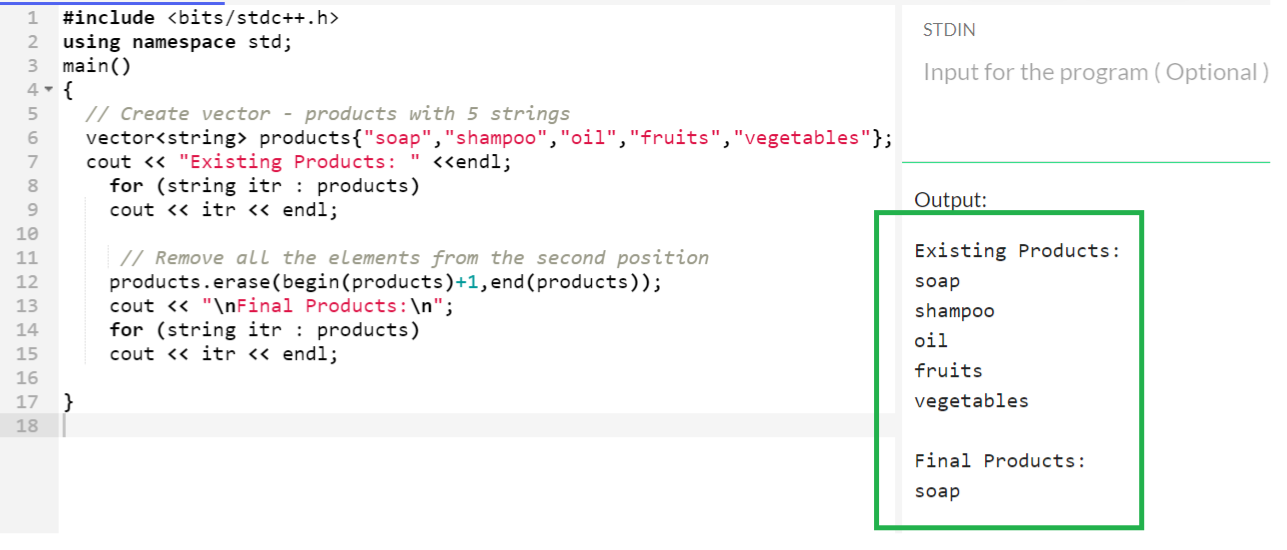
Now, there is only one element (“soap”) that is present in the “products” vector.
Scenario 2: Remove All Elements from the Vector
Let’s use the std::vector::clear() function to remove all the elements from the vector.
Syntax:
No parameters are passed to this function.
Consider the same vector that was utilized in the first scenario and remove all the elements using the clear() function.
using namespace std;
main()
{
// Create vector – products with 5 strings
vector<string> products{"soap","shampoo","oil","fruits","vegetables"};
cout << "Existing Products: " <<endl;
for (string itr : products)
cout << itr << endl;
// Remove all the elements from the products
products.clear();
cout << "\nFinal Products:\n";
for (string itr : products)
cout << itr << endl;
}
Output:
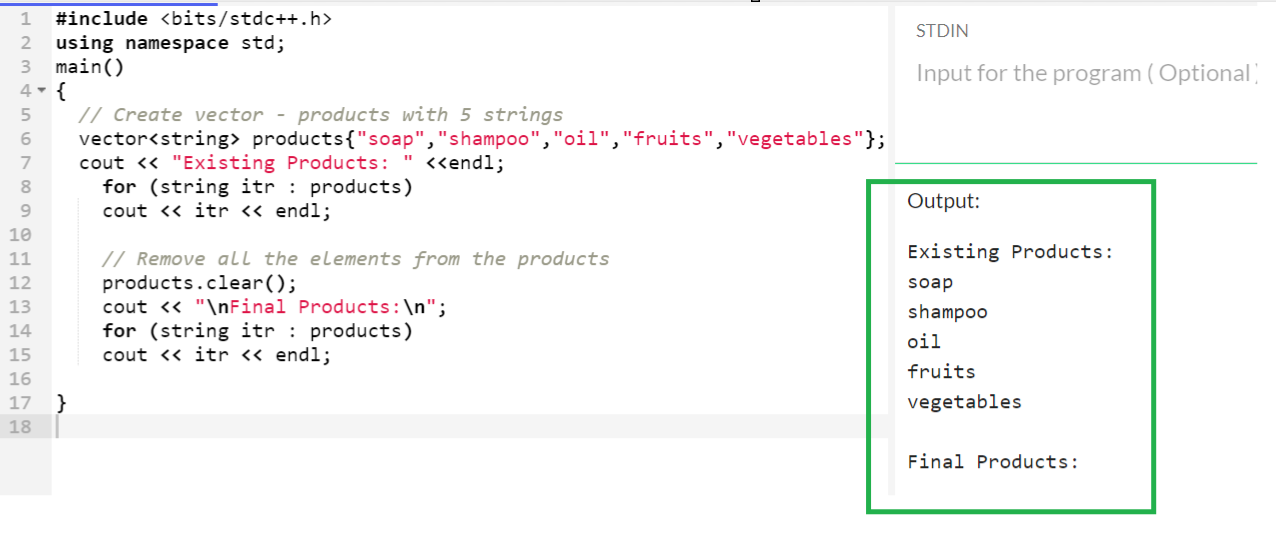
We can see that there are no elements in the “products” vector.
Union of Vectors
It is possible to perform the UNION operation on vectors using the std::set_union() function. Union returns the unique elements from the vectors by ignoring the duplicate elements. We need to pass both the iterators to this function. Along with this, an output iterator has to be passed which stores the result that is returned by both the iterators.
Syntax:
Here:
- The “first1” points to the first element of the first iterator (vector).
- The “last1” points to the last element of the first iterator (vector).
- The “first2” points to the first element of the second iterator (vector).
- The “last2” points to the last element of the second iterator (vector).
Create two vectors – “subjects1” and “subjects2” – of type integer.
- Sort the two vectors using the sort() function by passing the iterators.
- Create an output vector (iterator).
- Find the union of these two vectors using the std::set_union() function. Use begin() as the first iterator and end() as the last iterator.
- Iterate the output vector to display the elements that are returned by the function.
#include <iostream>
#include <vector>
using namespace std;
main()
{
// Create vector – marks1
vector<int> marks1={100,90,80,70,60};
// Create vector – marks2
vector<int> marks2={80,90,60,70,100};
// Sort both the vectors
sort(marks1.begin(), marks1.end());
sort(marks2.begin(), marks2.end());
vector<int> outputVector(marks1.size()+ marks2.size());
vector<int>::iterator i, s;
i = set_union(marks1.begin(), marks1.end(),
marks2.begin(),marks2.end(),
outputVector.begin());
cout << "\nmarks1 U marks2:\n";
for (s = outputVector.begin(); s != i; ++s)
cout << *s << " " << ‘\n‘;
}
Output:
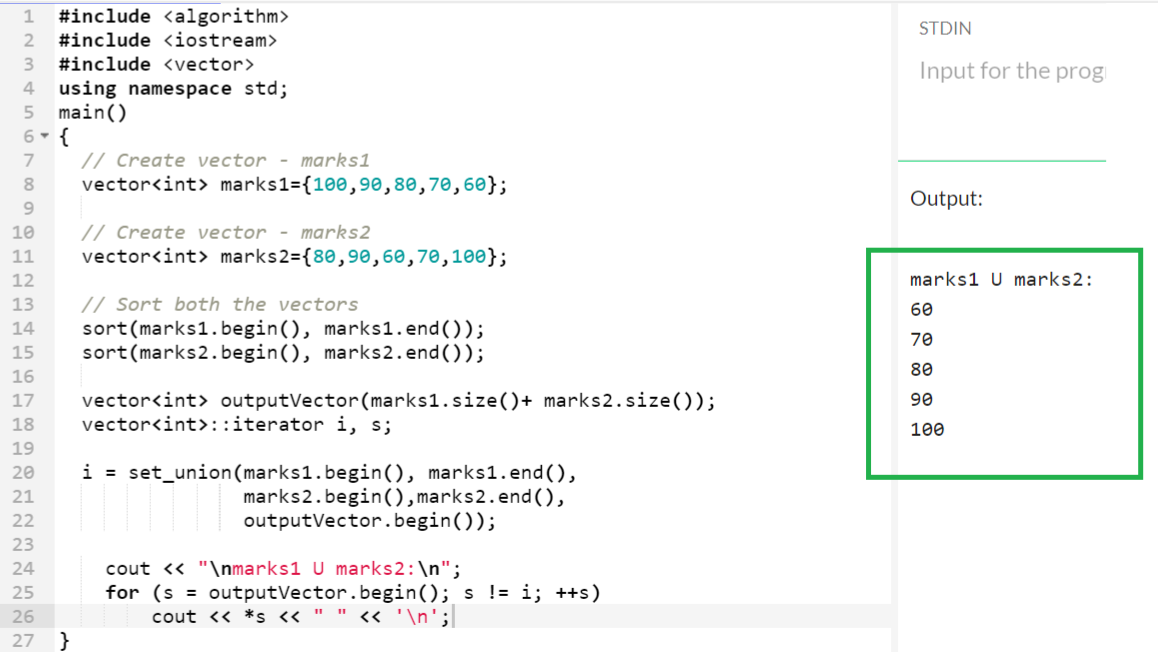
There are only five unique elements in both vectors (subjects1 and subjects2).
Intersection of Vectors
Finding the intersection of two vectors can be possible using the std::set_intersection() function. Intersection returns the elements that are present in both vectors.
Syntax:
The parameters that are passed to the set_union() function can be passed to this set_intersection() function, too.
Create two vectors – “subjects1” and “subjects2” – of type integer.
- Sort the two vectors using the sort() function by passing the iterators.
- Create an output vector (iterator).
- Find the intersection of these two vectors using the std::set_intersection() function. Use begin() as the first iterator and end() as the last iterator.
- Iterate the output vector to display the elements that are returned by the function.
#include <iostream>
#include <vector>
using namespace std;
main()
{
// Create vector – marks1
vector<int> marks1={100,10,80,40,60};
// Create vector – marks2
vector<int> marks2={50,90,60,10,100};
// Sort both the vectors
sort(marks1.begin(), marks1.end());
sort(marks2.begin(), marks2.end());
vector<int> outputVector(marks1.size()+ marks2.size());
vector<int>::iterator i, s;
i = set_intersection(marks1.begin(), marks1.end(),
marks2.begin(),marks2.end(),
outputVector.begin());
cout << "\nmarks1 ∩ marks2:\n";
for (s = outputVector.begin(); s != i; ++s)
cout << *s << " " << ‘\n‘;
}
Output:
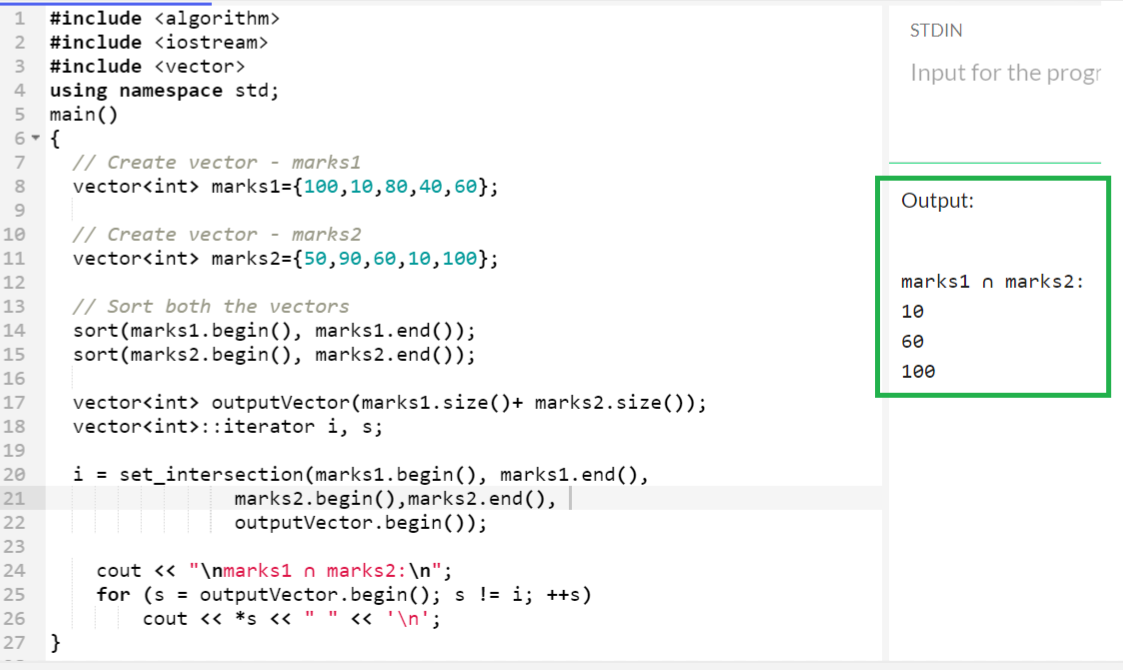
There are only three elements present in both vectors (subjects1 and subjects2).
Check Whether the Vector Is Empty or Not
Before working on vectors, it is important to check whether the vector is empty or not. It is also a good practice in software projects to check whether the vector is empty or not before doing the operations like CRUD operations, etc.
1. Using the Std::vector::empty()
This function returns 1 if the vector is empty (doesn’t contain any element). Otherwise, 0 is returned. No parameter is passed to this function.
2. Using the Std::vector::size()
The std::vector::size() function returns the integer that represents the total number of elements that are present in the vector.
Create two vectors – “college1” and “college2”. “College1” holds five elements and “college2” is empty. Apply both functions on both vectors and check the output.
#include <iostream>
#include <vector>
using namespace std;
main()
{
// Create vector – college1
vector<string> college1={"college-A","college-B","college-C","college-D","college-E"};
// Create vector – college2
vector<string> college2;
// empty()
cout << college1.empty() << endl;
cout << college2.empty() << endl;
// size()
cout << college1.size() << endl;
cout << college2.size() << endl;
}
Output:
The empty() function returns 0 for “college1” and 1 for “college2”. The size() function returns five for “college1” and 0 for “college2”.

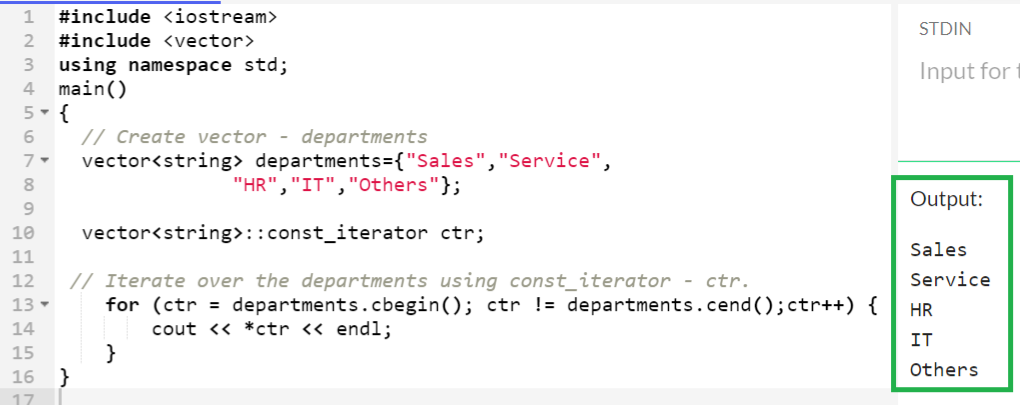
Traverse a Vector Using the Const_Iterator
When you are working on C++ containers like sets, vectors, etc., it is possible to iterate over all the elements that are present in the container without modifying them. The const_iterator is one of the iterators that achieve this scenario. The cbegin() (points to the first element in the vector) and cend() (points to the last element in the vector) are the two functions provided by each container which is used to return the constant iterator to the beginning and end of the container. While iterating the vector, we can utilize these two functions.
- Let’s create a vector named “departments” with five strings.
- Declare a const_iterator – ctr of type <string>.
- Iterate over the departments using the previous iterator using the “for” loop and display it.
#include <vector>
using namespace std;
main()
{
// Create vector – departments
vector<string> departments={"Sales","Service",
"HR","IT","Others"};
vector<string>::const_iterator ctr;
// Iterate over the departments using const_iterator – ctr.
for (ctr = departments.cbegin(); ctr != departments.cend();ctr++) {
cout << *ctr << endl;
}
}
Output:
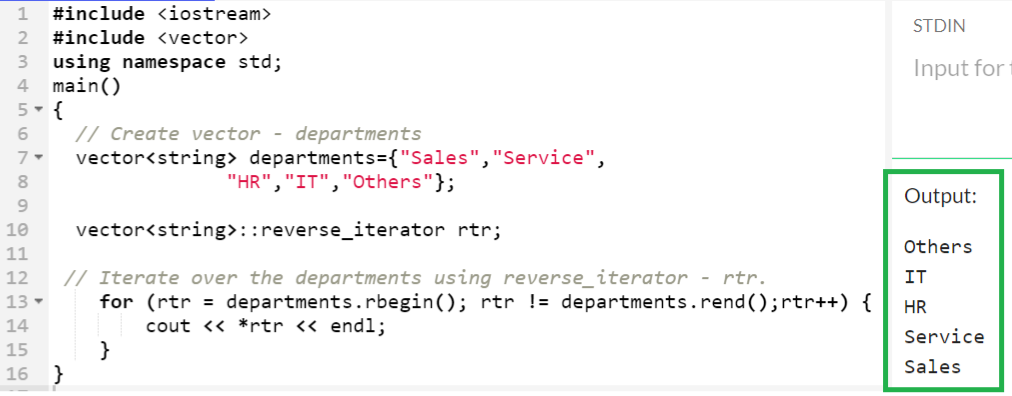
Traverse a Vector Using the Reverse_Iterator
The reverse_iterator is also an iterator that is similar to the const_iterator but it returns the elements in reverse. The rbegin() (points to the last element in the vector) and rend() (points to the first element in the vector) are the two functions provided by each container which is used to return the constant iterator to the ending and beginning of the container.
- Let’s create a vector named “departments” with five strings.
- Declare a reverse_iterator – rtr of type <string>.
- Iterate over the departments using the previous iterator using the “for” loop and display it.
#include <vector>
using namespace std;
main()
{
// Create vector – departments
vector<string> departments={"Sales","Service",
"HR","IT","Others"};
vector<string>::reverse_iterator rtr;
// Iterate over the departments using reverse_iterator – rtr.
for (rtr = departments.rbegin(); rtr != departments.rend();rtr++) {
cout << *rtr << endl;
}
}
Output:
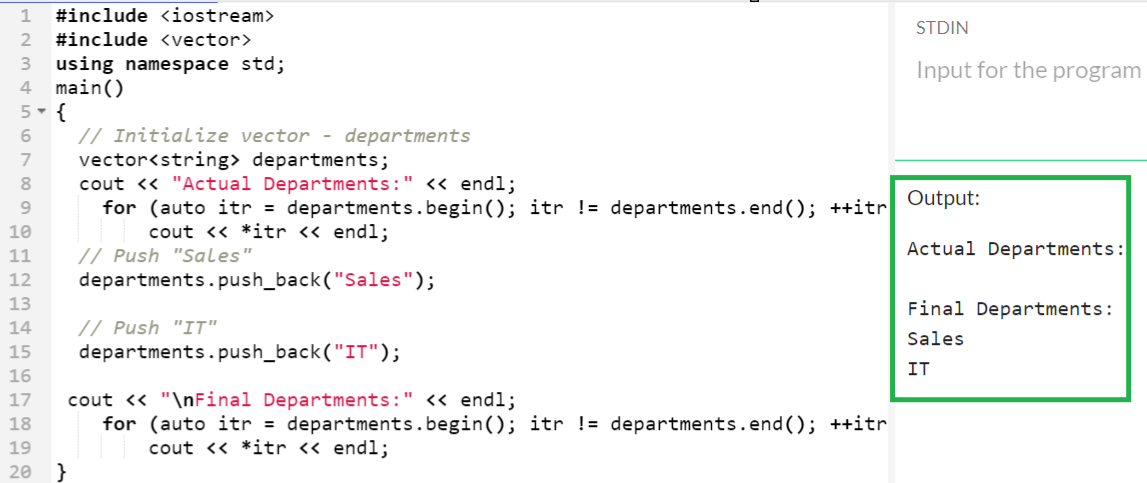
Push the Elements into the Vector
Pushing or appending the elements into a vector is a one-way insertion that can be done using the vector::push_back() function.
Syntax:
It takes an element to be pushed into the vector as a parameter.
Let’s create an empty vector named “departments” with five strings and push two strings one after another using the push_back() function.
#include <vector>
using namespace std;
main()
{
// Initialize vector – departments
vector<string> departments;
cout << "Actual Departments:" << endl;
for (auto itr = departments.begin(); itr != departments.end(); ++itr)
cout << *itr << endl;
// Push "Sales"
departments.push_back("Sales");
// Push "IT"
departments.push_back("IT");
cout << "\nFinal Departments:" << endl;
for (auto itr = departments.begin(); itr != departments.end(); ++itr)
cout << *itr << endl;
}
Output:
First, we push the “Sales”. After that, “IT” is pushed into the vector. Now, the “departments” vector holds two elements.
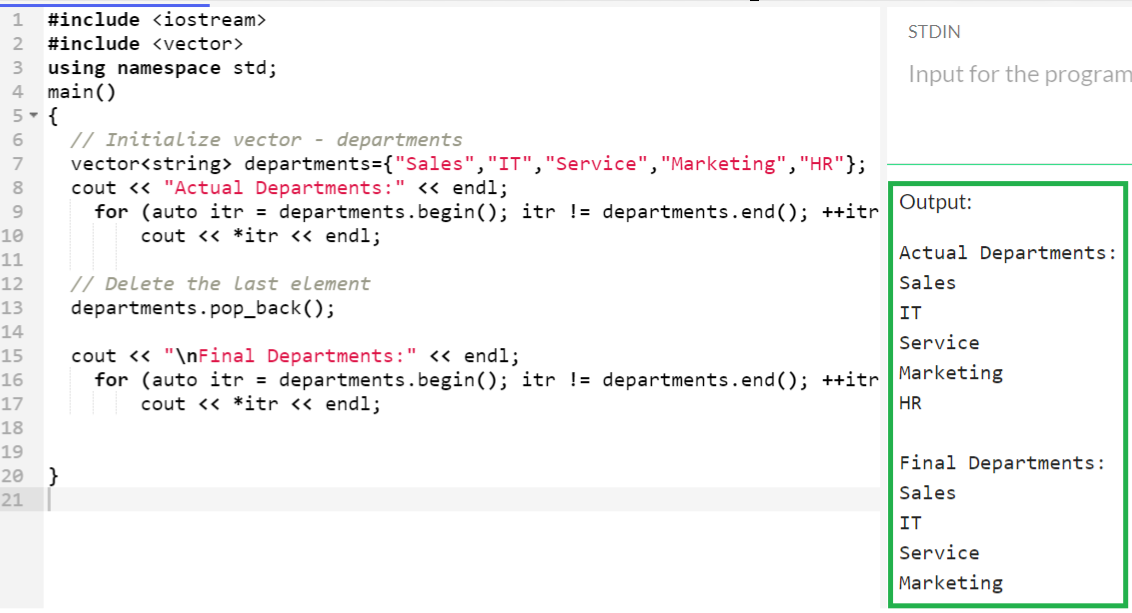
Pop the Elements from the Vector
If you want to delete the last item that is present in the vector, utilizing the vector::pop_back() function is the best approach. It deletes the last element that is present in the vector.
Syntax:
No parameter is needed for this function. It shows the undefined behaviour if we try to delete the last element from an empty vector.
Let’s create an empty vector named “departments” with five strings and delete the last element using the previous function. Display the vector in both cases.
#include <vector>
using namespace std;
main()
{
// Initialize vector – departments
vector<string> departments={"Sales","IT","Service","Marketing","HR"};
cout << "Actual Departments:" << endl;
for (auto itr = departments.begin(); itr != departments.end(); ++itr)
cout << *itr << endl;
// Delete the last element
departments.pop_back();
cout << "\nFinal Departments:" << endl;
for (auto itr = departments.begin(); itr != departments.end(); ++itr)
cout << *itr << endl;
}
Output:
“HR” is the last element that is present in the “departments” vector. So, it is removed from the vector and the final vector holds “Sales”, “IT”, “Service”, and “Marketing”.
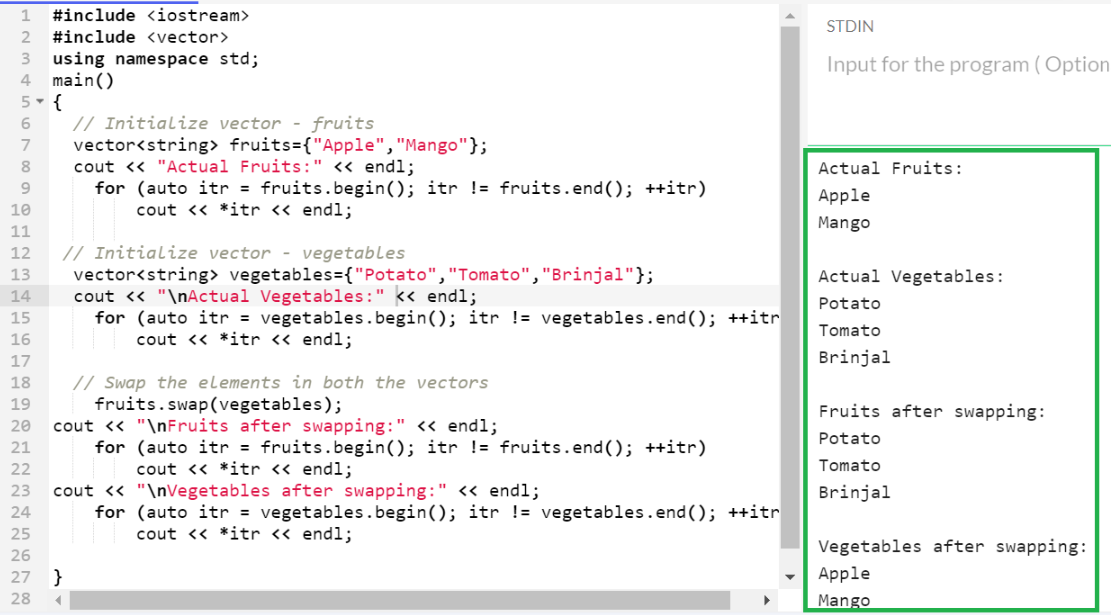
Swap the Vectors
The vector::swap() function in C++ STL is used to swap all the elements that are present in two vectors.
Syntax:
It does not consider the size of the vectors but the vectors should be of the same type (error is thrown if the vector types are different).
Let’s create two vectors – “fruits” and “vegetables” – of string type with different sizes. Swap each of them and display the vectors in both cases.
#include <vector>
using namespace std;
main()
{
// Initialize vector – fruits
vector<string> fruits={"Apple","Mango"};
cout << "Actual Fruits:" << endl;
for (auto itr = fruits.begin(); itr != fruits.end(); ++itr)
cout << *itr << endl;
// Initialize vector – vegetables
vector<string> vegetables={"Potato","Tomato","Brinjal"};
cout << "\nActual Vegetables:" << endl;
for (auto itr = vegetables.begin(); itr != vegetables.end(); ++itr)
cout << *itr << endl;
// Swap the elements in both the vectors
fruits.swap(vegetables);
cout << "\nFruits after swapping:" << endl;
for (auto itr = fruits.begin(); itr != fruits.end(); ++itr)
cout << *itr << endl;
cout << "\nVegetables after swapping:" << endl;
for (auto itr = vegetables.begin(); itr != vegetables.end(); ++itr)
cout << *itr << endl;
}
Output:
Previously, the “fruits” vector holds two elements and the “vegetables” vector holds three elements. After swapping, the “fruits” vector holds three elements and the “vegetables” vector holds two elements.
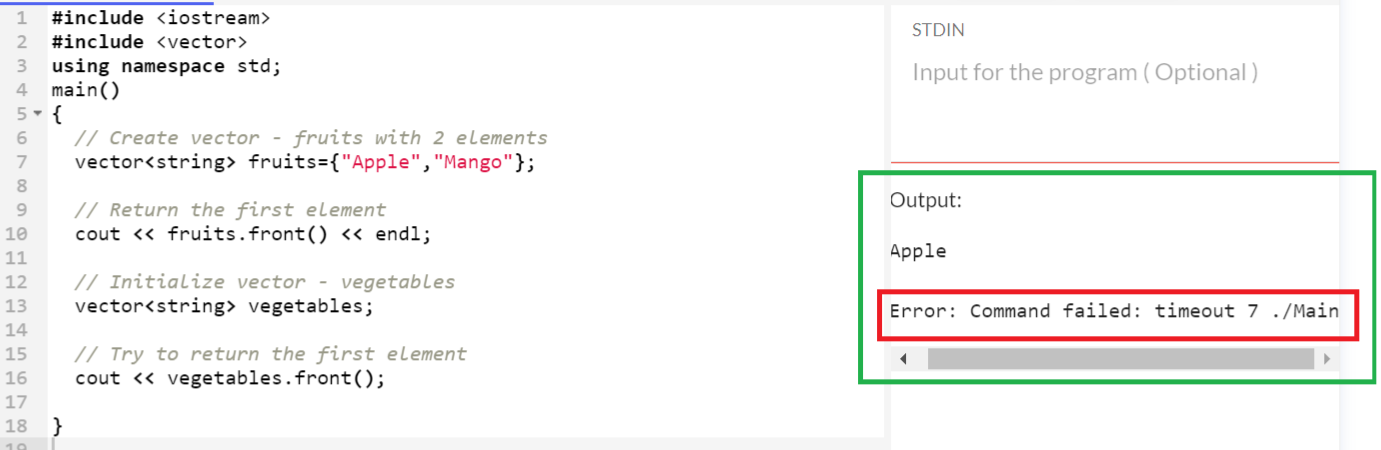
Fetch the First Element from the Vector
In some cases, the requirement is to return only the first element from the vector. The vector::front() function in C++ STL fetches only the first element from the vector.
Syntax:
This function won’t take any parameter. If the vector is empty, an error is thrown.
Let’s create two vectors – “fruits” and “vegetables” – of string type and try to fetch the first element separately from the two vectors.
#include <vector>
using namespace std;
main()
{
// Create vector – fruits with 2 elements
vector<string> fruits={"Apple","Mango"};
// Return the first element
cout << fruits.front() << endl;
// Initialize vector – vegetables
vector<string> vegetables;
// Try to return the first element
cout << vegetables.front();
}
Output:
“Apple” is the first element that is present in the “fruits” vector. So, it is returned. But an error is thrown when we try to fetch the first element from the “vegetables” vector since it is empty.
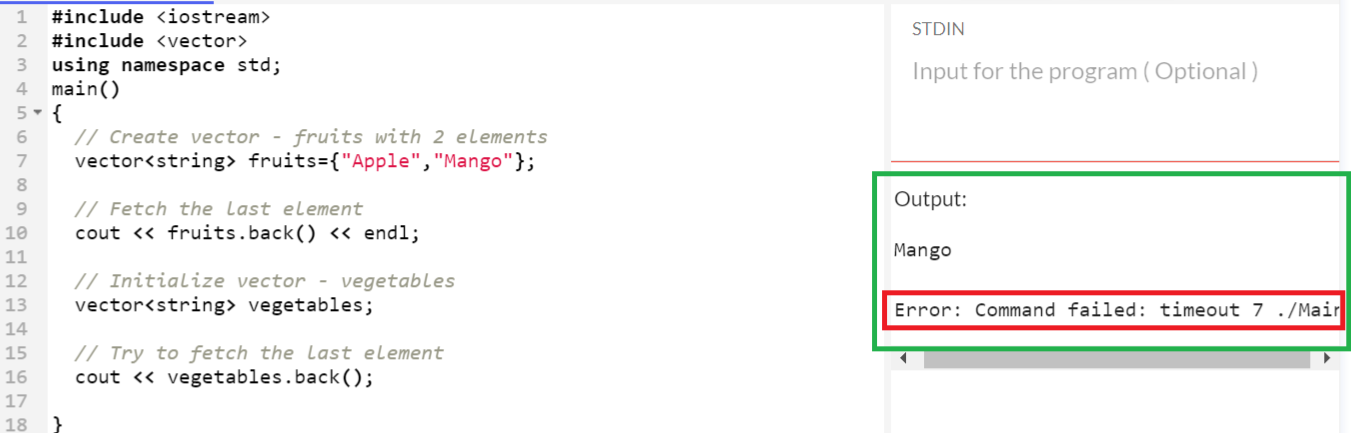
Fetch the Last Element from the Vector
The vector::end() function in C++ STL fetches only the last element from the vector.
Syntax:
This function won’t take any parameter. If the vector is empty, an error is thrown.
Let’s create two vectors – “fruits” and “vegetables” – of string type and try to fetch the last element separately from the two vectors.
#include <vector>
using namespace std;
main()
{
// Create vector – fruits with 2 elements
vector<string> fruits={"Apple","Mango"};
// Fetch the last element
cout << fruits.back() << endl;
// Initialize vector – vegetables
vector<string> vegetables;
// Try to fetch the last element
cout << vegetables.back();
}
Output:
“Mango” is the last element that is present in the “fruits” vector. So, it is returned. But an error is thrown when we try to fetch the last element from the “vegetables” vector since it is empty.
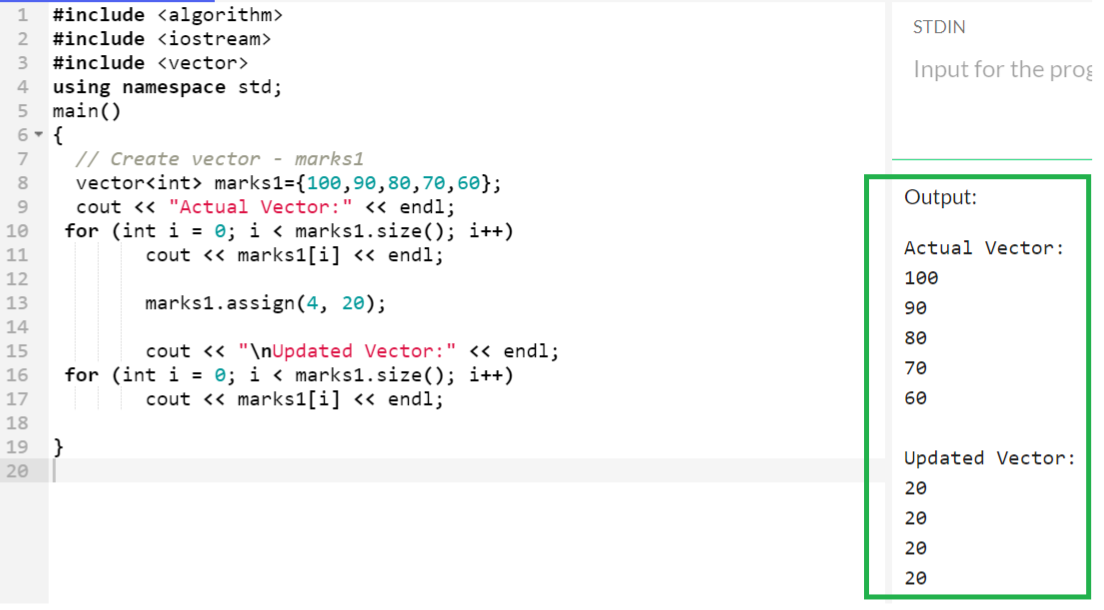
Assign New Values to a Vector
In some scenarios, if you want to update all the values with the new value or create a vector with the same values, using the vector::assign() function is the best approach. Using this function, we can:
- Create the vector with all similar elements
- Modify the existing vector with the same element
Syntax:
Two parameters are required to this function.
Here:
- The size specifies the number of elements to be assigned.
- The value specifies the element to be assigned.
Let’s create a vector named “marks1” with five values and update this vector with four elements such that all the elements in the updated vector are equal to 20.
#include <iostream>
#include <vector>
using namespace std;
main()
{
// Create vector – marks1
vector<int> marks1={100,90,80,70,60};
cout << "Actual Vector:" << endl;
for (int i = 0; i < marks1.size(); i++)
cout << marks1[i] << endl;
marks1.assign(4, 20);
cout << "\nUpdated Vector:" << endl;
for (int i = 0; i < marks1.size(); i++)
cout << marks1[i] << endl;
}
Output:
Previously, the vector holds five different elements. Now, it holds only four elements and all are equal to 20.
Extend the Vector Using Emplace()
We already know that new elements are dynamically inserted at any position in a vector. It is possible using the vector::emplace() function. Let’s quickly look at the syntax and parameters accepted by this function.
Syntax:
Two mandatory parameters are passed to this function.
Here:
- The first parameter takes the position so that we can insert the element at any position. We can get the position using the begin() or end() iterator function.
- The second parameter is the element to be inserted into the vector.
Consider the “chemicals” vector with two elements.
- Insert “Manganese” at the first position – begin(chemicals)
- Insert “Copper” at the last position – end(chemicals)
- Insert ‘Sulphur’ at the third position – begin(chemicals)+2
#include <iostream>
#include <vector>
using namespace std;
main()
{
// Create vector – chemicals
vector<string> chemicals={"Oxygen","CO"};
cout << "Actual Chemicals:" << endl;
for (int i = 0; i < chemicals.size(); i++)
cout << chemicals[i] << endl;
// Insert element at the first position
chemicals.emplace(begin(chemicals), "Manganese");
// Insert element at the last position
chemicals.emplace(end(chemicals), "Copper");
// Insert element at the third position
chemicals.emplace(begin(chemicals)+2, "Sulphur");
cout << "\nFinal Chemicals:" << endl;
for (int i = 0; i < chemicals.size(); i++)
cout << chemicals[i] << endl;
}
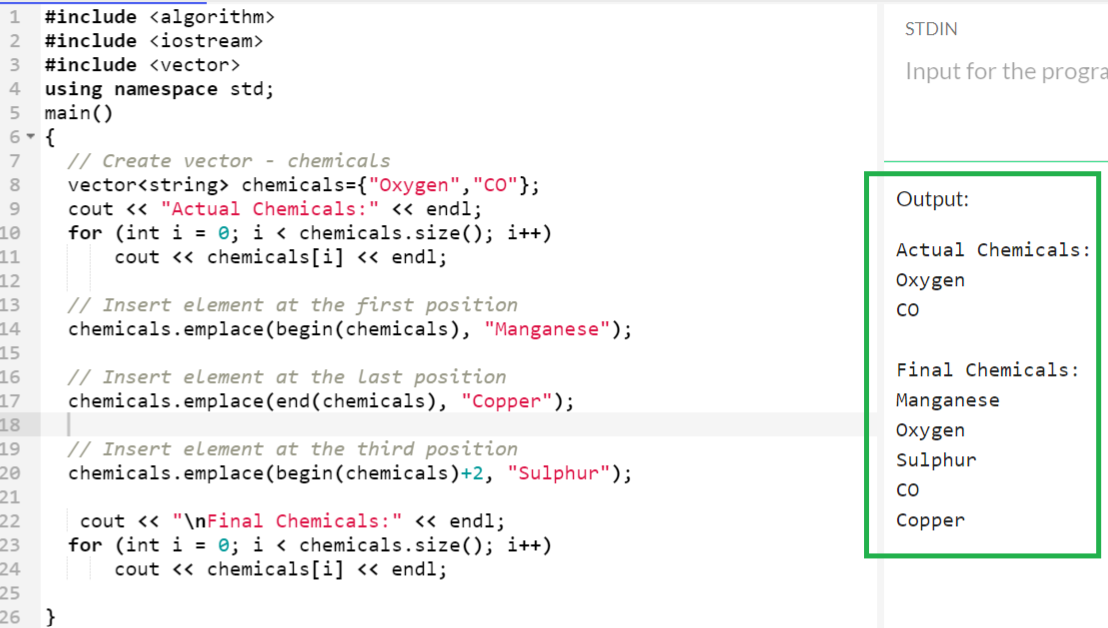
Output:
Now, the final vector holds five elements (provided in the following screenshot).
Extend the Vector Using Emplace_Back()
An element can be appended (adding at the end of the vector) which can be done using the vector::emplace_back() function.
Syntax:
It is mandatory to pass the element to be appended to the vector as a parameter.
Let’s add two elements one after another using the emplace_back() function.
#include <iostream>
#include <vector>
using namespace std;
main()
{
// Create vector – chemicals
vector<string> chemicals={"Oxygen","CO"};
cout << "Actual Chemicals:" << endl;
for (int i = 0; i < chemicals.size(); i++)
cout << chemicals[i] << endl;
// Insert Manganese at the end of the vector
chemicals.emplace_back("Manganese");
// Insert Manganese at the end of the vector
chemicals.emplace_back( "Copper");
cout << "\nFinal Chemicals:" << endl;
for (int i = 0; i < chemicals.size(); i++)
cout << chemicals[i] << endl;
}
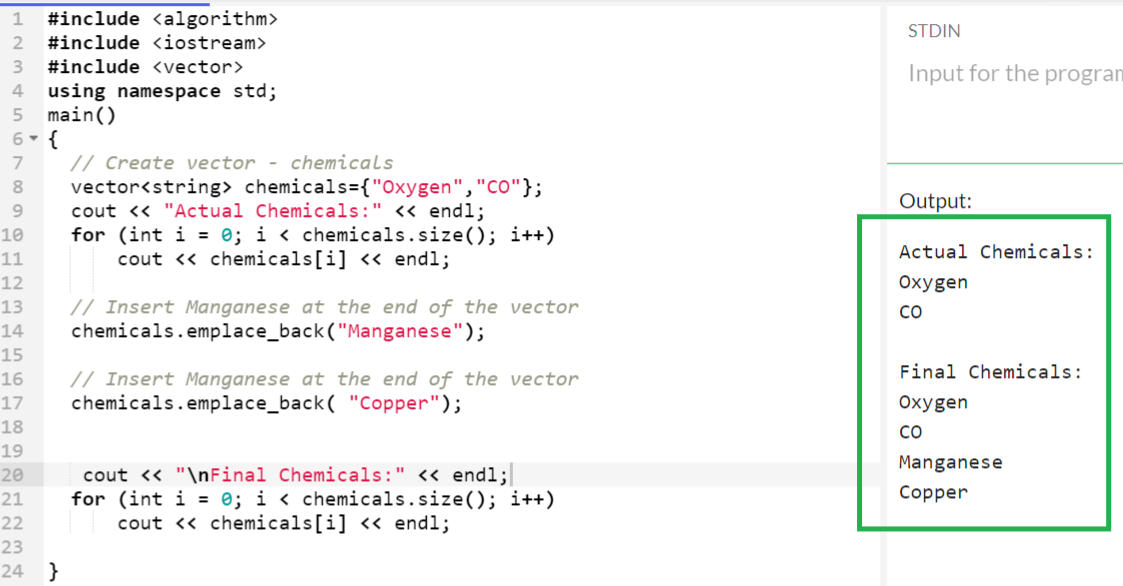
Output:
Now, the final vector holds four elements after adding “Manganese” and “Copper”.
Maximum Element of a Vector
- Create a vector with some elements.
- To find the maximum element that is present in the vector, use the *max_element() function which accepts two iterators as arguments. These two parameters act as the range and the maximum element is returned within the provided range. The starting position is begin() and the last position is end().
Let’s consider a vector named “item_costs” that holds five integer type values and return the maximum element.
#include <iostream>
#include <algorithm>
using namespace std;
main()
{
// Create vector – item_costs
vector<int> item_costs={8900,5677,200,1000,2300};
cout << "Cost of Items:\n";
for (int i = 0; i < item_costs.size(); i++)
cout << item_costs[i]<< endl;
// Return the maximum element from the above vector – item_costs
cout << "\nMaximum Cost: "<< *max_element(begin(item_costs),end(item_costs));
}
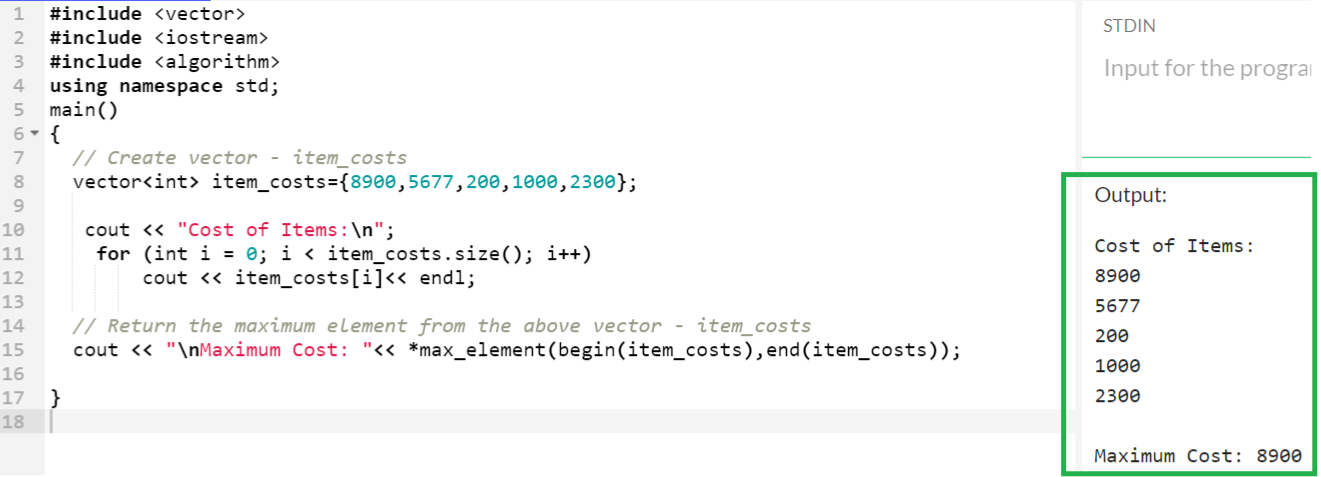
Output:
Here, 8900 is the maximum element among all the elements that are present in the ”item_costs” vector.
Minimum Element of a Vector
- Create a vector with some elements.
- To find the minimum element that is present in the vector, use the *min_element() function which accepts two iterators as arguments. These two parameters act as the range and the minimum element (less than all the other elements) is returned within the provided range. The starting position is begin() and the last position is end().
Utilize the same vector that is created to find the maximum element and find the minimum element using the *min_element() function.
#include <iostream>
#include <algorithm>
using namespace std;
main()
{
// Create vector – item_costs
vector<int> item_costs={8900,5677,200,1000,2300};
cout << "Cost of Items:\n";
for (int i = 0; i < item_costs.size(); i++)
cout << item_costs[i]<< endl;
// Return the minimum element from the above vector – item_costs
cout << "\nMinimum Cost: "<< *min_element(begin(item_costs),end(item_costs));
}
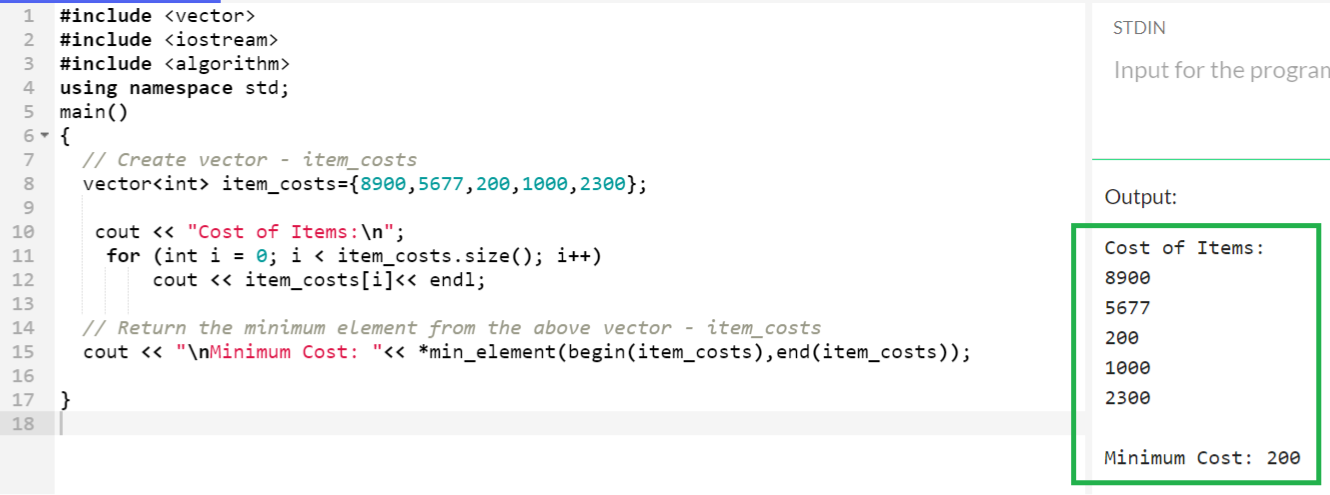
Output:
Here, 200 is the minimum element among all the elements that are present in the “item_costs” vector.
Sum of Elements in a Vector
To return the sum of all the elements that are present in the vector, the accumulate() function in C++ STL is used. It accepts three parameters. The first parameter takes the first index that represents the starting element in the range (specify the begin() iterator) and the second parameter takes the last index that represents the ending element in the range (specify the end() iterator) . Lastly, we need to pass the initial value of the sum (in our case, it is 0).
Create a vector named “item_costs” with five integer type elements and calculate the sum.
using namespace std;
main()
{
// Create vector – item_costs
vector<int> item_costs={8900,5677,200,1000,2300};
cout << "Cost of Items:\n";
for (int i = 0; i < item_costs.size(); i++)
cout << item_costs[i]<< endl;
// Return the sum of all elements in the above vector – item_costs
cout << "\nTotal Cost: "<< accumulate(begin(item_costs),end(item_costs),0);
}
Output:
The sum of 8900, 5677, 200, 1000, 2300 is 18077.

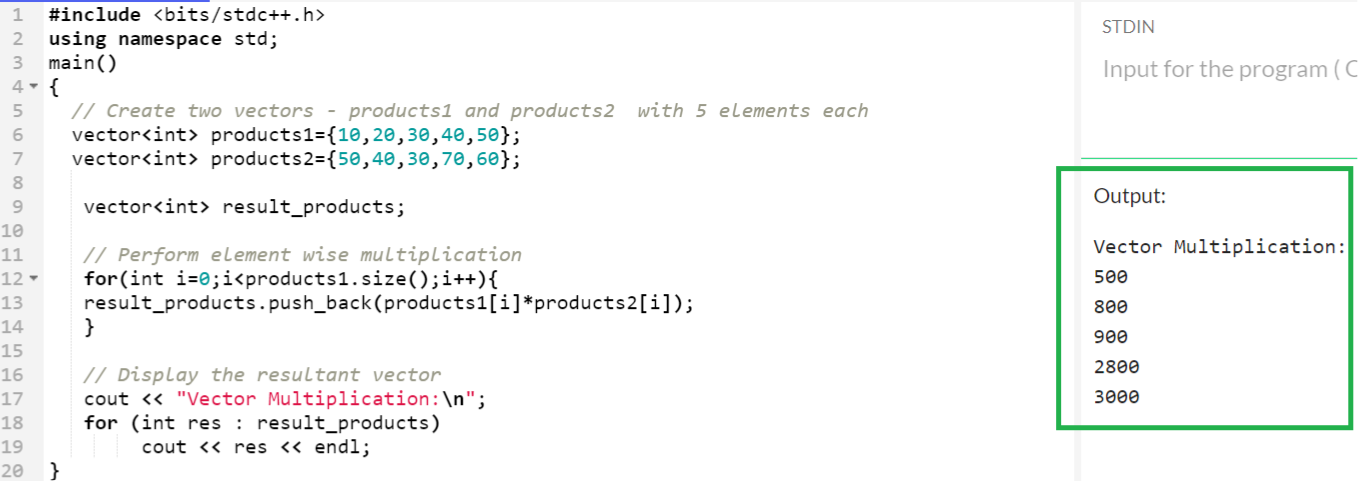
Element-Wise Multiplication of Two Vectors
- Create two vectors with type numeric and two vectors must be of the same size (total number of elements present in the first vector = total number of elements present in the second vector).
- Declare a new vector and use the for loop, perform the multiplication operation on two elements in each iteration, and store the value into the created vector using the push_back() function.
- Display the elements that are present in the resultant vector by iterating it.
{
result_vector.push_back(first_vec[itr]*sec_vec[itr]);
}
Create a vector named “item_costs” with five integer type elements and calculate the sum.
using namespace std;
main()
{
// Create two vectors – products1 and products2 with 5 elements each
vector<int> products1={10,20,30,40,50};
vector<int> products2={50,40,30,70,60};
vector<int> result_products;
// Perform element wise multiplication
for(int i=0;i<products1.size();i++){
result_products.push_back(products1[i]*products2[i]);
}
// Display the resultant vector
cout << "Vector Multiplication:\n";
for (int res : result_products)
cout << res << endl;
}
Output:
Iteration–2: 20 * 40 => 800
Iteration–3: 30 * 30 => 900
Iteration–4: 40 * 70 => 2800
Iteration–5: 50 * 60 => 3000
Dot Product of Two Vectors
In the case of C++ vectors, the dot product is defined as the “sum of the products of the corresponding entries of the two sequences of vectors”.
Syntax:
Use the inner_product() function to return the dot product. This function takes four required parameters.
Here:
- The first parameter refers to an iterator that points to the beginning of the first vector (specify using the begin() function).
- The second parameter refers to an iterator that points to the ending of the first vector (specify using the end() function).
- The third parameter refers to an iterator that points to the beginning of the second vector (specify using the begin() function).
- The initial value has to be passed as the last parameter which is an integer for the accumulation of the dot product.
Utilize the same program that is created for the multiplication of two vectors and use the innsr_product() function to find the dot product of the two vectors.
using namespace std;
main()
{
// Create two vectors – products1 and products2 with 5 elements each
vector<int> products1={10,20,30,40,50};
vector<int> products2={50,40,30,70,60};
// Display the resultant vector
cout << "Dot Product of products1 and products2: ";
cout << inner_product(begin(products1),end(products1),begin(products2), 0);
}
Output:
=> 500 + 800 + 900 + 2800 + 3000
=> 8000

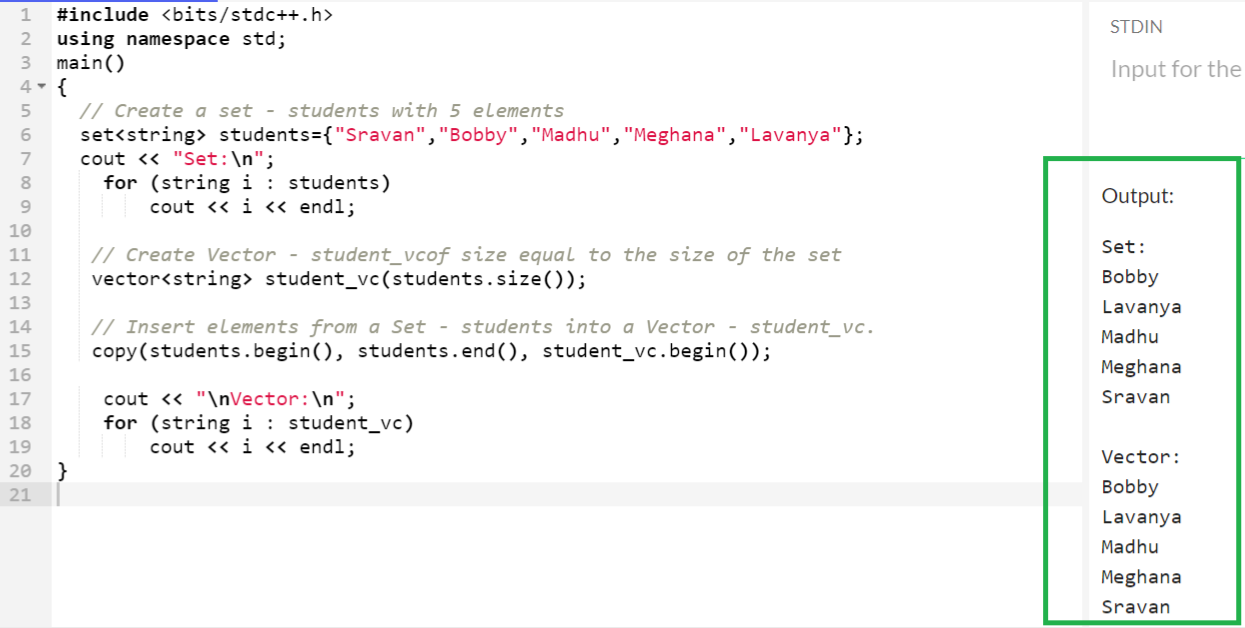
Convert a Set into a Vector
There are many ways to convert a set into a vector by passing all the elements that are raised in a set into a vector. The best and simplest way is using the std::copy() function.
Syntax
Use the std::copy() function which inserts the elements from a set into the vector. It takes three parameters.
Here:
- The first parameter refers to the source iterator that points to the first element in the iterator. Here, set is the source iterator that is specified using the begin() function.
- Similarly, the second parameter points to the last element (end() function).
- The third parameter refers to the destination iterator that points to the first element (specified using the begin() function) in the iterator.
Let’s create a set with five students and copy all the elements into a vector using the previous function.
using namespace std;
main()
{
// Create a set – students with 5 elements
set<string> students={"Sravan","Bobby","Madhu","Meghana","Lavanya"};
cout << "Set:\n";
for (string i : students)
cout << i << endl;
// Create Vector – student_vcof size equal to the size of the set
vector<string> student_vc(students.size());
// Insert elements from a Set – students into a Vector – student_vc.
copy(students.begin(), students.end(), student_vc.begin());
cout << "\nVector:\n";
for (string i : student_vc)
cout << i << endl;
}
Output:
Now, all the elements that are present in the “Students” set are copied into the “students_vc” vector.
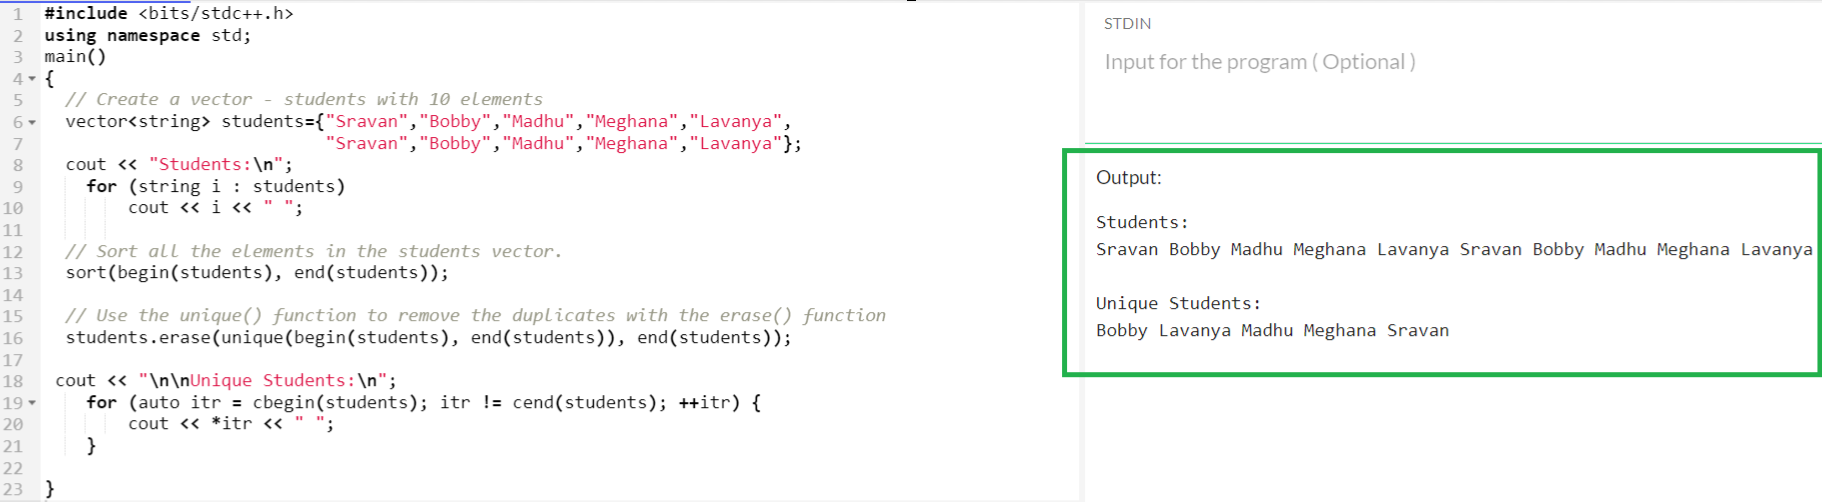
Remove the Duplicate Elements
- First, we need to sort the elements in the vector so that all the duplicate elements will be adjacent to each other using the std::sort() function.
- Use the std::unique() function so that the duplicate elements will be selected. At the same time, use the erase() function to remove the duplicates that are returned by the std::unique() function. The order of elements may change in the final vector.
Create the “students” vector with 10 elements and return the vector by removing the duplicates.
using namespace std;
main()
{
// Create a vector – students with 10 elements
vector<string> students={"Sravan","Bobby","Madhu","Meghana","Lavanya",
"Sravan","Bobby","Madhu","Meghana","Lavanya"};
cout << "Students:\n";
for (string i : students)
cout << i << " ";
// Sort all the elements in the students vector.
sort(begin(students), end(students));
// Use the unique() function to remove the duplicates with the erase() function
students.erase(unique(begin(students), end(students)), end(students));
cout << "\n\nUnique Students:\n";
for (auto itr = cbegin(students); itr != cend(students); ++itr) {
cout << *itr << " ";
}
}
Output:
Now, all the elements are unique in the vector.
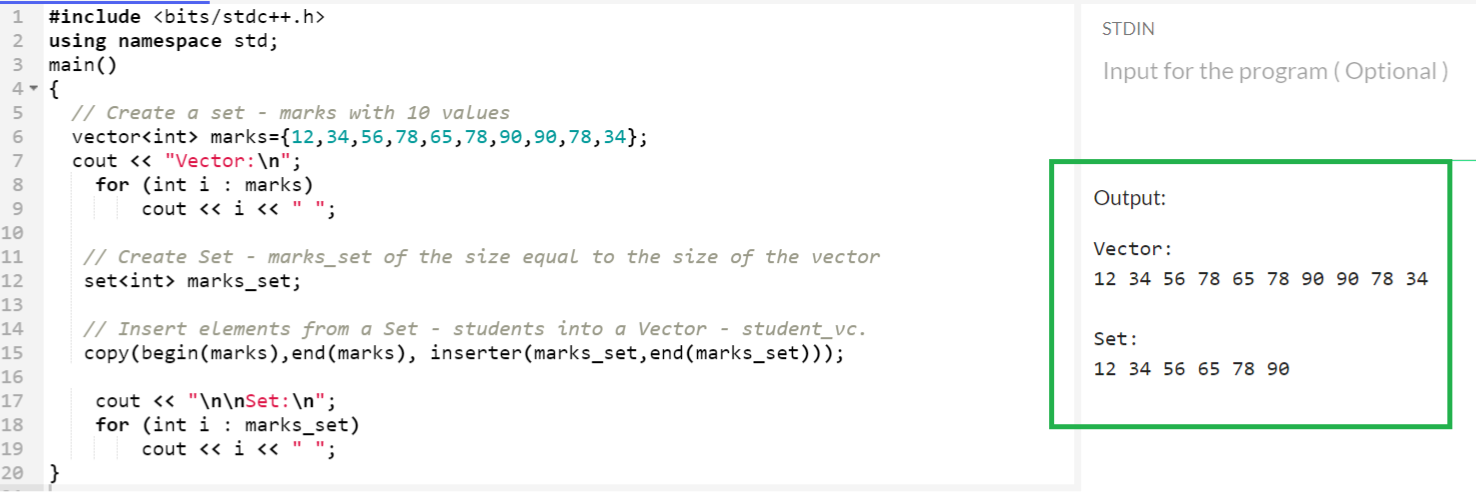
Convert a Vector into a Set
Set does not allow the duplicate elements. If you are typing to insert a vector into a set with duplicates, they will be ignored. We use the same std::copy() function that was used in the previous scenario that converted the set into a vector.
In this scenario:
- The first parameter takes the vector as the source iterator that is specified using the begin() function.
- The second parameter takes the vector as the source iterator that is specified using the end() function.
- Pass the std::inserter() function which is used to overwrite/copy the elements automatically at a specific position in the set by providing the set and iterator that point to the end of the set as parameters.
Let’s create a vector with 10 integers and copy the elements into a set.
using namespace std;
main()
{
// Create a set – marks with 10 values
vector<int> marks={12,34,56,78,65,78,90,90,78,34};
cout << "Vector:\n";
for (int i : marks)
cout << i << " ";
// Create Set – marks_set of the size equal to the size of the vector
set<int> marks_set;
// Insert elements from a Set – students into a Vector – student_vc.
copy(begin(marks),end(marks), inserter(marks_set,end(marks_set)));
cout << "\n\nSet:\n";
for (int i : marks_set)
cout << i << " ";
}
Output:
The existing vector named “marks” has 10 values. After copying it into the “marks_set” set, it holds only six elements because the other four elements are duplicated.
Remove the Empty Strings
There is no use of empty strings that are present in a vector. It is a good practice to remove the empty strings that are present in the vector. Let’s see how to remove the empty strings from the C++ vector:
- Iterate the vector using the “for” loop.
- In each iteration, check if the element is empty (“”) or not using the “==” operator with the at() member function.
- Using the std::erase() function, remove the empty strings after checking the previous condition.
- Repeat step2 and step3 until the end of the vector.
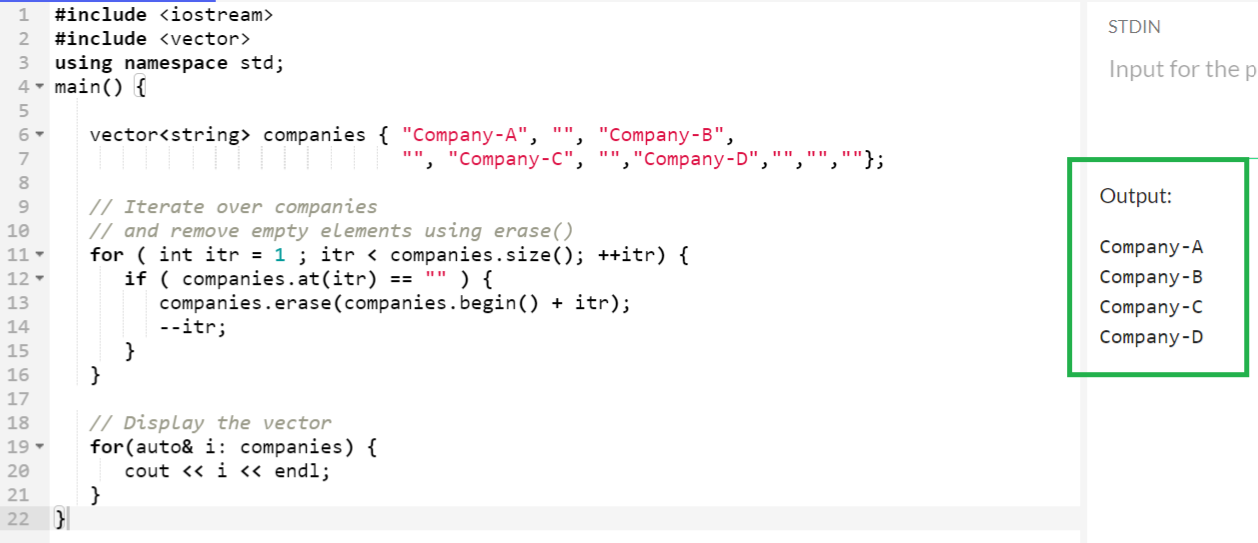
Let’s create the “companies” vector with 10 strings. Among them, five are empty and we remove them by implementing the previous approach.
#include <vector>
using namespace std;
main() {
vector<string> companies { "Company-A", "", "Company-B",
"", "Company-C", "","Company-D","","",""};
// Iterate over companies
// and remove empty elements using erase()
for ( int itr = 1 ; itr < companies.size(); ++itr) {
if ( companies.at(itr) == "" ) {
companies.erase(companies.begin() + itr);
—itr;
}
}
// Display the vector
for(auto& i: companies) {
cout << i << endl;
}
}
Output:
Now, the “companies” vector holds the non-empty strings.
Write a Vector to a Text File
Let’s discuss how to write all the elements that are present in a vector to a file using the vector indices using the fstream.
- Push some elements into it using the push_back function after initializing the vector.
- Use the open() function from the “fstream” library with the mode as out.
- Traverse each element that is present in the vector using the indices in a “for” loop and write each element to the provided file.
- Finally, close the file.
Let’s implement the previous approach by running a C++ code.
#include <string>
#include <iostream>
#include <fstream>
using namespace std;
main()
{
// Create a Vector – v_data
// and push two elements into it.
vector<string> v_data;
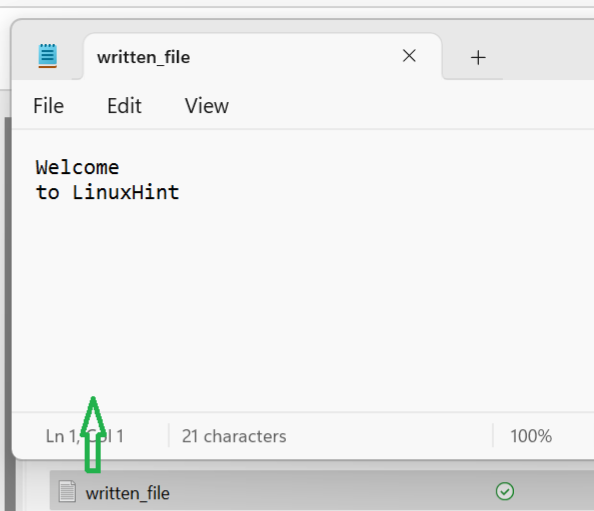
v_data.push_back("Welcome");
v_data.push_back("to LinuxHint");
fstream f;
// Open the file
f.open("written_file.txt",ios_base::out);
// Iterate each element of the vector and write to the file one by one.
for(int i=0;i<v_data.size();i++)
{
f<<v_data[i]<<endl;
}
// Close the file
f.close();
}
Output:
The “v_data” vector holds two elements and a file is created in the path where the program is executed with the elements that are present in the vector.
Create a Vector from a Text File
We learned how to write the elements that are present in the vector to a text file. Here, let’s create a vector from the content that is present in the text file.
- Create an “ifstream” variable which is used to read the information from the text file in which we create the vector from the file.
- Create an empty vector to store the file content and use an empty string variable as a flag to check the end of the file.
- Read the next line from the file until it reaches the end (basically using the “while” loop). Use the push_back() function to read the next line and push it into the vector.
- Display the line that is present in the line separately to see the elements that are present in the vector on the console.
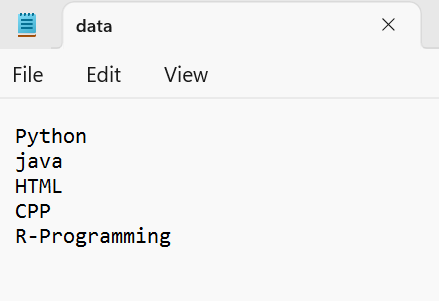
Let’s implement the previous approach by running the C++ code. Let’s consider the “data.txt” file with the following content. Here, the name of the vector is “v_data”.
using namespace std;
main()
{
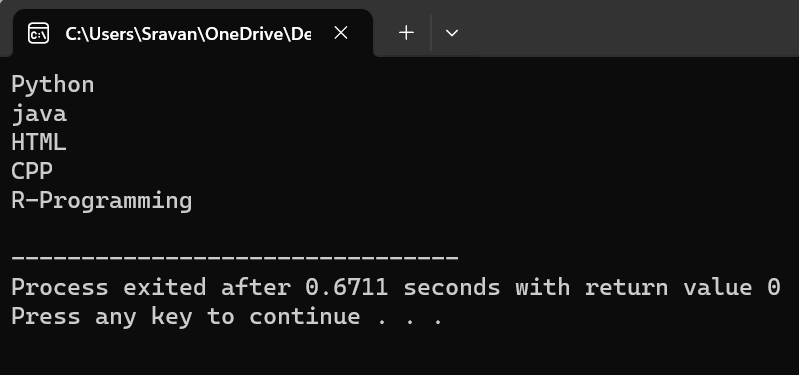
// Open the text file – data
ifstream file("data.txt");
// Create vector – v_data of type – string
vector<string> v_data;
string var;
// Read the next line from the data.txt
// till it reaches the end.
while (file >> var) {
// Read the next line and push into the v_data
v_data.push_back(var);
}
// Display the line present in the line separately.
copy(v_data.begin(), v_data.end(),ostream_iterator<string>(cout, "\n"));
}
Output:
We can see that “v_data” holds five elements that came from the file.
Conclusion
In this long article, we explored all the possible examples that are used in real-time applications related to vectors in the C++ programming language. Each example is explained with syntax, parameters, and example with output. Comments are added in each code to get a clear understanding of the code.
Source: linuxhint.com