15 Rsync Examples
Advantages of the “Rsync” Command
- It is faster than the other tools because it copies only those files from the source location to the destination location which are modified or do not exist in the destination location.
- It supports the incomplete transfer.
- It requires less bandwidth because it compresses the data during the transmission.
- It decreases the overhead of the transmission because the less important data can be transmitted without encryption.
Syntax
The syntax of the “rsync” command is given in the following:
Here, the source and destination paths can be local or remote. Different types of options can be used with this command for different purposes.
Useful Options of the “Rsync” Command
Some commonly used options of the “rsync” command are explained in the following:
| Option | Purpose |
|---|---|
| -z | It is used to compress the data during the transmission. |
| -r | It is used to synchronize the data recursively without keeping any file permission. |
| -a | It is used to synchronize the data recursively by keeping all file permissions. |
| -b | It is used to keep a backup of the data during transmission. |
| -v | It is used to display the output in verbose format. |
| -p | It is used to display the progress of the transfer. |
| -n | It is used to check whether the synchronization works or not before transferring the files or folders. |
List of 15 “Rsync” Examples
- Transfer a Single File and Folder Locally
- Transfer Multiple Files and Folders Locally
- Transfer a Single File and Folder Remotely
- Transfer Multiple Files and Folders Remotely
- Display the Progress of the Transfer
- Compress the Data During the Transfer
- Transfer with the Bandwidth Limit
- Transfer the Files and Folders Recursively
- Transfer with the Minimum Size Limit
- Transfer with the Maximum Size Limit
- Transfer the Files of the Particular Type
- Display the Differences Between the Source and Destination Files
- Include or Exclude the Files During the Transfer
- Synchronize the Data in Dry Mode
- Delete the Source Files and Folders After the Transfer
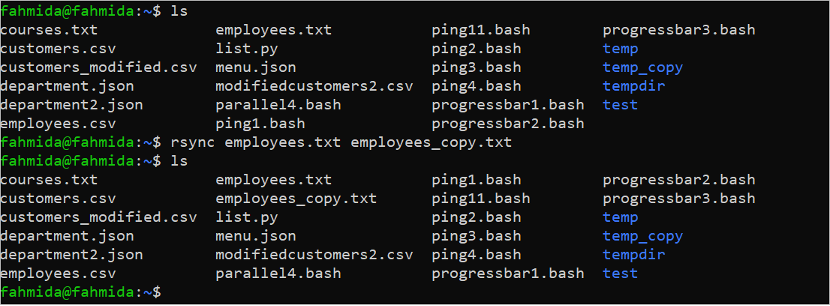
Transfer a Single File and Folder Locally
Run the “ls” command to display the list of files and folders of the current location. Next, run the “rsync” command to transfer the “employees.txt” file to the “employees_copy.txt” file locally. Run the “ls” command again to check whether the file is transferred properly or not.
$ rsync employees.txt employees_copy.txt
$ ls
The following output shows that the “employee.txt” file is transferred successfully:
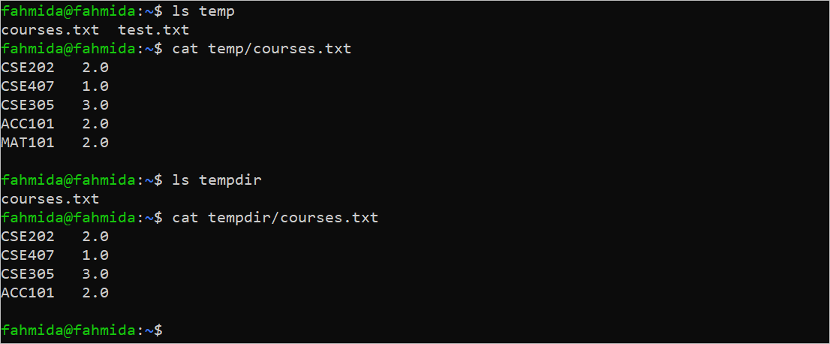
Suppose the content of the temp folder needs to transfer to the tempdir folder where the “courses.txt” file exists on both folders. Run the “ls temp” command to check the content of the temp folder. Next, run the “cat temp/courses.txt” command to check the content of this file. Next, run the “ls tempdir” command to check the content of the tempdir folder. Next, run the “cat tempdir/courses.txt” command to check the content of this file.
$ cat temp/courses.txt
$ ls tempdir
$ cat tempdir/courses.txt
The output shows that the content of the “courses.txt” file of the temp and tempdir folders is slightly different and the “courses.txt” file of the temp folder contains more data than the “courses.txt” file of the tempdir folder.
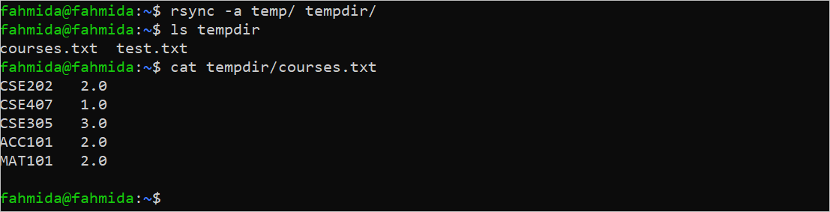
Run the following command to transfer the content of the temp folder to tempdir folder and check the content of “courses.txt” file of the tempdir folder to confirm that the file is updated properly or not:
$ ls tempdir
$ cat tempdir/courses.txt
The following output shows that the content of the temp folder is transferred properly to the tempdir folder and the content of the “courses.txt” file of the tempdir folder is updated properly:
Transfer Multiple Files and Folders Locally
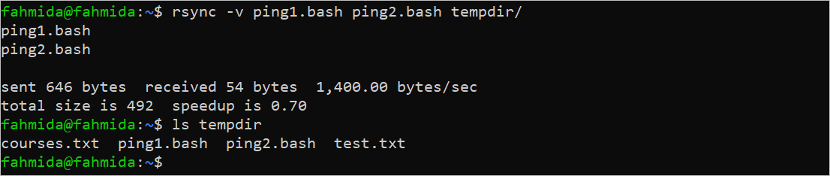
The “rsync” command can be used to transfer multiple files and folders locally. Run the following command to transfer the “ping1.bash” and “ping2.bash” files to the tempdir folder and check the content of the tempdir folder after the transfer. The -v option is used with the “rsync” command to display the output in verbose format:
$ ls tempdir
The following output shows that multiple files are transferred properly into the tempdir folder:
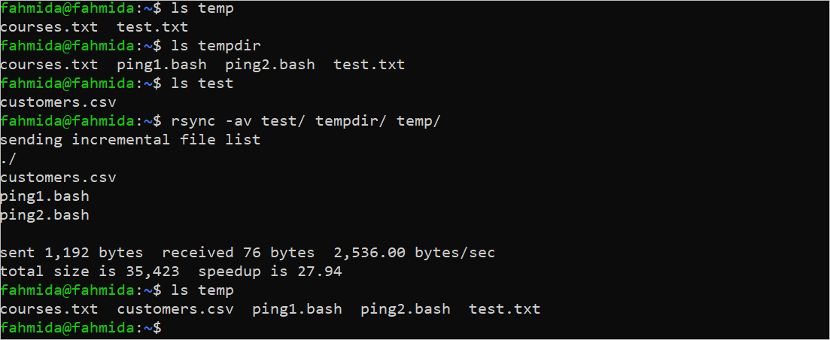
Run the following commands to check the content of the temp, tempdir, and test folders and transfer the content of the test and tempdir folder to the temp folder:
$ ls tempdir
$ ls test
$ rsync -av test/ tempdir/ temp/
$ ls temp
The output shows that the content of the test and tempdir folders are transferred successfully to the temp folder. The “customers.csv”, “ping1.bash”, and “ping2.bash” files are added as new files to the temp folder:
Transfer a Single File and Folder Remotely
You have to install and configure the SSH server in the remote location to transfer the files and folders remotely. You can check on this tutorial to configure the SSH server.
Run the following command to check the size of the “courses.txt” file of the current location:
The output shows that the size of the “courses.txt” file is 65 bytes:

Run the following command to transfer the “courses.txt” to the /home/ubuntu/courses/ folder of the remote location, ubuntu@192.168.0.101. You have to provide the root password of the remote machine before transferring the file:
The following output shows that the “courses.txt” file is transferred into the remote machine properly and the file size is 65 bytes:

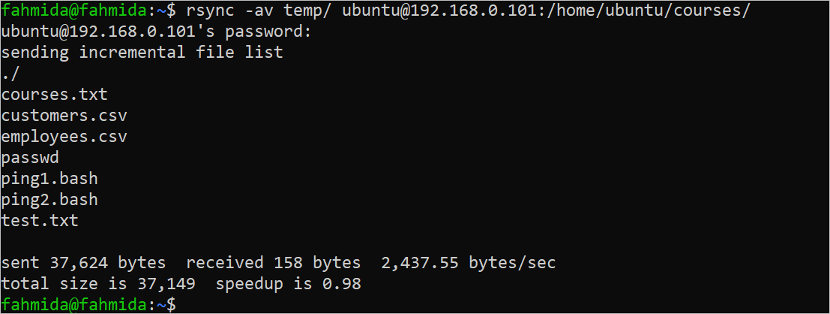
Run the following command to transfer the temp folder to the /home/ubuntu/courses/ folder of the remote location, ubuntu@192.168.0.101. You have to provide the root password of the remote machine before transferring the file like the previous command.
The following output shows that the content of the temp folder is transferred into the remote machine properly:
Transfer Multiple Files and Folders Remotely
The following “rsync” command transfers the “customers.csv” and “department.json” files to the /home/Ubuntu/files/ folder of the remote location, ubuntu@192.168.0.101.
The following output shows that multiple files are transferred successfully to the remote location:

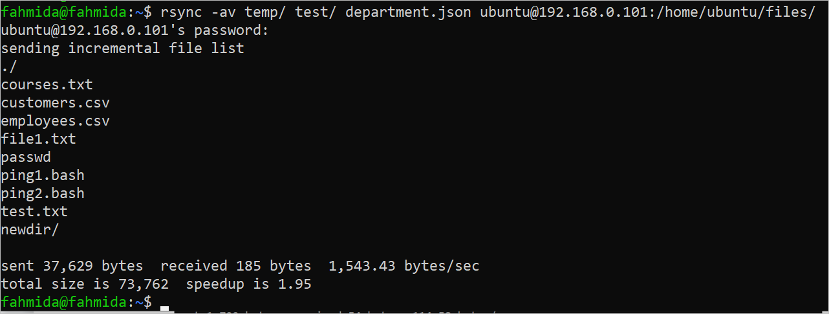
The following “rsync” command transfers the content of the temp and test folders and “department.json” file to the /home/Ubuntu/files/ folder of the remote location, ubuntu@192.168.0.101.
The following output shows that the content of the multiple folders are transferred successfully into the remote location:
Display the Progress of the Transfer
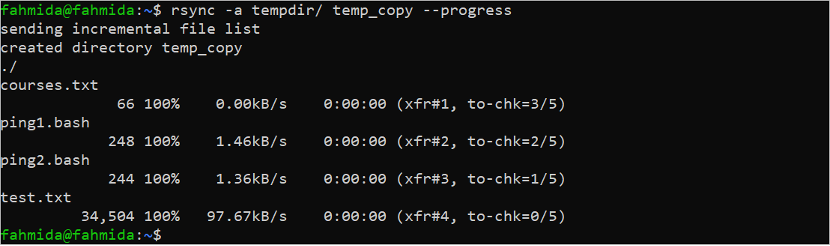
Run the “rsync” command with the –progress option to transfer the content of the tempdir folder to the temp_copy folder with the progress information.
The following output shows that the temp_copy directory is created locally and the content of the tempdir folder is transferred successfully to the temp_copy folder:
Compress the Data During the Transfer
Run the following “rsync” command with the –z option to compress and transfer the tempdir directory to the test directory locally:
The following output shows that the compressed directory is transferred successfully locally:

Transfer with the Bandwidth Limit
Run the following “rsync” command with the –bwlimit option with 100 value to transfer the /etc/passwd file to the temp folder locally:
The following output shows that the passwd file is transferred successfully:

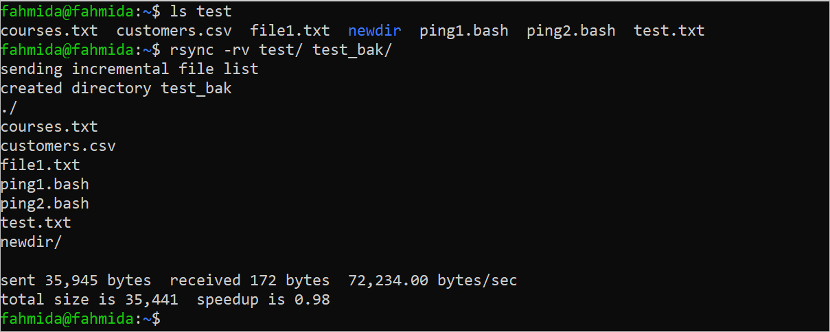
Transfer the File and Folder Recursively
Run the following “rsync” command with the –rv option to transfer the test folder into the test_bak folder locally:
The following output shows that the test folder is transferred successfully to the test_bak folder:
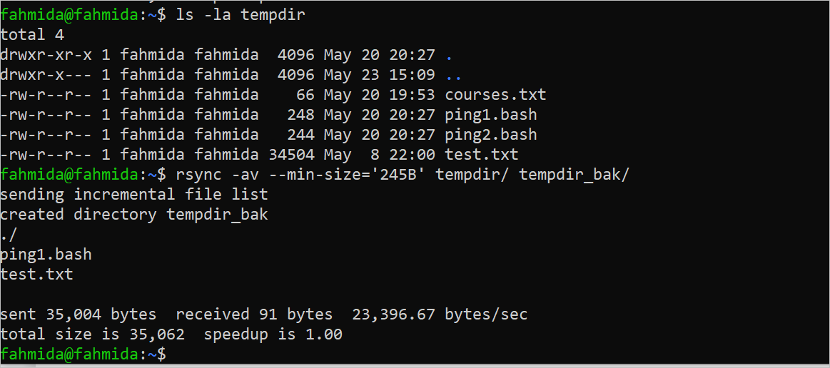
Transfer with the Minimum Size Limit
Transferring the files and folders using the “rsync” command can be limited using the –min-size option to set the minimum size limit of the transferring the files and folders. Run the following “ls -la tempdir” command to check the size of each file and folder of this folder. Next, run the “rsync” command to transfer the content of the tempdir folder to the tempdir_bak folder with the minimum size limit.
rsync -av --min-size='245B' tempdir/ tempdir_bak
The following output shows that two files exist in the tempdir folder that matches the minimum size. These are “ping1.bash” (248 bytes) and “test.txt” (34504 bytes). These files are transferred into the tempdir_bak folder and the other files of the tempdir folder are omitted:
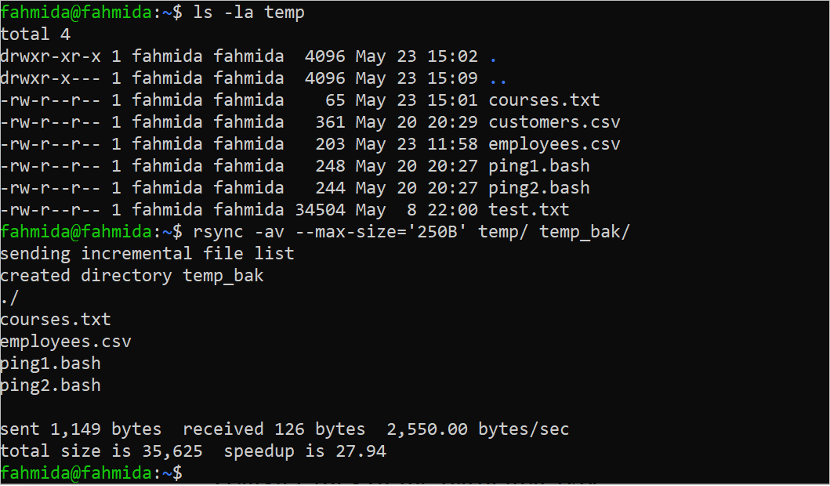
Transfer with the Maximum Size Limit
Transferring the files and folders using the “rsync” command can be limited using the –max-size option to set the maximum size limit of the transferring files and folders. Run the following “ls -la temp” command to check the size of each file and folder of this folder. Next, run the “rsync” command to transfer the content of the temp folder to the temp_bak folder with the maximum size limit.
rsync --max-size='250B' temp/ temp_bak/
The following output shows that four files exist in the temp folder that matches the maximum size limit. These are “courses.txt” (65 bytes), “employees.csv” (361 bytes), “ping1.bash” (248 bytes) and “ping2.bash” (244 bytes). These files are transferred into the temp_bak folder and the other files in the temp folder are omitted:
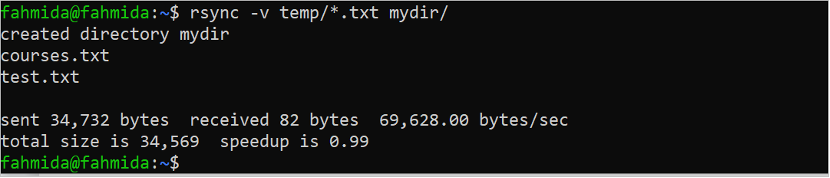
Transfer the Files of the Particular Type
The type of file that will transfer can be set by mentioning the extension of the file in the “rsync” command. Run the following “rsync” command to transfer all text files of the temp folder to the mydir folder. Here, the extension of the text file is denoted using “*.txt”:
The following output shows that two text files, “courses.txt” and “test.txt”, are transferred to the mydir folder, and the other files of the temp folder are omitted:
Display the Differences Between the Source and Destination Files
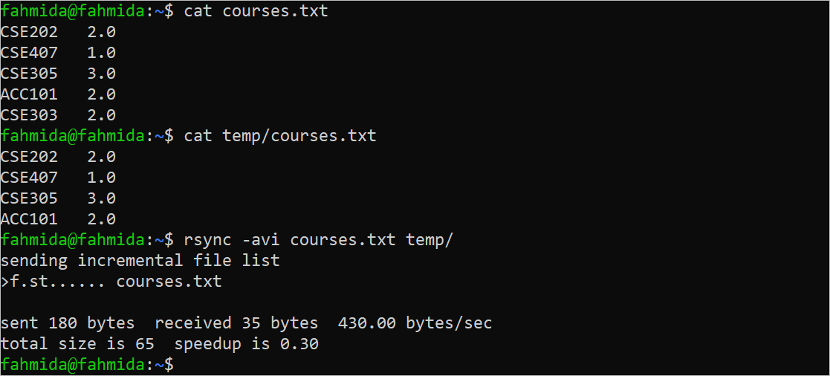
When the files or the folders are transferred from one location to another location locally or remotely, both location may contain the same files or folders. The differences between the source and destination during the transmission can be examined using the -i option with the “rsync” command. Run the following “cat” commands to check the content of the source and the destination file before transfer. Here, the “courses.txt” file is transferred to the temp folder.
cat temp/courses.txt
rsync -avi courses.txt temp/
The following output shows that the “courses.txt” file of the source and destination are slightly different. The output of the “rsync” command shows the difference between the files:
Synchronize the Data in Dry Mode
If you want to know which files and folders are transferred by the “rsync” command before the actual transfer, it is better to run the “rsync” command with the –dry-run option or the –n option. When the “rsync” command is executed with this option, it checks which files or folders are copied from the source folder to the destination folder but keeps the destination folder unchanged. Run the “ls –la department.json” file to check the size of the file. Next, run the “rsync” command with the –dry-run mode to check the transfer of the “department.json” to the temp folder.
rsync -v --dry-run department.json temp/
The following output shows that the size of the “department.json” file is 1172 bytes. The file size shows 1172 bytes after executing the “rsync” command with the –dry-run option:

Include or Exclude the Files During the Transfer
You can filter the type of the file at the time of transferring from the source location to the destination location using the –include and –exclude options. The “optionsinclude” option is used to define the extension of those files that will be transferred from the source to the destination. The –exclude option is used to define the extension of those files that will not be transferred from the source to the destination.
Run the following “ls temp” folder to check the content of the temp folder. Next, run the “rsync” command with the –include and –exclude options. According to the command, all CSV files of the temp folder are transferred to the files folder and all text files of the temp folder are omitted at the time of transfer. Next, run the “ls files” command to check which files are transferred from the temp folder to the files folder.
rsync -a temp/ files/ --include=*.csv --exclude=*.txt
ls files
The following output shows that the temp folder contains two CSV files, two text files and two BASH files. The files folder is empty before the transfer and two CSV files and two BASH files are transferred:

Delete the Source Files and Folders After the Transfer
In the previous all “rsync” commands, the source files and folders remain in the source location after transferring to the destination location. But sometimes, it requires permanently transferring the files and folders to the destination location. This task can be done using the –remove-source-files option with the “rsync” command. Run the “ls” command to check all the files and folders of the current location. Run the “ls temp” command to check the files and folders of the temp folder. Next, run the “rsync” command with the –remove-source-files option to delete the files and folders of the source location after completing the transfer. Run the “ls” command again to check whether the source file is removed from the source location or not.
ls temp
rsync employees.csv temp/ --remove-source-files
ls
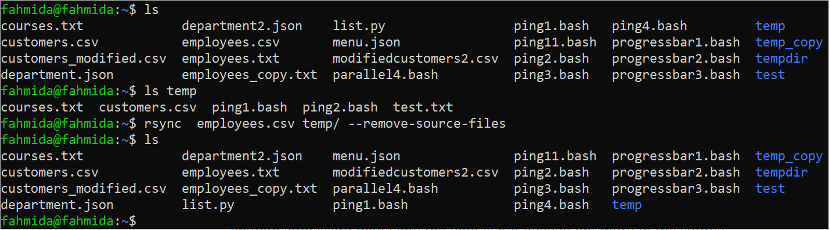
The following output shows that the “employees.csv” file of the current location is transferred to the temp folder and the “employees.csv” file is removed from the source location after the transfer:
Conclusion
The “rsync” is a very useful tool of Linux that makes the transmission task of the files and folders from one location to another location easier using different options. The methods of using the “rsync” command to transfer the files and folders from one location to another location by compressing, setting the files and folders size, setting the file type, setting the bandwidth limit, etc. are shown in 15 simple examples of this tutorial. This tutorial helps the Linux users to know the basic uses of the “rsync” command in Linux properly.
Source: linuxhint.com