How to Change Your Username in Linux
Linux enables multiple users to access the same system at a time, or we can say it is a multi-user OS. Along with that, there are multiple responsibilities that the admin must manage like giving permissions to users, allotting unique id names, etc. When we talk about changing the credentials of users like changing their ids or name, Linux also enables us to change the name of the user using commands.
To change the username in the Linux operating system, we use a command called “usermod”. The “usermod” command is a command line utility or library which is provided by Linux that is used to change the properties that are related to the user information. Like other command line utilities, this utility also takes options as input to analyze what action to perform. In our case, what this command does is that it changes or modifies the root system files which are called system account files to make the changes that are specified in the command line prompt. One thing to keep in mind before performing such an activity is that we should not edit or modify the /etc/passwd file manually or by any text editor.
Syntax:
To change or rename the user, we use the following syntax:
The “-l” option is used to tell the system that we are changing the username. The command replaces the existing name with the “old-name” parameter and replaces it with “login-name”. This command does not change or edit anything else. When we are changing the username, we must change the user’s home directory to make an impact on the change that we made.
By passing other options to this command instead of “-l”, we can also make changes to the other properties of the user like adding it to a group, changing its home directory, etc.
Example:
In this example, we try to change the username of our operating system. As we know, the user details and their credentials are always stored in a /etc/passwd. We can also change the username manually by editing that file. But sometimes, it can cause some issues in the system. So, mostly, this is avoided by the admin that changes it manually. For this reason, most of the time, the usermod utility is used in Linux to perform any modifications in the user details and manage them. To perform this procedure, you must have an access to the super user account unless you cannot manage those tasks.
Adding New User
Let us suppose we want to change the name of the user. For that, we first try to add a new user of which we then try to change the name. To create a new user, we run the following command in our terminal:
After running the previous command, it asks for the password of the admin that is creating the new user. One thing to keep in mind is it won’t display the password while you are entering it on the terminal. Just type the password and then press the enter key.
![]()
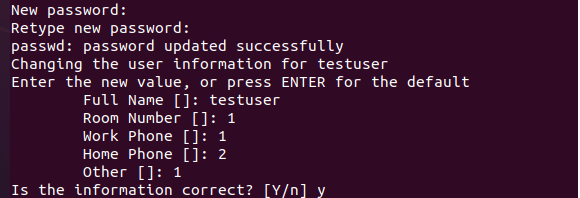
After entering the password, you get the following output in which the directory for the new user is created:

It asks you to set a new password for the new user. When the password is entered, it then takes some details which may include the full name of the user that you want to use. Some additional details are “room number”, “work phone”, “home phone”, and “other”. You can enter any details or press escape so you can skip it. By providing all the details, it asks for your confirmation. By entering the “y” value, you allow the system to create a new user.
At last, by logging out of the user that you are currently using, you can check that the new user is created with the name, “testuser”. As can be seen in the following snippet, both the new and the old users are shown:

Renaming the User
Now, it’s time to rename the user that we created. We first log in to the system. After logging into the system, we open the terminal where, using the command, we try to rename our user. To do so, we have to run a simple command which is shown in the next line:
In the previously-mentioned command, we use the usermod command that is used to modify the system files. The “-l” flag is used to rename any file while using it along with the usermod command enables us to rename the user. The next keyword, “testuser1”, is the name that we use as a new name for the user. Then, we use the “-d” flag that denotes the directory. We pass the path of the directory in which the credentials of the users are located. The “-m” denotes the modification of the name, “testuser”. When we press the enter key, it asks us to enter the password of the user. After entering the password, it won’t display any output in the terminal. It simply hands over the terminal to the user to run the further commands.

Now, to check whether the username has changed or not, we simply log out of the current user and check it in our log-in area.

Or by logging into our user which we renamed, we can see that the directory name that is created in our home directory name is also changed.
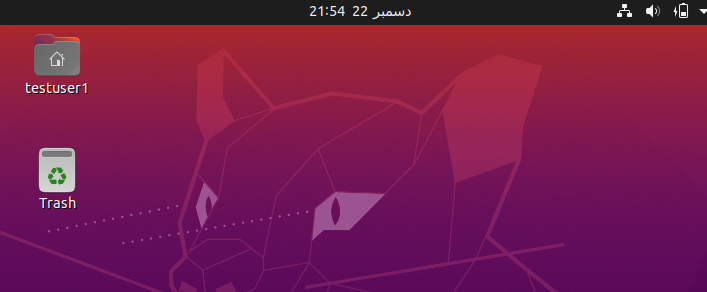
Or by just opening the terminal, it can be seen that the name of the terminal is changed to “testuser1” as shown in the following snippet:

Conclusion
We introduced you to the procedure to change the username in the Linux operating system. Sometimes, you can go through a situation when it is necessary to change the username. Then, we tried to explain the complete procedure by explaining it to you via an example in which we explained each step that has been taken while implementing these commands.

Source: linuxhint.com